Table of Contents
Ready to deck your nails with holiday cheer? This "christmas nail designs tutorial" is your go-to guide for creating festive manicures that range from simple to spectacular. We're ditching the salon prices and embracing DIY fun, so whether you're a nail art newbie or a seasoned pro, there's something here for you. First, we’ll walk through some super easy designs, perfect for beginners or those short on time, think classic candy canes and sparkly snowflakes. Then, we'll level up to more intricate art, like tiny Christmas trees and reindeer, that'll have everyone asking, "Where did you get your nails done?" Finally, we'll tackle common nail art hiccups and give you tons of ideas to spark your own unique, holiday-themed creations. Get your polish ready, because we're about to make your nails the star of the Christmas show!
Easy Christmas Nail Designs: A StepbyStep Tutorial
Easy Christmas Nail Designs: A StepbyStep Tutorial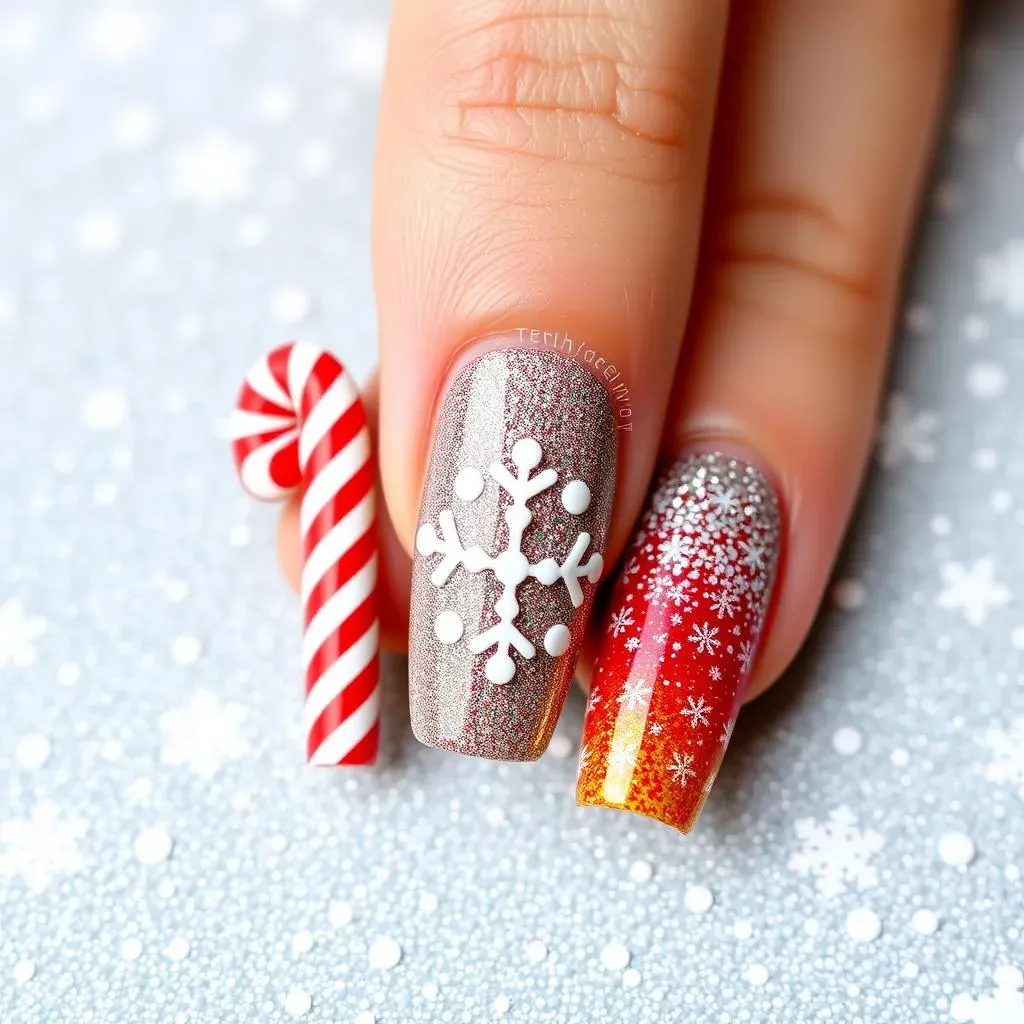
let’s start with the basics, you know, the kind of designs that even your non-crafty friend can pull off. Think of it as dipping your toes into the festive nail art pool. We’re talking simple stripes, dots, and color blocking – no fancy tools required! First up, the classic candy cane: Grab a base coat of white, then, with a thin brush or even a toothpick, add red stripes. Don't worry about them being perfect; the slight wobble adds charm. Next, the super easy snowflake: use a toothpick, dip it in white polish, and make a few dots in the shape of a snowflake. It’s like connect-the-dots but way more fun. And for the ultimate beginner move? Go for a glitter gradient! Just paint your nails your favorite base color and then add glitter polish to the tips, fading it out as you go. It's like a party on your fingertips, and it’s impossible to mess up.
Christmas Nail Art: From Simple to Stunning
Christmas Nail Art: From Simple to Stunning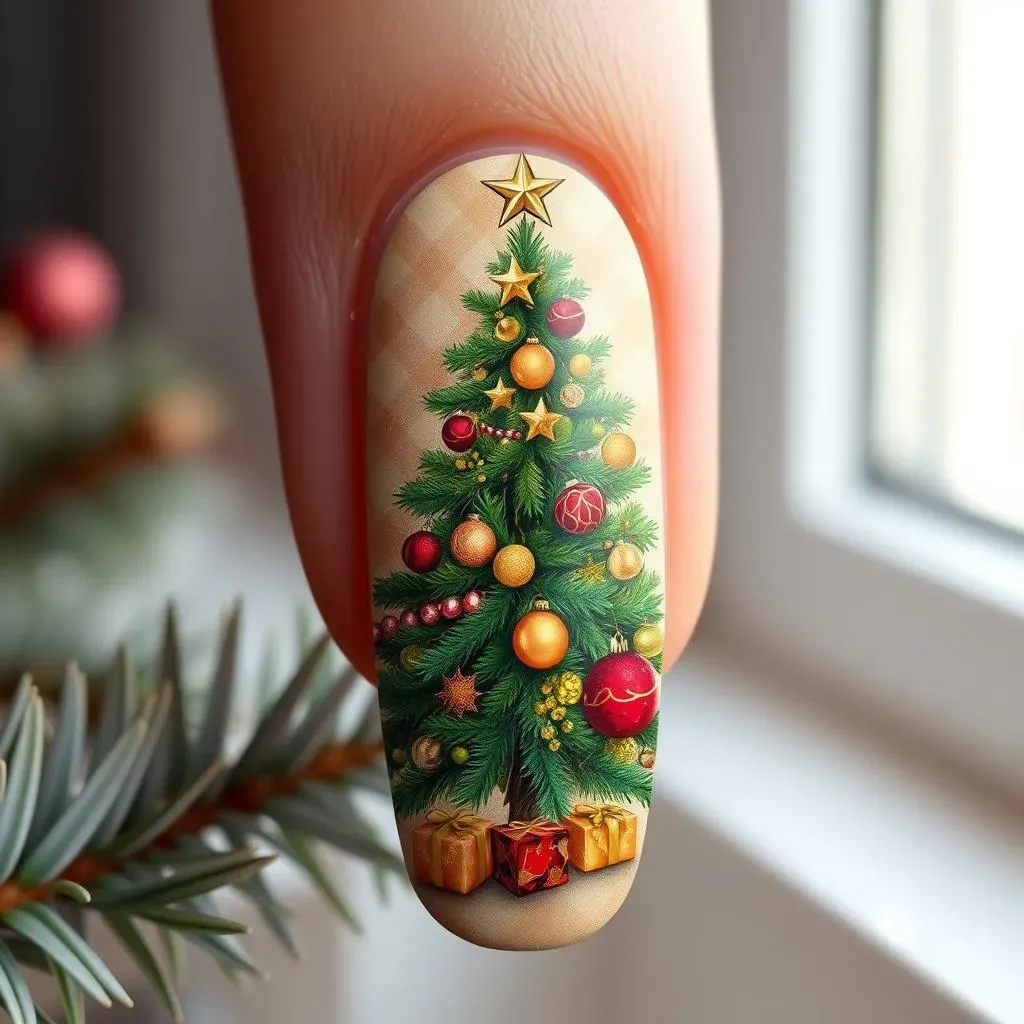
Leveling Up: Intermediate Designs
Alright, so you’ve mastered the basics, and now you're itching for something a bit more challenging, right? Let’s get into some intermediate designs that add a little flair without requiring a fine art degree. Think of it like graduating from stick figures to slightly more detailed drawings. First up, we've got the mini Christmas tree. Start with a green base and then use a thin brush to create a triangle, filling it in with more green layers. Add tiny dots of different colors for ornaments, and boom, you've got a tree on your nail. Next, try a reindeer accent nail. Use a brown base, then add a couple of curved lines for antlers and a small red dot for the nose. It’s cute, festive, and surprisingly easy once you get the hang of it. And if you’re feeling extra, try a subtle plaid pattern, using thin lines of different colors on a neutral base, just like a cozy winter scarf.
Getting Fancy: Advanced Techniques
now we’re moving into the big leagues, where precision and patience are your best friends. These designs might seem intimidating, but trust me, with practice, you can pull them off. Let's tackle the detailed snowflake. Use a thin brush and white polish, start from the center, and create intricate lines extending outward. It’s a bit like drawing a star, but with more flair. Then, there’s the gift-wrapped nail, which uses straight lines and bows to mimic a present, it’s like adding a touch of elegance to your fingertips. And for the ultimate challenge? Try a full-on winter scene, with tiny painted snowmen, trees, and falling snowflakes. It's like creating a miniature painting on each nail, and the results are absolutely stunning. Remember, the key here is thin layers and a steady hand – take your time, and don’t be afraid to start over if needed.
Design | Difficulty | Tools Needed |
|---|---|---|
Mini Christmas Tree | Intermediate | Thin brush, dotting tool |
Reindeer Accent Nail | Intermediate | Thin brush, dotting tool |
Detailed Snowflake | Advanced | Thin brush |
Gift-Wrapped Nail | Advanced | Thin brush, striping tape |
Tips for Success
No matter how ambitious your design, there are a few secrets to making sure your Christmas nail art looks its absolute best. First, always use a good base coat; it protects your nails and makes your polish last longer. Second, thin layers are your friend. It's better to do two or three thin coats than one thick one, that can get bubbly and take forever to dry. Third, invest in a good top coat; it seals in your design and adds shine. And finally, don’t be afraid to practice. Nail art takes time and patience, but the results are totally worth it. Remember, every nail is a canvas, and it's okay to make mistakes, that's part of the learning process. And if it does not look good, well, there's always nail polish remover, right?
Troubleshooting Your Christmas Nail Designs and Inspiring Ideas
Troubleshooting Your Christmas Nail Designs and Inspiring Ideas
so you're all set to create some amazing holiday nail art, but what happens when things go a little sideways? Don't worry, we've all been there. One of the most common issues is smudging. It's like the universe conspiring against your freshly painted masterpiece. To avoid this, make sure each layer is completely dry before adding the next, and don't be shy with a quick-dry top coat. Another common problem? Bubbles in your polish. This usually happens when the polish is too thick or you're shaking the bottle too vigorously. Instead of shaking, gently roll the bottle between your palms. And if your lines are looking shaky, try using striping tape for clean edges or a thin brush for more control. Remember, practice makes progress, and even the pros have their off days.
Now that we've tackled the common nail art gremlins, let's talk about adding some extra sparkle to your designs. If you're feeling stuck in a creative rut, try looking to other sources for ideas, like holiday cards, wrapping paper, or even your favorite Christmas sweater. How about a cute Santa hat on your tips, or a string of colorful Christmas lights across your nails? You can also play with different textures, using matte and glitter polishes for contrast. Or, try adding some nail decals for a quick and easy way to get intricate designs. And don't forget about color combinations! Classic red and green are always a hit, but try mixing in gold, silver, or even some icy blues for a unique twist. The key is to have fun and let your creativity flow.
Problem | Solution |
|---|---|
Smudging | Ensure each layer is completely dry, use a quick-dry top coat |
Bubbles in polish | Roll the polish bottle gently, avoid thick layers |
Shaky lines | Use striping tape or a thin brush for control |
Sometimes, the best ideas come from just looking around. Think about the things that make you feel festive. Is it the twinkling lights? The warmth of a fire? The sparkle of snow? Use these as inspiration for your nail art. Maybe you want to try a design that mimics the look of a cozy knitted sweater, or perhaps a design that captures the magic of a winter night. There are so many possibilities and you don't have to be an expert to achieve great results. The most important thing is that you enjoy the process and love the final result. So, go ahead, grab your polishes, and get creative. I'm sure you'll create some amazing Christmas nail designs that you can be proud of.
And if you're really looking for a challenge, try creating your own custom nail art stickers using a clear base coat and a very thin brush. You can paint your designs on a piece of plastic, let them dry, and then peel them off and stick them to your nails. It's a great way to get intricate designs without having to paint directly on your nails. It's like having a tiny, personalized art studio right at your fingertips. And if you have any questions or want to show off your creations, I'm always here to cheer you on. Nail art is meant to be fun and expressive, so don't be afraid to experiment and try new things.
Wrapping Up Your Christmas Nail Designs
So there you have it, a sleigh-full of ideas to make your nails merry and bright this Christmas. We’ve gone from simple dots to detailed designs, and hopefully, you've discovered that creating fantastic nail art is easier than you thought. Remember, practice makes perfect, and don't be afraid to experiment with colors and techniques to find your unique style. Whether you're rocking a subtle shimmer or a full-on festive scene, your nails will be a conversation starter at every holiday gathering. Now go forth, paint those nails, and spread the holiday joy, one fabulous fingertip at a time!