Table of Contents
Ready to add some festive sparkle to your holiday look? This guide is packed with "cute and easy Christmas nail designs" perfect for anyone, from nail art newbies to seasoned pros. Forget complicated tutorials and expensive salon visits! We'll explore a range of simple yet stunning designs, from beginner-friendly options using nail strips and stickers to more advanced techniques that'll still leave you with plenty of time for holiday baking (or Netflix binging!). Whether you're after minimalist chic or maximalist merry, we've got the inspiration to transform your fingertips into tiny works of art. Get ready to ditch the boring manicures and embrace the festive cheer with our collection of cute and easy Christmas nail designs – let's get started!
Simple Christmas Nail Art Ideas: Cute Designs for Beginners
Simple Christmas Nail Art Ideas: Cute Designs for Beginners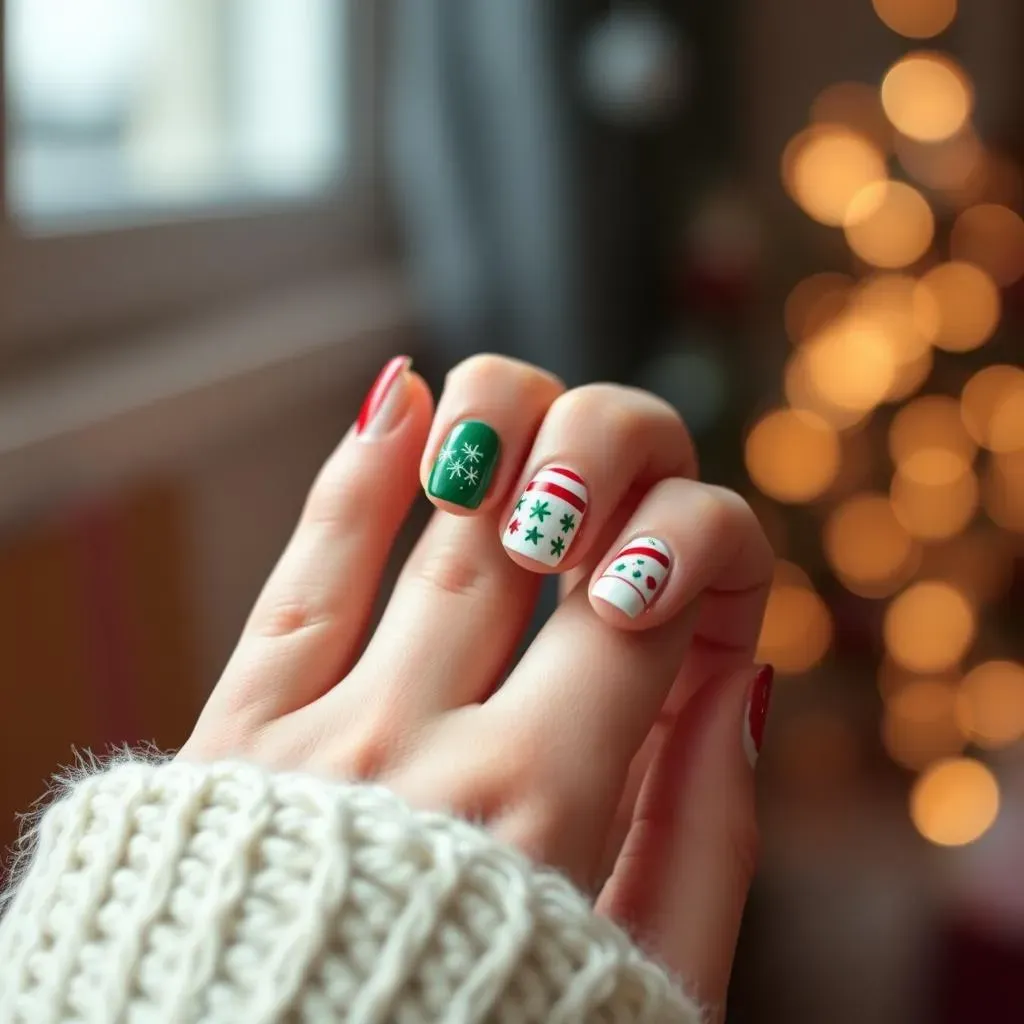
Classic Red and Green Christmas Nails
Let's start with a Christmas classic! A simple red and green design is festive, easy, and perfect for beginners. You can achieve this look with just two colors of nail polish. Paint your nails with a base coat of red, then use a thin brush or a toothpick to create simple green stripes or dots. You can even add some tiny white dots to mimic snowflakes. It’s a timeless combination, and the simplicity makes it perfect for a quick and fun manicure.
Don't worry about perfection; a slightly imperfect look adds charm! Think of it as rustic Christmas charm rather than a mishap. The key is to have fun and let your creativity flow. A top coat will seal the deal and give your nails a shiny, festive finish.
Step | Description |
|---|---|
1 | Apply a base coat |
2 | Paint nails red |
3 | Add green stripes or dots |
4 | Add white dots (optional) |
5 | Apply a top coat |
Simple Snowflake Nail Art
Snowflakes are synonymous with Christmas, and creating simple snowflake designs on your nails is surprisingly easy. You can use nail art tools like dotting tools or even a toothpick to create small dots and lines, forming basic snowflake shapes. Start with a white base coat for a clean look, or use a festive color like deep blue or emerald green for a more adventurous style. Remember, even simple snowflakes add a touch of elegance.
If freehand drawing isn't your forte, don't fret! Nail art stickers or stencils make creating perfect snowflakes a breeze. Just apply your base coat, carefully position the stickers or stencils, and then paint over them with your chosen color. Once dry, gently remove the stickers or stencils to reveal beautifully crisp snowflakes. This is a great way to get professional-looking results without needing advanced nail art skills.
- Use white or colored base coat
- Create simple snowflake shapes with dots and lines
- Use nail art stickers or stencils for easy snowflakes
- Seal with a top coat
Festive French Manicure Twist
Give the classic French manicure a festive twist! Instead of the traditional white tips, use a Christmas-themed color like red, green, or even a sparkly gold. This is an incredibly easy way to add a touch of holiday cheer to your nails. It's chic, sophisticated, and requires minimal effort. You can even use a thin brush to add tiny festive details to the colored tips, like small dots or a simple Christmas tree design.
Consider adding some glitter to the tips for extra sparkle! A simple glitter top coat adds a touch of glamour and festivity. Or, if you want a more subtle look, you can use a fine glitter that blends seamlessly with your chosen color. Remember, the goal is to create a design that's both festive and easy to achieve. A little glitter goes a long way in elevating a simple design.
"Simplicity is the ultimate sophistication." - Leonardo da Vinci
Cute Christmas Nail Designs Using Nail Strips & Stickers: Easy Festive Looks
Cute Christmas Nail Designs Using Nail Strips & Stickers: Easy Festive Looks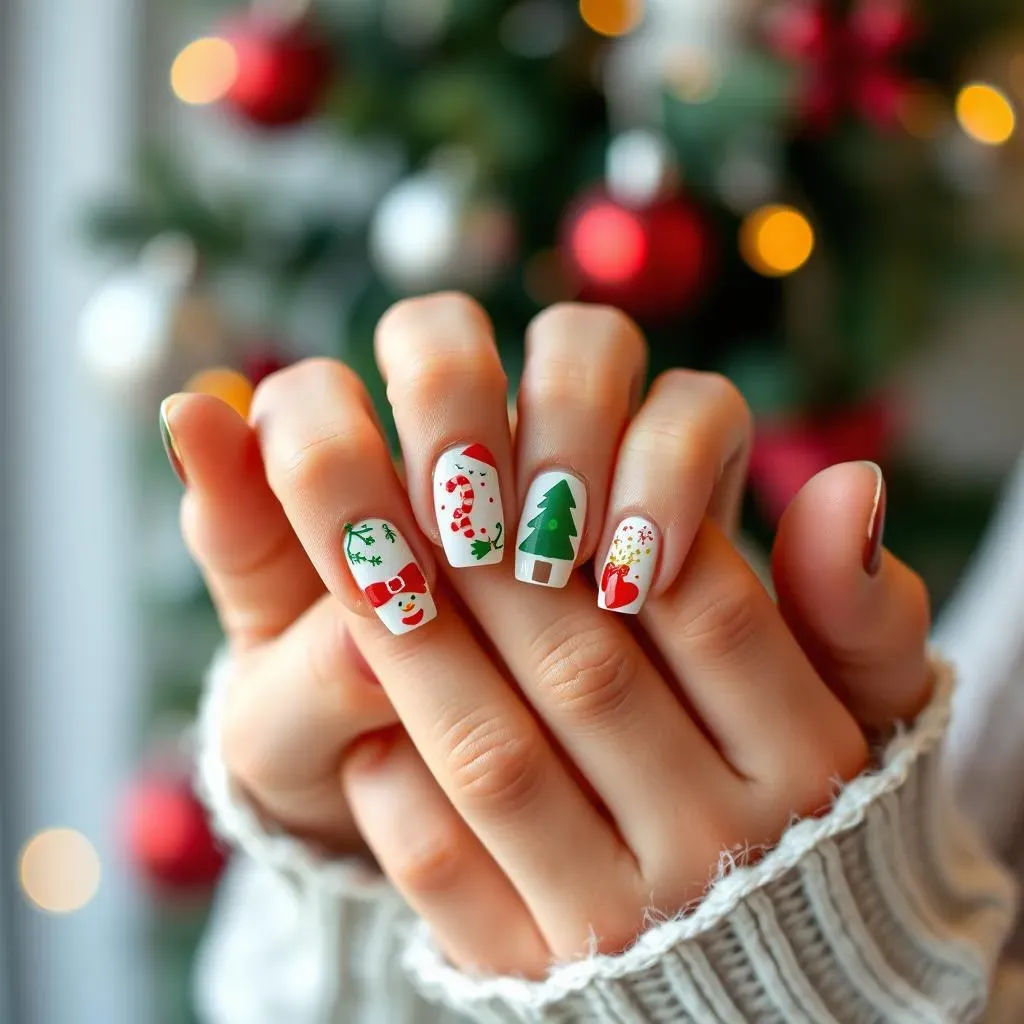
Christmas Nail Strips: Quick & Festive
Nail strips are your secret weapon for achieving adorable Christmas nail art in minutes! They come in tons of festive designs, from snowflakes and reindeer to candy canes and Christmas trees. Simply choose your favorite design, carefully apply the strip to your clean nail, file off the excess, and finish with a top coat. It's that easy! You can even layer different strips for a more unique look. For example, try a base of sparkly red strips and top it with smaller snowflake strips. The possibilities are endless!
Don't be afraid to experiment with different placements! You can create a fun, mismatched look by using different designs on each nail or stick to one consistent theme across all your nails for a more uniform appearance. Remember, nail art is all about self-expression, so let your personality shine through your design choices! And the cleanup is a breeze; no complicated cleanup required.
Step | Description |
|---|---|
1 | Choose your favorite Christmas nail strips |
2 | Apply the strips to clean, dry nails |
3 | File off any excess strip material |
4 | Apply a top coat for shine and durability |
Christmas Nail Stickers: Add Some Detail
Nail stickers offer incredible versatility for adding cute details to your Christmas manicure. They are available in countless designs, shapes, and sizes, allowing you to create intricate designs without the need for advanced nail art skills. You can find stickers featuring tiny snowflakes, adorable snowmen, festive bows, or even entire Christmas scenes. Simply apply your base coat, carefully place the stickers onto your nails, and seal everything with a top coat.
Mix and match different stickers for a personalized touch! For example, you could use snowflake stickers on some nails and tiny Christmas tree stickers on others. You can even add small glitter accents around the stickers to make them pop. The great thing about nail stickers is that they allow for creativity without the need for precise painting skills. They are perfect for adding a unique, personalized touch to your Christmas manicure, making it truly your own.
- Apply a base coat of your favorite color.
- Choose your Christmas nail stickers.
- Carefully place the stickers onto your nails, ensuring they're aligned properly.
- Seal with a top coat to protect your design.
Advanced Cute & Easy Christmas Nail Designs: Stepping Up Your Game
Advanced Cute & Easy Christmas Nail Designs: Stepping Up Your Game
Subtle Glitter and Gradient Effects
Let's move beyond simple stripes and dots! Try incorporating subtle glitter for a touch of glamor. A gradient effect, where one color smoothly transitions into another, is also a fantastic way to elevate your design. You can achieve this by using a sponge to blend two or three Christmas-themed colors together on each nail. Start with a base coat, then dab the sponge onto the nail, overlapping the colors slightly to create a seamless blend. Experiment with different color combinations like red to gold, or green to silver. Remember, less is more – a subtle gradient adds elegance without being overwhelming.
For a truly unique look, consider using a negative space technique. This involves leaving parts of the nail unpainted to create interesting shapes and patterns. For example, you could create a Christmas tree shape by leaving a triangular section of the nail unpainted, then filling in the rest with a festive color. Adding a few tiny glitter accents to the negative space can add an extra touch of sparkle. Negative space designs are a great way to show off your creativity and create a sophisticated look.
Step | Description |
|---|---|
1 | Apply a base coat. |
2 | Create a gradient effect using a sponge and two or three colors. |
3 | Add glitter accents (optional). |
4 | Apply a top coat. |
Incorporating Festive Patterns
Ready to take on more complex patterns? Try incorporating classic Christmas patterns like argyle, plaid, or fair isle. These patterns can be achieved using thin nail art brushes and a steady hand, or with the help of nail art stencils. Start by applying a base coat, then carefully paint the pattern onto your nails. Remember, practice makes perfect! If you make a mistake, simply wipe it off with nail polish remover and start again. Don't be afraid to experiment with different colors and variations of these patterns.
For a whimsical touch, try incorporating miniature Christmas characters like Santa, reindeer, or snowmen. These can be painted freehand or applied using small nail art stickers. You can create a fun and playful look by using these characters on one or two nails, while keeping the rest of your nails simple. Remember, the key is to have fun and let your creativity guide you. Don't be afraid to experiment and try new things; the possibilities are truly endless!
- Choose a festive pattern (Argyle, Plaid, Fair Isle).
- Use nail art brushes or stencils to paint the pattern.
- Add miniature Christmas characters (optional).
- Seal with a top coat.
Adding 3D Embellishments
For the ultimate festive flair, consider adding 3D embellishments to your nails. Tiny Christmas-themed charms, such as miniature bows, stars, or snowflakes, can be easily applied using nail glue. This technique adds texture and dimension to your design, creating a truly eye-catching manicure. Start with a base coat and your chosen nail design. Once the nail polish is completely dry, carefully apply a small amount of nail glue to the back of each charm and place it onto your nail. Make sure the charm is firmly attached before moving on to the next one.
Remember to use high-quality nail glue to ensure the charms stay securely in place. You can also use a top coat to seal the charms and protect your design. With a little patience and attention to detail, you can create stunning, eye-catching Christmas nail art that's sure to turn heads. Consider using a variety of charms to create a more dynamic and interesting look. Don't be afraid to experiment with different placements and arrangements to achieve your desired effect.
"Creativity takes courage." - Henri Matisse
Cute and Easy Christmas Nail Designs: Inspiration for the Holidays
Cute and Easy Christmas Nail Designs: Inspiration for the Holidays
Classic Christmas Color Palettes
Let's tap into the timeless charm of classic Christmas colors! Think rich reds, deep greens, snowy whites, and shimmering golds. These hues are effortlessly festive and offer endless design possibilities. A simple red base with a green accent stripe, or a white base adorned with gold glitter, can create a sophisticated yet easy look. You can also experiment with ombre effects, blending two or more of these colors for a soft, dreamy transition. Remember, simplicity is key – even a single accent nail in a contrasting color can make a big impact.
Don't forget the power of textures! Combine a matte base with a glossy top coat for a modern twist, or use a textured nail polish to add depth and dimension. A subtle shimmer can elevate a classic design without overpowering it. The key is to find the balance between festive and refined – a look that's both celebratory and elegant.
Color | Design Idea |
|---|---|
Red | Solid red with gold glitter accent |
Green | Green ombre with white tips |
White | White base with red and green polka dots |
Gold | Gold glitter accent on a red or green base |
Winter Wonderland Nail Art
Expand your horizons beyond traditional Christmas motifs and embrace the beauty of winter! Think snowflakes, icy blues, sparkling silvers, and frosty whites. These colors and themes evoke a sense of serenity and magic, perfect for a more understated yet still festive manicure. A simple snowflake design, created with a dotting tool or nail art brush, can add a touch of elegance. Alternatively, a gradient effect blending icy blues and silvers can create a mesmerizing wintery scene on your nails.
Consider adding subtle details to enhance your winter wonderland theme. Tiny silver glitter accents can mimic glistening ice crystals, while a matte top coat can create a frosty, snow-covered effect. You can also incorporate subtle textures, like a slightly textured white polish to represent freshly fallen snow. Remember, the goal is to create a look that feels both magical and understated – a quiet celebration of the winter season's beauty.
- Icy blues and silvers
- Subtle snowflake designs
- Matte top coat for a frosty effect
- Silver glitter accents