Table of Contents
Tired of chipped nails just days after a manicure? I get it! That's why I'm so excited to share the world of dip powder nails with you. This method isn't just about durability; it's a fantastic way to create stunning, long-lasting manicures at home, even if you're a complete beginner. Forget the frustration of smudged polish and hello to vibrant, chip-free color that lasts weeks. In this article, we're diving into the magic of easy dip powder nail designs. I'll walk you through why dip powder is a total game-changer, the essential tools you'll need, and a simple step-by-step guide to get you started. But that's not all – I've also curated 39 inspiring ideas to spark your creativity. Whether you’re into subtle elegance or bold statements, there's a design here for everyone. So, grab your favorite color, and let's get ready to elevate your nail game with these amazing and easy dip powder nail designs!
Why Dip Powder is a Game Changer for Easy Nail Designs
Why Dip Powder is a Game Changer for Easy Nail Designs
The Longevity Factor
Okay, let's be real, who has the time for constant touch-ups? I know I don't! That's where dip powder nails swoop in like a superhero. Unlike regular polish that chips at the first sign of trouble – like washing dishes or typing furiously – dip powder is incredibly durable. It's like giving your nails a suit of armor. We're talking weeks, not days, of flawless color, which is a total win for anyone who wants low-maintenance, gorgeous nails. Plus, the color stays super vibrant, no fading or dullness here, just pure pigmented perfection. I once went three weeks with a dip manicure and it looked just as fresh as day one. It's nuts!
The Ease of Application
Now, you might be thinking, "Okay, durable is great, but is it hard to do?" Nope! That's the beauty of it. Dip powder is surprisingly easy to apply, even if you're not a nail art wizard. It's way less fussy than trying to paint a perfect, streak-free coat of regular polish. You're basically dipping your nails into the powder after applying a special base coat, and then sealing it all up with a top coat. It’s like a magic trick, but it's actually super simple. I remember the first time I tried it, I was shocked at how smooth and even my nails looked. It's a game changer for anyone like me, who has zero patience for painting nails.
Feature | Dip Powder | Regular Polish |
|---|---|---|
Durability | Weeks | Days |
Application | Easy, dipping method | Requires precise painting |
Chip Resistance | High | Low |
Color Longevity | Vibrant, long-lasting | Fades, can get dull |
Creative Freedom
Beyond the ease and durability, dip powder opens up a whole world of creative possibilities. You can do so much more than just a single color. Think ombré, glitter, color blocking, even simple nail art using stencils. The options are nearly endless! Because the powder is so pigmented, your designs will really pop. It's like having a tiny canvas right at your fingertips. I’ve seen some truly amazing dip powder designs that look like they were done by a pro, but were actually simple to achieve. The best part? You can experiment and have fun without worrying about messing up too badly, because it's all so easy to fix. It's a perfect way to express your style and add a little flair to your everyday look.
Essential Tools and Prep for Easy Dip Powder Nail Application
Essential Tools and Prep for Easy Dip Powder Nail Application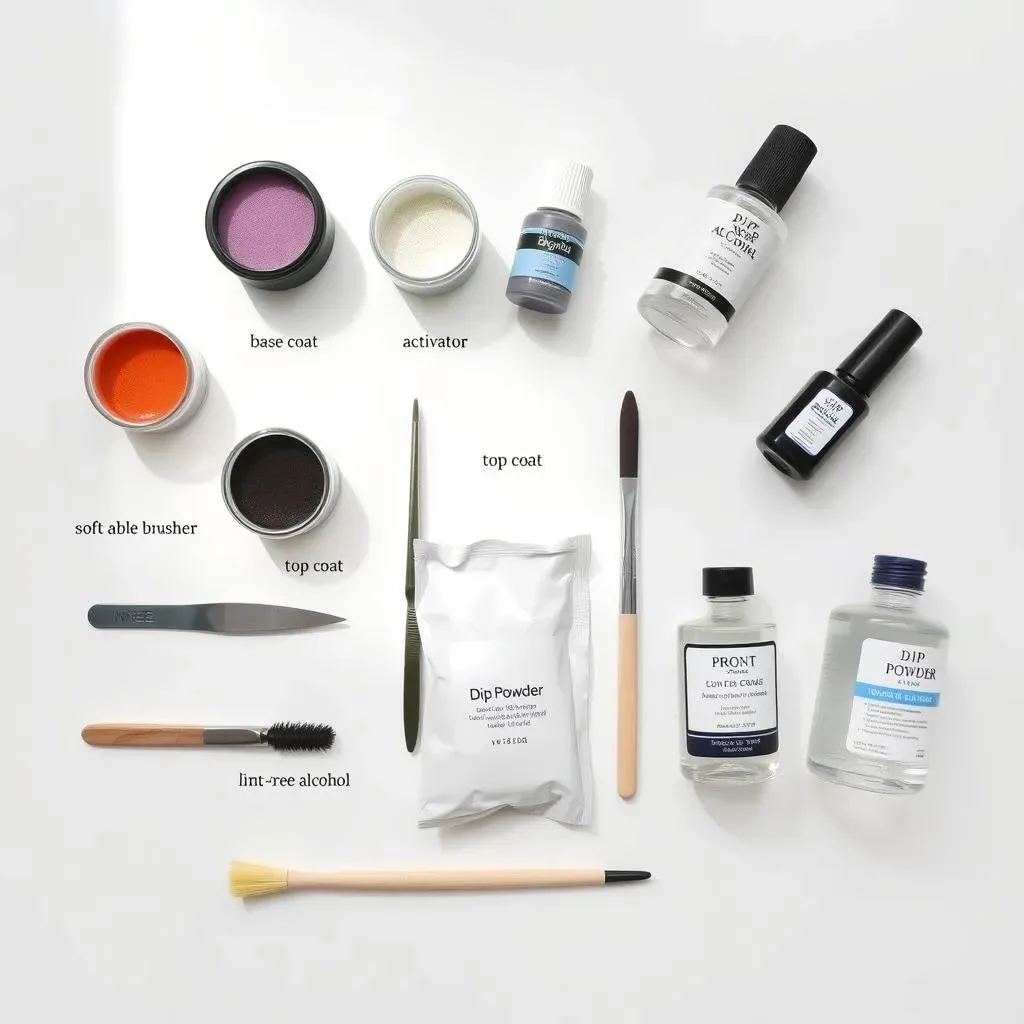
Gathering Your Dip Powder Arsenal
Okay, before we get to the fun part, let's talk gear. You can't just jump into dip powder without the right tools, it's like trying to bake a cake without flour. First up, you need a good quality dip powder system, which usually includes a base coat, an activator, and a top coat. Don't skimp on these, they're the foundation of a long-lasting mani. You'll also need your choice of dip powder colors, a nail file, a buffer, and a cuticle pusher. Oh, and don't forget a brush to dust off any excess powder. I learned the hard way that using the wrong brush can make things messy, so get a soft one. It's like having the right set of paintbrushes for an artist, makes all the difference.
Prepping Your Nails Like a Pro
Now, let's get to the prep work, and trust me, this is crucial. It's like preparing a canvas before painting, it makes all the difference in the final result. Start by shaping your nails with a file, then gently push back those cuticles. I know it seems like a small detail but trust me, it makes your mani look so much cleaner and more professional. Next, buff the surface of your nails to create a slightly rough texture, which helps the dip powder adhere better. I like to think of it as giving the powder something to grab onto. Finally, wipe your nails with a lint-free wipe and some alcohol to remove any oils or dust. This step ensures everything is squeaky clean and ready for dip powder magic.
"Proper preparation prevents poor performance." - An old saying that applies to nail care too!
Essential Tool Checklist
To make sure you’re all set, here's a quick checklist of everything you'll need. Having these ready before you start will make the whole process a breeze. It's like having all your ingredients measured out before you start cooking; it keeps things smooth and efficient. I always double-check my tools before I start, so I don't have to stop mid-manicure.
- Dip Powder Base Coat
- Dip Powder Activator
- Dip Powder Top Coat
- Your favorite Dip Powder Colors
- Nail File
- Buffer
- Cuticle Pusher
- Dust Brush
- Lint-free Wipes
- Rubbing Alcohol
StepbyStep Guide to Achieve Easy Dip Powder Nail Designs at Home
StepbyStep Guide to Achieve Easy Dip Powder Nail Designs at Home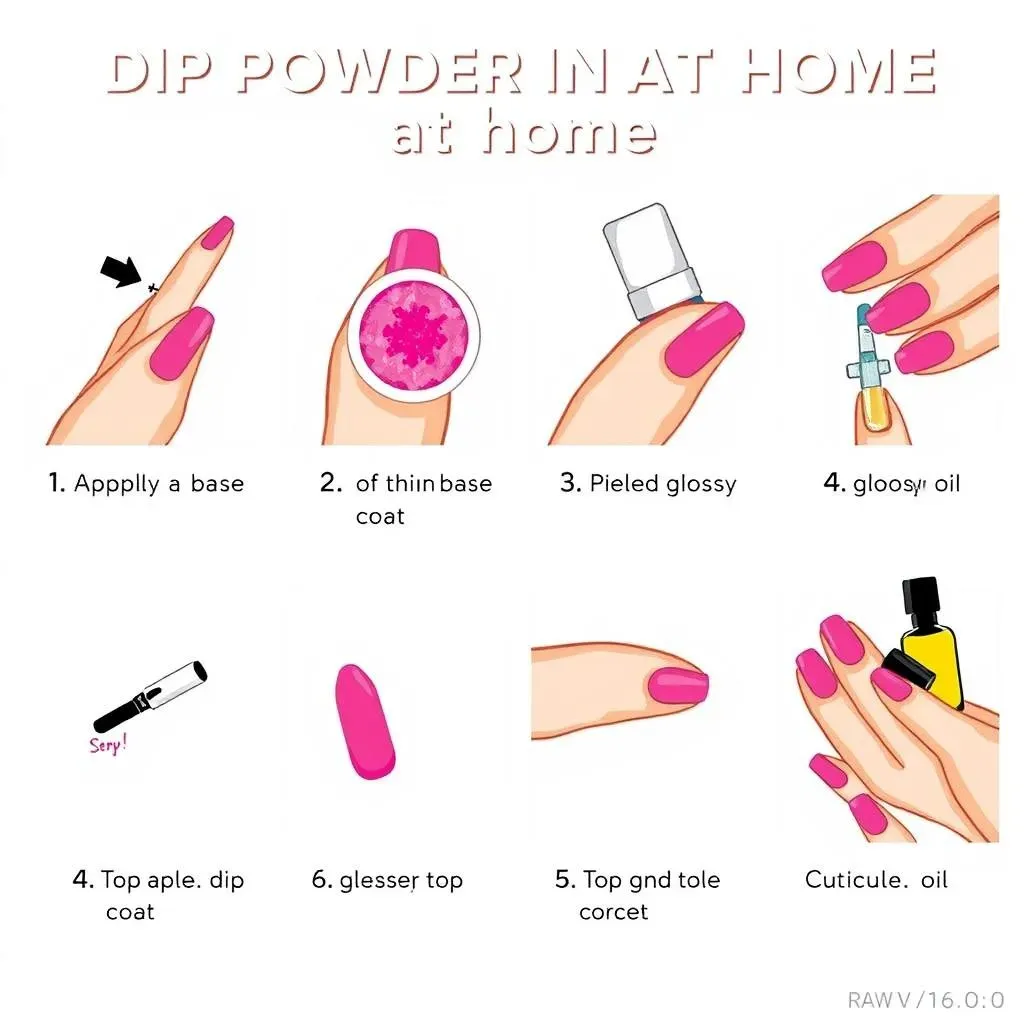
The Base Layer Magic
Alright, let's get into the nitty-gritty of applying dip powder. First up, it’s all about the base coat. Think of it as the glue that holds everything together. Apply a thin, even layer of the base coat to one nail at a time. Don’t go too thick, or you’ll end up with a gloopy mess. Then, quickly dip your nail into your chosen powder color, making sure the entire nail is covered. Tap off any excess powder and repeat this process one more time. This double dip ensures a nice, even coverage. It's like layering paint, you need a good base before adding the color. I remember the first time I tried this, I was amazed at how quickly the powder adhered to the base coat. It's super satisfying!
After you’ve dipped all your nails, it’s time for the activator. This stuff hardens the powder and sets the stage for the top coat. Apply a generous layer of the activator to all your nails and let it dry for a couple of minutes. You'll notice the powder starts to harden, which is a good sign that you are on the right track. This step is essential for the durability of your manicure. I learned the hard way that skipping the activator is a big no-no. Your manicure will be ruined in no time. So, take your time and make sure your nails are thoroughly covered!
Sealing the Deal
Now, for the final step – the top coat, it is like the glossy finish on a painting. Once your activator is completely dry, apply a layer of top coat to all your nails. This top coat will give your nails a shiny, smooth finish and protect them from chipping. Let it dry completely and you are done! If you want extra shine, you can apply a second coat of top coat. I like to wait at least 5 minutes before applying the second layer. Make sure you are patient with this step, because any smudge can ruin the entire manicure. And that is all! You now have your own dip powder nails at home.
After your top coat is dry, you can file and buff your nails to perfection. This step will help remove any excess powder from the sides of your nails and give it a more professional look. I like to use a soft buffer to smooth out any edges. Finally, apply some cuticle oil to hydrate your nails and cuticles. This will keep your nails looking healthy and moisturized. It's like the final touch in a spa treatment. This step will make you feel like you just left the salon.
Step | Description | Key Point |
|---|---|---|
Base Coat | Apply a thin layer | Ensures powder adhesion |
Powder Dip | Dip nail into powder | Double dip for coverage |
Activator | Apply a generous layer | Hardens the powder |
Top Coat | Apply a smooth layer | Provides shine and protection |
Finishing | File and buff, cuticle oil | Perfection and hydration |
39 Inspiring Ideas for Your Next Easy Dip Powder Nail Design
39 Inspiring Ideas for Your Next Easy Dip Powder Nail Design
Classic and Chic
Alright, let's get to the really fun part – the designs! If you're a fan of timeless elegance, you can't go wrong with classic shades. Think a soft, creamy nude that complements any outfit, or a bold, sophisticated red that screams confidence. These shades are not only super chic, but they're also incredibly versatile and perfect for any occasion. I've always been a fan of a good nude, it's like the little black dress of nail colors, it always looks good. And if you're feeling a little daring, go for a deep burgundy or a classic navy, they're always a hit. Trust me, sometimes the simplest designs are the most impactful. These colors are great for any season and any mood. It’s like having a foolproof outfit, you know you’ll always look great.
For a touch of subtle glam, consider a French manicure with a dip powder twist. Instead of painting the white tips, use a white dip powder for a crisp, clean line. You can also experiment with different tip shapes like a rounded or a more angular tip, to give it a modern edge. I love how a French manicure can make your hands look so elegant and polished. And if you are feeling adventurous, try a reverse French manicure, with the color at the base of your nail. It's a classic look with a unique twist. The best part is that these designs are so easy to achieve with dip powder, making them perfect for beginners and pros alike.
Bold and Beautiful
Now, if you are someone who loves to make a statement, let's explore some bolder options! Think vibrant, eye-catching colors like electric blue, hot pink, or a bright, sunny yellow. These shades are perfect for adding a pop of fun to your everyday look. I once did a bright pink manicure and it made me feel so much more energized and confident. You can also play around with glitter dip powders, they're like tiny disco balls for your nails! A glitter accent nail is a great way to add some sparkle without going overboard. Don't be afraid to mix and match different colors and glitters to create your own unique design. It is like creating your own masterpiece right on your fingertips.
Another fun trend is color blocking. Use tape to create clean lines and fill in different sections with contrasting dip powder colors. You can do geometric patterns, stripes, or even simple shapes. The possibilities are endless! I remember the first time I tried color blocking, I was surprised at how easy it was and how amazing it looked. It’s a great way to show your personality. You can also try an ombre effect, blending two or more colors together for a smooth, gradient look. Start with a lighter color at the base of your nail and gradually transition to a darker shade at the tip. It's a great way to create a unique and eye-catching design that will surely turn heads. Dip powder makes it so easy to achieve these trendy looks.
Design Style | Description | Color Palette |
|---|---|---|
Classic Chic | Timeless, elegant designs | Nudes, reds, burgundies, navy |
Bold & Beautiful | Eye-catching, statement designs | Electric blue, hot pink, sunny yellow, glitters |
French Twist | Classic French with a dip powder twist | White tips, reverse French |
Color Blocking | Geometric patterns, stripes, shapes | Contrasting colors, tapes |
Ombre | Smooth gradient effect | Light to dark transitions |