Table of Contents
Halloween is creeping closer, and what better way to get into the spirit than with some seriously spooky nails? Forget the complicated costumes for a moment, because your fingertips are about to become the star of the show. This year, we're ditching the salon and embracing the fun of "easy diy halloween nail designs". Whether you're a nail art newbie or a seasoned pro, we've got you covered with a monstrously massive collection of 75 different designs that range from cute and quirky to downright chilling. Think ghosts, bats, spiderwebs, pumpkins, and a whole lot of glitter – all at your fingertips, literally! We’ll be guiding you through some simple techniques, offering step-by-step tips, and showing you how to achieve these looks without needing a professional artist. Get ready to transform your nails into miniature masterpieces, perfect for any Halloween bash or just to flaunt your festive spirit. So, grab your polishes and lets get started, it’s time to create some nail art that's both boo-tiful and easy to make!
Spooky & Sweet: Easy DIY Halloween Nail Designs
Spooky & Sweet: Easy DIY Halloween Nail Designs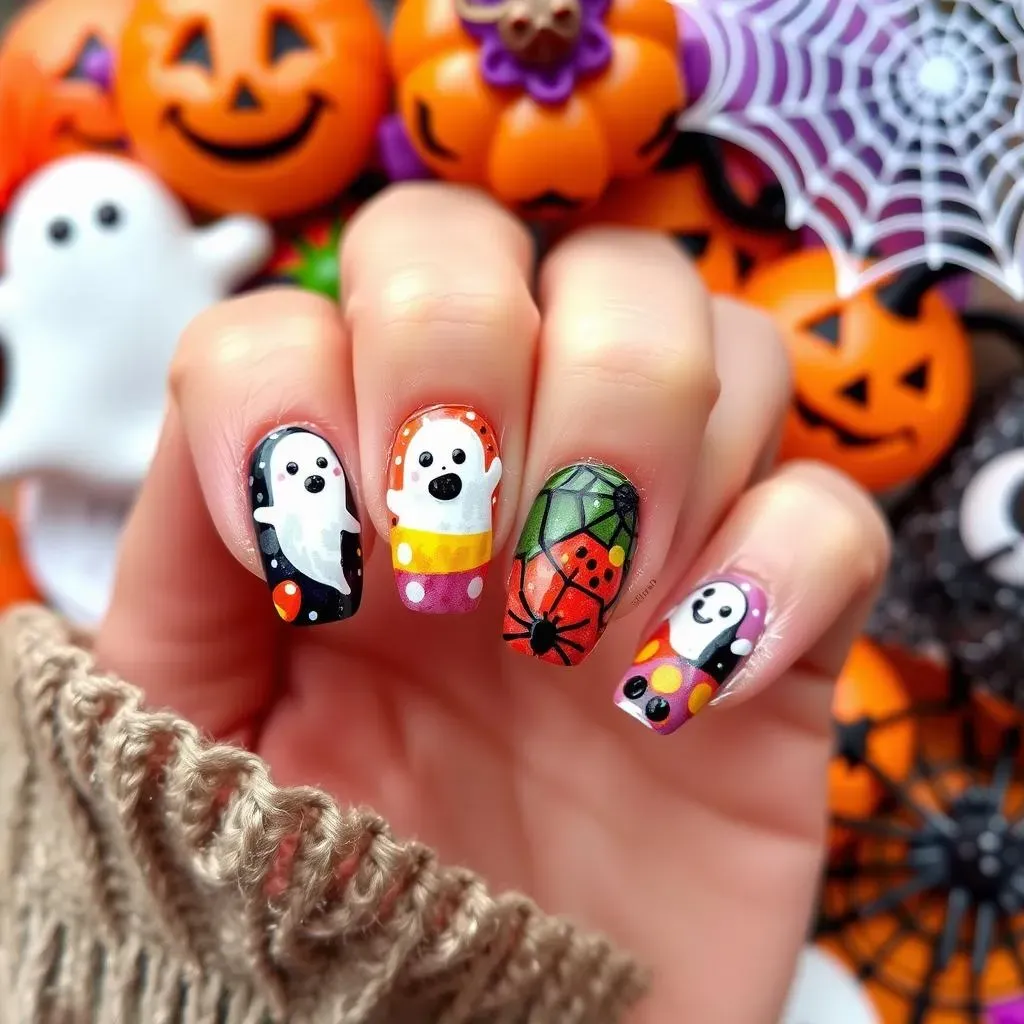
Okay, so you're thinking Halloween nails, but maybe you're not exactly a pro painter, right? No sweat! "Spooky & Sweet" is all about finding that perfect balance between cute and creepy. We're talking adorable ghosts that aren't trying to scare anyone, maybe just politely haunt your cuticles. Think candy corn stripes that look good enough to eat, or tiny spiderwebs that are more charming than chilling. It's about embracing the fun of Halloween without needing a degree in nail art. This section is your go-to for designs that are both easy to achieve and absolutely festive, perfect for anyone who wants to join in the Halloween spirit but doesn't want to spend hours at the nail salon.
Get Creative: StepbyStep Guide to Halloween Nail Art
Get Creative: StepbyStep Guide to Halloween Nail Art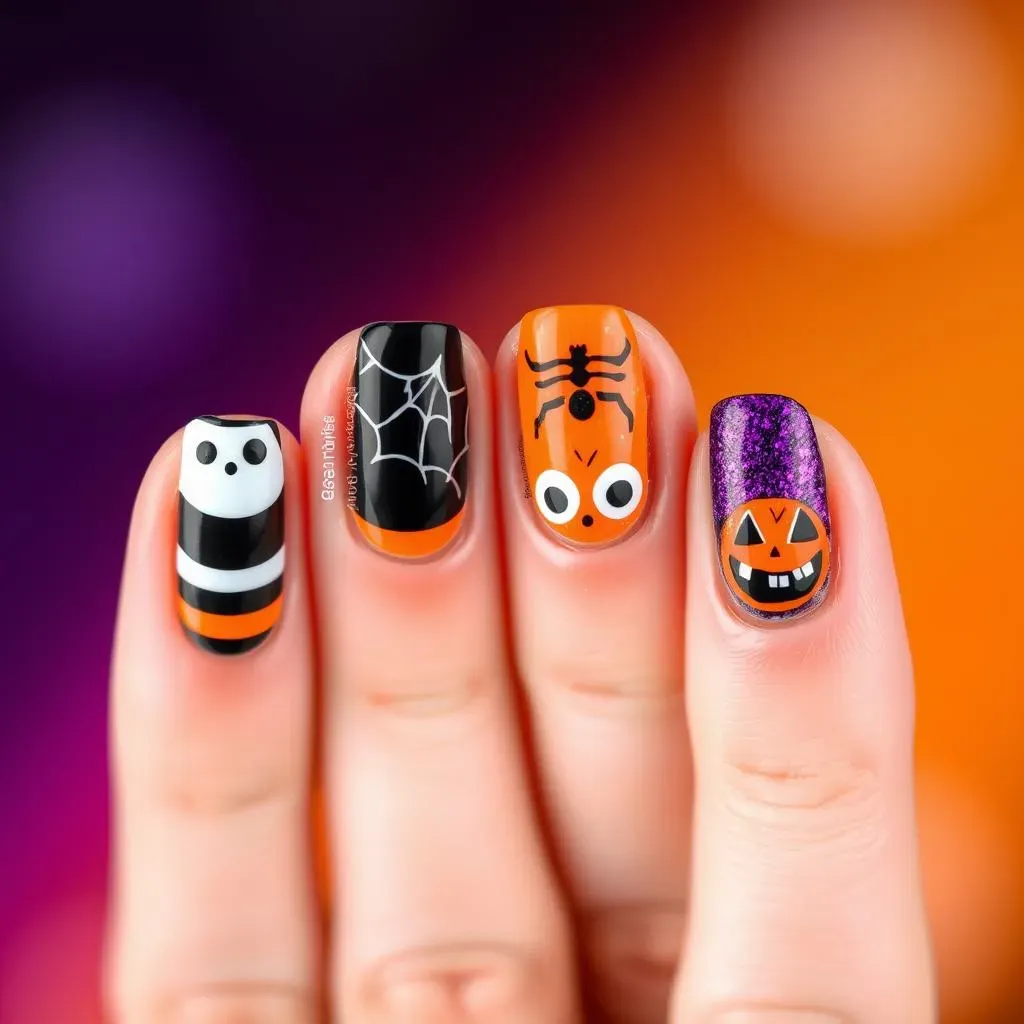
Prep Like a Pro
Alright, so you're ready to get your hands dirty, or rather, your nails polished? Before you even think about reaching for that spooky shade of black, let's talk prep. This is where the magic really starts, believe it or not. A good base is like the foundation of a house; if it's shaky, the whole thing is gonna crumble. So, grab your nail polish remover and get rid of any old polish. Then, give your nails a good trim and file. We're going for smooth, not jagged, okay? After that, push back those cuticles – gently, no need to go full-on Edward Scissorhands. Finally, apply a clear base coat. This isn’t just for show; it'll protect your nails and help your Halloween designs last longer. Trust me, this little step can save you a lot of frustration later.
Now that your nails are prepped, it’s time to talk tools. You don't need a fancy kit to make awesome nail art, but there are a few things that can make your life easier. First up, good quality nail polish. Cheap polish can be streaky and chip easily, so invest in a few good colors. Next, some thin brushes for details. You can find these at most craft stores or online. A dotting tool is also useful for making, well, dots! And lastly, don’t forget some cotton swabs and nail polish remover for those inevitable mistakes. Remember, practice makes perfect, so don’t be afraid to experiment and have some fun. It's Halloween; embrace the chaos!
Tool | Purpose |
|---|---|
Thin Brush | Creating fine lines and details |
Dotting Tool | Making dots and small circles |
Cotton Swabs | Cleaning up mistakes |
Nail Polish Remover | Correcting errors and removing polish |
Techniques that are Simple
Okay, let's get into the actual painting. One of the easiest techniques for Halloween nail art is using tape. Yes, your regular household tape. Just stick a piece on your nail, paint over it, and peel it off. Boom! Perfect lines. You can use this to make stripes, geometric shapes, or even the base for your spooky spiderwebs. Another great technique is dotting. Use your dotting tool, or even a toothpick, to make dots for ghost eyes, spider bodies, or even tiny polka dots for a more playful look. If you're feeling a bit more adventurous, try some simple freehand painting. Start with basic shapes like triangles for teeth or curved lines for pumpkin smiles. Don't worry if it's not perfect; it's Halloween, a little messiness adds to the charm.
Layering is another technique that can really elevate your designs without being too hard. Start with a base color, let it dry, and then add another layer on top. For example, you can paint your nails black and then add a layer of glitter polish for a sparkly, spooky effect. You can also use a sponge to create ombre effects, just dab a bit of polish onto the sponge and then gently pat it onto your nails. The key here is to be patient and let each layer dry before adding another. It prevents smudging and gives your designs that clean, professional look. So, grab your brushes, dots, and sponges, and let's get creative. Remember, the goal is to have fun and create something uniquely you.
- Tape Method: Use tape to create clean lines and shapes.
- Dotting: Use a dotting tool or toothpick for dots and small details.
- Freehand: Start with basic shapes and simple lines.
- Layering: Apply multiple layers for depth and sparkle.
Halloween Nail Design Ideas: From Simple to Spooky
Halloween Nail Design Ideas: From Simple to Spooky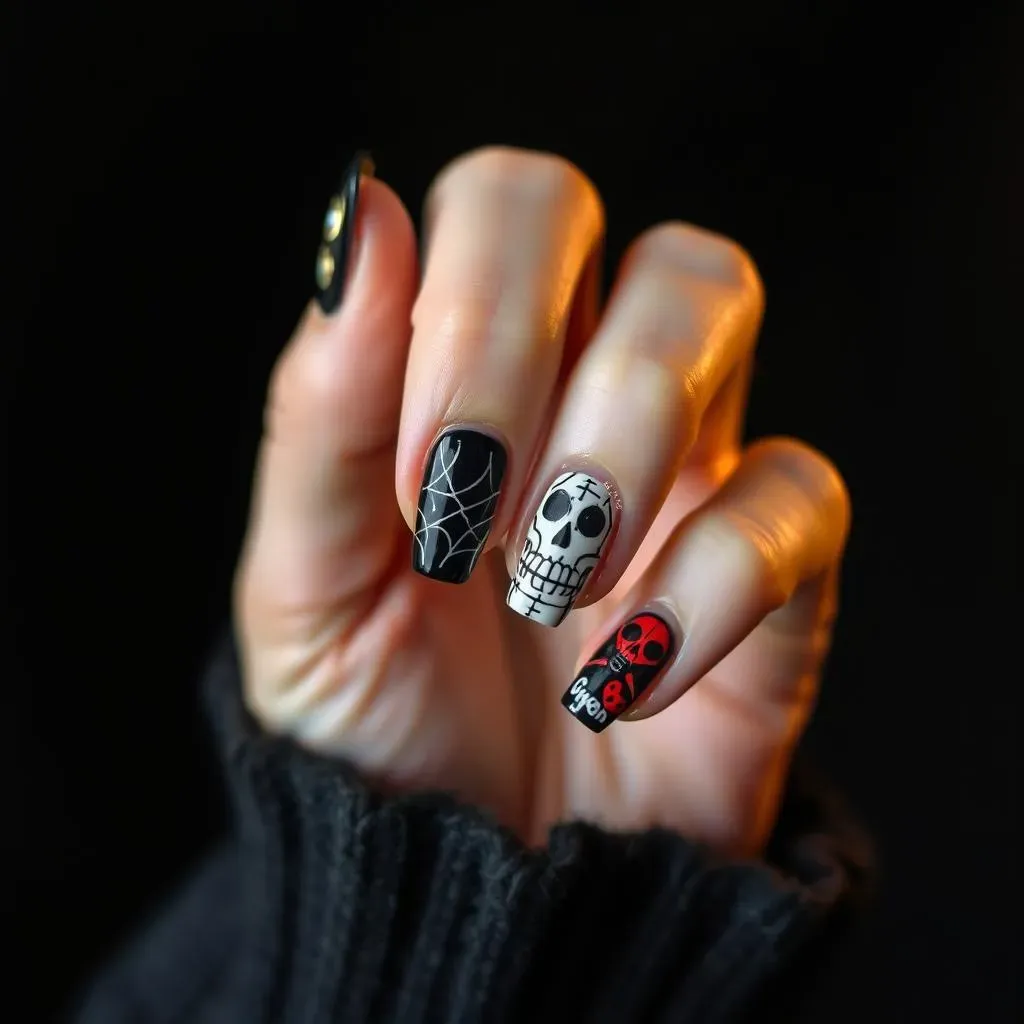
Simple & Sweet Designs
Let's start with the easy peasy stuff, shall we? If you're new to nail art or just want something quick and cute, these ideas are perfect. Think single-color nails with a tiny ghost painted on one finger – adorable, right? Or how about using some Halloween-themed nail stickers? They're a total lifesaver and come in so many fun designs. Another super easy idea is to paint your nails in classic Halloween colors like orange, black, or purple and add a layer of glitter. It's festive, it's fun, and it's definitely not going to take you all day. These designs are all about minimal effort with maximum impact. So, if you're looking for something simple, these are your go-to options.
And hey, don't think simple means boring! You can totally rock a minimalist look with a touch of Halloween flair. Consider a French manicure with a black tip instead of white, or a nude base with tiny bats or spiderwebs painted on a single nail. The key is to keep it clean and elegant while still embracing the spooky spirit. It’s all about finding that sweet spot where simplicity meets festivity. These designs are great for those who prefer a more subtle approach to Halloween, but still want to participate in the fun. Plus, they're super versatile and can be worn to work, school, or any Halloween gathering.
Design | Description | Difficulty |
|---|---|---|
Single Ghost Nail | One nail with a simple ghost drawing | Easy |
Halloween Stickers | Using pre-made Halloween themed stickers | Easy |
Glitter Nails | Single color with a glitter coat | Easy |
Black French Tip | French manicure with black tips | Easy |
Stepping Up the Spookiness
Alright, feeling a bit more adventurous? Let’s crank up the spook factor with designs that are a little more involved but still totally doable. We're talking about those classic Halloween vibes: think dripping blood nails (don't worry, it's just red polish!), or maybe some spiderweb designs that actually look like they might trap a tiny fly. Or how about some Frankenstein-inspired nails with those iconic green and black jagged lines? These designs require a bit more patience, but the end result is totally worth it. These are perfect for when you want to show off your nail art skills and get some serious Halloween cred. You can even mix and match these ideas for a totally unique look.
Let's talk about some specifics. For the dripping blood effect, use a thin brush and start at the cuticle, letting the red polish drip down the nail. Don't worry about making it perfect; the messier, the better! For spiderwebs, start with a base color, then use a thin white or black polish to draw the web lines. It doesn’t have to be perfect, just give it a go! And for Frankenstein, you can use a sponge to create a textured green base and then add the black lines with a thin brush. These techniques are all about embracing the slightly imperfect, spooky vibes of Halloween. So, grab your brushes and get ready to get a little messy, it's all part of the fun.
- Dripping Blood: Red polish drips from the cuticle.
- Spiderwebs: Thin lines creating a web design.
- Frankenstein Nails: Green base with black jagged lines.
Full-On Fright Fest
Okay, you're ready to go all out? Let’s dive into the realm of seriously spooky nail art. We’re talking about designs that might make your friends do a double take, the kind that scream "I take Halloween very seriously!" Think intricate skull designs, glow-in-the-dark ghosts, or maybe even some detailed zombie-inspired nails. These are the designs that take a bit more time and skill, but the payoff is huge. These are perfect for Halloween parties or when you want to make a statement. Remember, it’s all about pushing your creative boundaries and having fun with it. If you are up for the challenge, these designs will definitely make your nails the talk of any party.
To achieve these more complex designs, you might want to use some nail art tools like thin brushes or dotting tools. For example, for the skull designs, start with a white base and then use a thin black brush to draw the details. You can also use stencils if you're not comfortable with freehand. For the glow-in-the-dark ghosts, use a special glow-in-the-dark polish and paint your ghosts on a dark background. And for the zombie nails, you can use a mix of colors and add some texture with a sponge. Don’t be afraid to experiment and try new things. The more you practice, the better you will get. So, if you're ready to embrace your inner nail artist, let's create some seriously spooky designs!