Table of Contents
Ever looked down at your toes and thought, "They could use a little something?" Well, you're not alone! I used to think fancy nail art was only for fingers, but guess what? Toes deserve some love too! And the best part? You don't need to be a pro to get amazing results. This article is all about easy nail designs for toes that anyone can do. We're talking simple techniques, fun colors, and ideas that'll make your toes the talk of the beach (or your living room). Forget spending hours at the salon; we'll show you how to create cute, stylish looks with minimal effort. From basic colors and patterns to sparkly holiday themes, we’ve got a bunch of ideas that are easy to follow. So, get ready to grab your polish, and let's make those toes shine!
Simple and Sweet: Easy Toe Nail Designs for Beginners
Simple and Sweet: Easy Toe Nail Designs for Beginners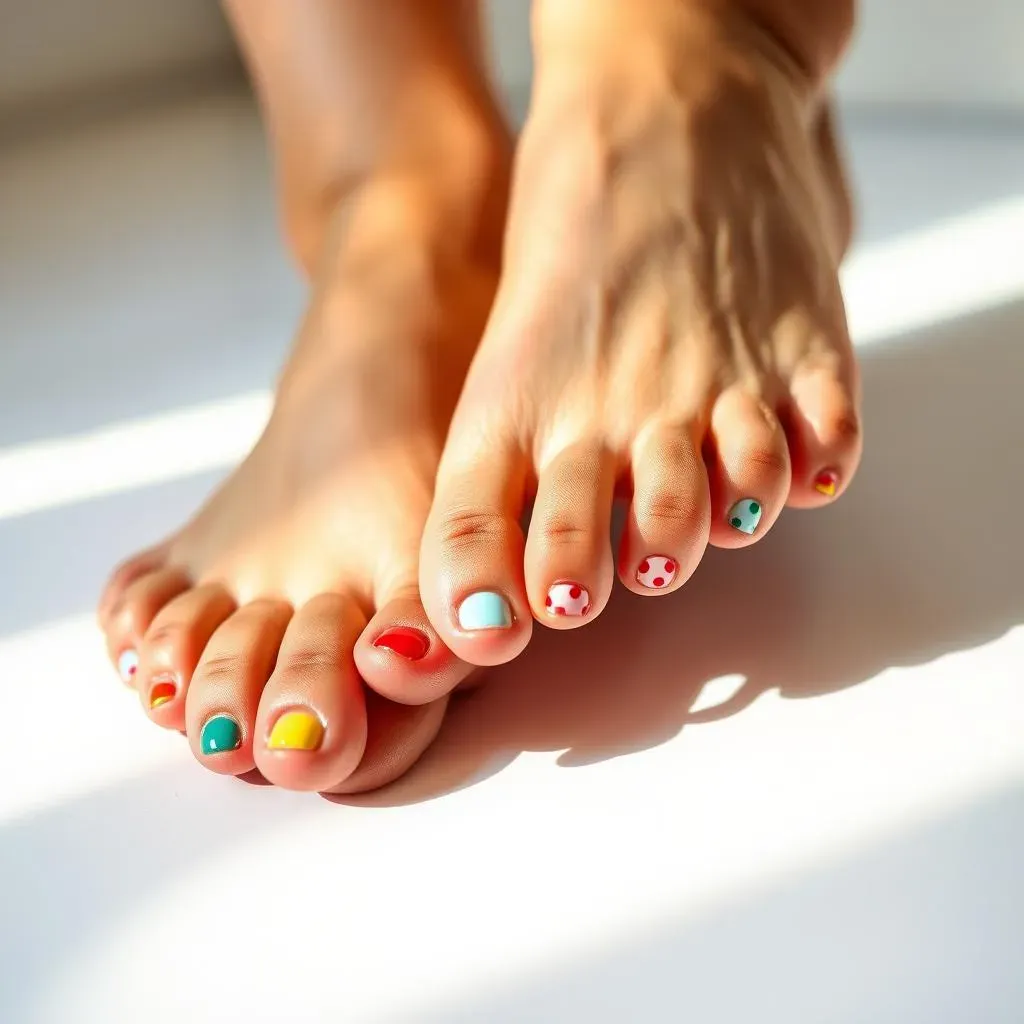
Starting Simple: Solid Colors
Okay, so you're new to this whole toe nail art thing? No problem! Let's start with the absolute easiest: solid colors. Seriously, it doesn't get simpler than this. Pick your favorite nail polish – maybe a bright pink, a cool blue, or a classic red. Paint each toe with a single coat, let it dry, and then add another coat. Done! The key here is to make sure the coats are thin and even. Thick coats will take forever to dry, and they're more likely to smudge. Trust me, I've been there with the thick polish disasters! Solid colors are great because they're always in style and they go with everything.
Don't worry about being perfect, either. If you get a little polish on your skin, just grab a cotton swab dipped in nail polish remover and clean it up. It's like coloring, but for your toes. It's a great way to practice your control, and it's super relaxing once you get the hang of it. The best part is, you can change up your colors whenever you feel like it! It's all about having fun and making your toes look their best.
Polka Dots: A Touch of Fun
Ready to kick things up a notch? Let's talk polka dots! These are super easy, and they add a playful touch. After your base coat (I recommend a light color), grab a dotting tool or even a toothpick. Dip the tip into a contrasting color and gently dot it onto your nails. The size of the dots depends on how much polish you use on the tip. You can make a pattern of evenly spaced dots or create a random, whimsical look. Polka dots are forgiving, so don't stress about making them all perfect.
I love how polka dots can be customized to any color combination. Think white dots on a navy base, black dots on a bright yellow, or rainbow dots on a white base. The possibilities are endless! It’s a simple design that can make your toes look instantly more festive and fun. Plus, it's a great way to use up those mini nail polishes you've collected over time. Just have fun and experiment with different colors and dot sizes. It's your toes, so you make the rules!
Design | Base Color | Dot Color |
|---|---|---|
Classic Polka Dots | Light Pink | White |
Funky Polka Dots | Bright Yellow | Black |
Rainbow Polka Dots | White | Various Colors |
Stripes: Clean and Simple
Last but not least, stripes! These are another incredibly easy design that looks super stylish. After your base coat dries, use thin nail tape or even just a steady hand to create stripes. You can do horizontal stripes, vertical stripes, or even diagonal stripes. The key to clean lines is to let the base coat dry completely. Apply the tape carefully, paint over it with your stripe color, and then peel off the tape while the polish is still a little wet. It might take a couple of tries to get the hang of it, but once you do, it’s a breeze.
Stripes can be as simple or as bold as you want them to be. Try thin white stripes on a navy base for a nautical look, or thick metallic gold stripes on a black base for a more glamorous look. You can even do rainbow stripes for a fun, colorful vibe. It is all about having fun and doing what makes you happy! Don't be afraid to get creative and try something new. Your toes are your canvas, so go wild!
Summer Fun: Bright and Easy Toe Nail Art Ideas
Summer Fun: Bright and Easy Toe Nail Art Ideas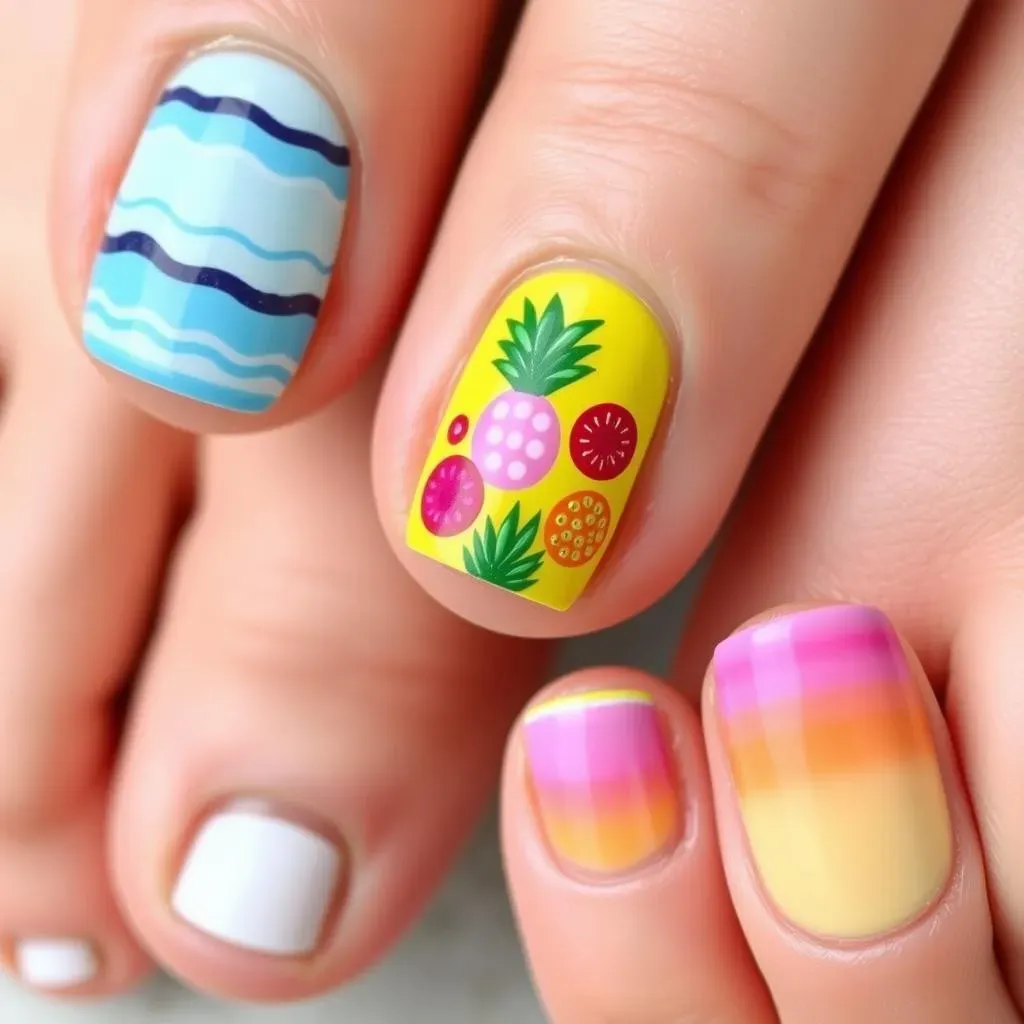
Beachy Keen: Ocean-Inspired Toes
Alright, let's get into some summer vibes! When I think of summer, I think of the ocean, and what better way to bring that to your toes? Start with a base coat of a light blue or turquoise. Then, grab a thin brush or a toothpick and add some wavy lines in a darker blue or white to mimic the waves. You can even add a tiny bit of glitter for a little sparkle, like the sun hitting the water. It’s like having a mini beach party on your feet!
For a super easy addition, try using a sponge to dab on some white polish at the tips of your toes, creating a subtle ombre effect that looks like the foamy part of the waves. It's simple, it's cute, and it totally screams summer. You can also add tiny little seashells or star stickers if you're feeling extra crafty. This design is not only perfect for beach days but also for any summer outing where you want to feel relaxed and beachy.
Tropical Twist: Fruity Fun
If the beach isn't your thing, how about some tropical fruit? Think bright colors and fun shapes! Start with a vibrant base color like yellow, pink, or green. Then, use a thin brush or a dotting tool to create tiny fruits on your toes. Think little watermelons with red and green, pineapples with yellow and brown, or strawberries with red and tiny green dots for the seeds. It's a fun and playful way to show off your summer spirit.
You don't need to be an artist to pull this off, either. Simple shapes and bright colors are all you need. It’s like a mini fruit salad on your toes! You can even mix and match different fruits on each toe for a quirky look. This design is perfect for summer picnics, pool parties, or just when you want to add a little bit of fun to your day. It’s a guaranteed mood booster every time you look at your feet. Remember, it's all about embracing the summer fun!
Fruit | Base Color | Detail Colors |
|---|---|---|
Watermelon | Light Pink | Red, Green, Black |
Pineapple | Yellow | Brown, Green |
Strawberry | Red | Green, Black |
Sunset Hues: Gradient Magic
Okay, for something a little different, let’s try a sunset gradient! It’s easier than it looks, I promise. Start with a base coat of a light color, like a pale yellow or white. Then, using a small sponge, dab on different colors, starting with a bright orange at the base of your nail and blending up to a pink or purple at the tip. The key is to apply the polish in thin layers and blend well, creating a seamless gradient effect. It’s like having a tiny sunset on each toe.
If you're feeling extra fancy, you can add a touch of gold glitter at the tips to simulate the sun setting on the horizon. It's an easy way to add a touch of glam to your summer look. This design looks especially stunning in the evening light and is perfect for any summer gathering. It’s a fun and creative way to express your love for summer. Plus, it's a great conversation starter! Who wouldn't want to talk about your gorgeous sunset toes?
Holiday Sparkle: Festive Easy Toe Nail Designs
Holiday Sparkle: Festive Easy Toe Nail Designs
Christmas Cheer: Classic Colors and Sparkle
Okay, let's get festive! When the holidays roll around, it’s time to bring out the sparkle. For a classic Christmas look, start with a base coat of red or green. These are the quintessential holiday colors, right? Then, grab a glitter polish – gold or silver works wonders – and add a coat over your base color. If you're feeling fancy, you can use a small brush or a toothpick to add a few glitter accents, like stars or dots. It’s like putting tiny Christmas lights on your toes!
Another easy idea is to do a candy cane stripe. Use a white base coat and then add thin red stripes using nail tape or a steady hand. You can even add a bit of glitter on top for extra sparkle. It’s such a simple yet festive design that screams holiday cheer. Don't be afraid to mix and match colors and glitter, either! It's the holidays, so have some fun with it. The key is to keep it simple and sparkly – just like the season itself.
New Year's Glam: Glitter and Metallic
As we get closer to New Year's, it's time to bring on the glam! Think lots of glitter, metallics, and bold colors. A super easy design is a full glitter coat over a black or dark blue base. It’s like having tiny fireworks on your toes! You can also try a metallic polish – gold, silver, or rose gold – for a chic and stylish look. These colors are perfect for ringing in the new year with some sparkle.
If you want to add a little extra detail, use a thin brush or a dotting tool to add small dots or lines in a contrasting metallic color. It's a simple way to make your toes look extra special for the big night. Don't be afraid to go bold and experiment with different metallic shades. The idea is to shine bright and celebrate the new year with style. It's all about having fun and embracing the celebratory spirit.
Holiday | Base Color | Detail Colors | Additional Sparkle |
|---|---|---|---|
Christmas | Red or Green | Gold or Silver | Glitter Accents |
New Year's | Black or Dark Blue | Gold, Silver, Rose Gold | Full Glitter Coat |
Winter Wonderland: Snowy Details
For those who love a more subtle look, why not try a winter wonderland theme? Start with a light blue or white base coat, then use a dotting tool or a toothpick to create tiny white dots that look like snowflakes. It’s a simple yet elegant design that captures the magic of winter. You can also add a touch of silver glitter for extra sparkle, like the sun hitting the snow. It's a beautiful way to bring the winter season to your toes.
Another easy idea is to use a light gray or silver polish for the base, then add a few thin white lines that look like icicles. It’s a simple design that feels very wintery and chic. Don’t worry about making the snowflakes or icicles perfect; it's the simplicity that makes this design so charming. It's all about embracing the beauty of the winter season with your toes. These designs are perfect for those chilly days and nights when you want to feel cozy and festive.
Quick and Cute: Everyday Easy Toe Nail Art
Quick and Cute: Everyday Easy Toe Nail Art
Minimalist Magic: Simple Lines and Shapes
Okay, so you need something quick and easy for everyday wear, right? Let’s talk minimalist designs. Think clean lines and simple shapes. Start with a nude or light base coat – something that goes with everything. Then, use a thin brush or a nail art pen to add a few simple lines. You could do a single vertical line down the center of each toe, a couple of horizontal lines, or even a small triangle or dot at the base of the nail. The key here is to keep it simple and clean. It's amazing how a few well-placed lines can make your toes look instantly chic and put-together.
I love minimalist designs because they're so versatile. They go with any outfit and any occasion, whether you're heading to work, running errands, or going out with friends. Plus, they're super quick to do, which is perfect for those busy mornings when you don't have a lot of time. You can switch up the colors and shapes to create a variety of different looks, so don’t be afraid to experiment. It’s all about finding what works for you and your style.
Design | Base Color | Detail Color | Shape |
|---|---|---|---|
Single Line | Nude | Black | Vertical Line |
Double Line | Light Pink | White | Horizontal Lines |
Simple Shape | Light Grey | Gold | Triangle at base |
Geometric Gems: Easy Patterns
Ready for something a bit more interesting but still super easy? Let’s get geometric! Think simple patterns like chevrons, stripes, or even tiny squares. After your base coat dries, use thin nail tape to create the shapes. For chevrons, place the tape in a V shape and paint over it. For stripes, you can do horizontal, vertical, or diagonal lines. For squares, use a thin brush or a toothpick to create small squares at the corners or center of your nails. The key is to be precise with your lines, but don't worry about perfection. It's the overall effect that matters.
I find geometric designs so satisfying because they look so polished and intentional, but they’re actually very easy to achieve. They’re perfect for adding a little bit of edge to your everyday look. Plus, you can play around with different colors and patterns to create something unique. If you're feeling bold, try combining different geometric shapes on each toe for a more eclectic style. It's a fun and easy way to express your creativity and make your toes look awesome, even on a regular day.