Table of Contents
Ever dreamt of sporting a bit of Hogwarts magic right at your fingertips? You're not alone! Loads of us Potterheads want to show off our house pride or favorite spells, but sometimes, complicated nail art feels like a potions class gone wrong. That's where the fun begins! This guide is your Marauder's Map to creating easy Harry Potter nail designs, even if you think your artistic skills are more like Neville Longbottom's potion-making than Hermione's spellcasting. We'll start with simple, beginner-friendly ideas that won't require a trip to Ollivander's for special tools. Then, we’ll move on to designs that let you show off your Gryffindor, Slytherin, Ravenclaw, or Hufflepuff colors. We'll also explore how to use stickers and stencils for instant wizarding flair. And for those who want to add a touch of extra magic, we'll include some slightly more advanced, yet still totally doable, ideas. Get ready to transform your nails into a spellbinding display of your love for the wizarding world with these easy Harry Potter nail designs.
Simple Spells: Easy Harry Potter Nail Designs for Beginners
Simple Spells: Easy Harry Potter Nail Designs for Beginners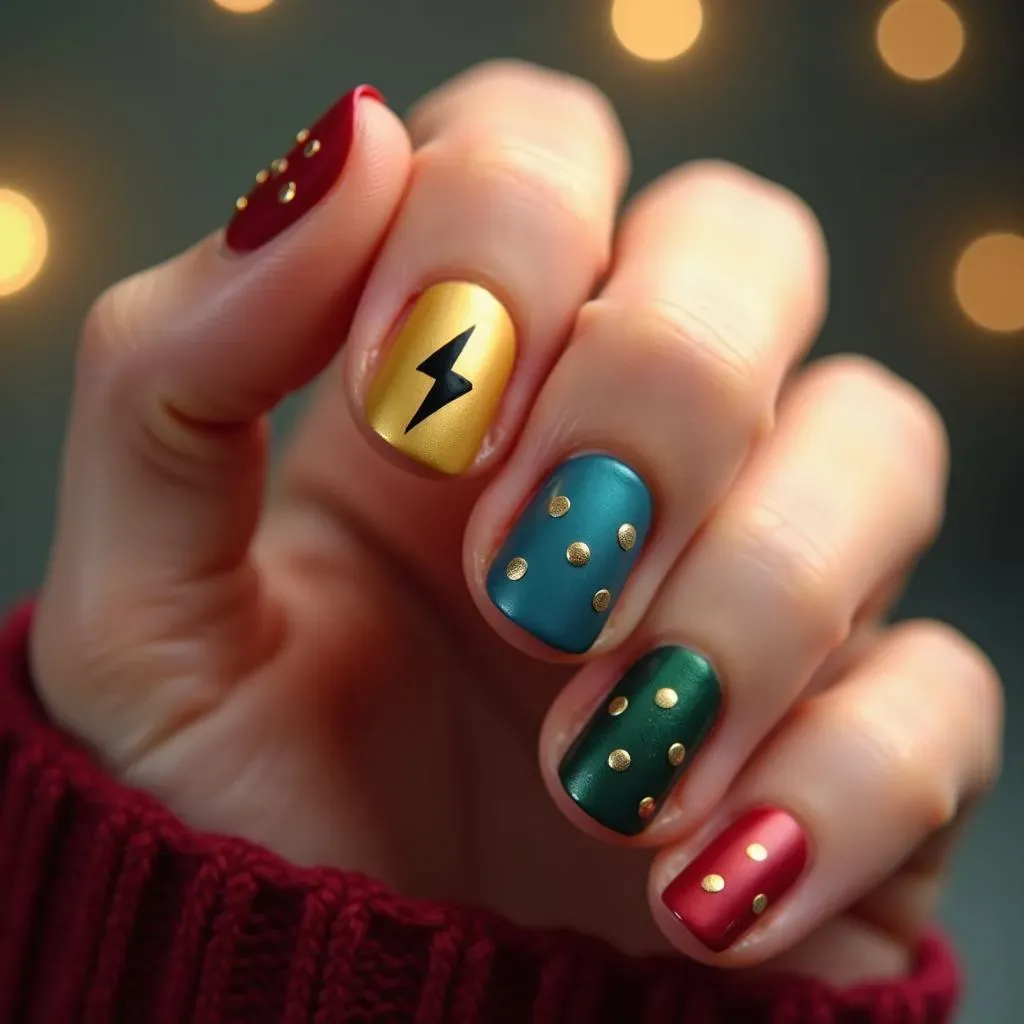
Okay, so you're itching to get some magic on your nails, but you're not exactly a nail art pro, right? No sweat! We're starting with the absolute easiest designs, the ones even a first-year could manage without accidentally turning their fingers into frogs. Think of these as your basic Charms – simple, effective, and totally doable. We're talking solid colors inspired by the Hogwarts houses, like a bold red for Gryffindor or a sleek silver for Slytherin. Or maybe just a classic black with a lightning bolt – that's Harry's signature look, after all! The idea here is to get comfortable with applying polish and maybe adding a simple shape or two. No tiny brushes or complicated techniques required. We're all about easy and fun, so grab your polishes and let's get started!
I remember when I first started, I was so worried about messing up. My hands would shake, and the polish would end up everywhere but my nails! But you know what? It's totally okay to not be perfect. That's why we're starting with the basics. Think of it like learning to fly a broomstick – you're not going to be a Quidditch star on day one. It takes a bit of practice, but the more you do it, the better you'll get. And honestly, even a slightly wonky lightning bolt just adds to the charm. So don't stress, just have fun with it. These designs are all about expressing your love for Harry Potter, not about creating a masterpiece.
Design | Description | Difficulty |
|---|---|---|
Solid House Colors | One color polish representing your favorite house | Very Easy |
Lightning Bolt | Black polish with a simple lightning bolt on one nail | Easy |
Golden Snitch Dots | Yellow polish with two small silver dots | Easy |
House Pride: Quick Harry Potter Nail Designs for Each House
House Pride: Quick Harry Potter Nail Designs for Each House
Alright, so you've mastered the basics, and now it's time to really show your colors! I'm talking about your Hogwarts house, of course. Whether you're a brave Gryffindor, a cunning Slytherin, a wise Ravenclaw, or a loyal Hufflepuff, there's a super easy nail design that's perfect for you. We're not going to get bogged down in complicated crests or detailed characters. Instead, we're focusing on using the house colors to create bold and recognizable looks. Think simple stripes, color blocking, or even just a single accent nail. These designs are all about making a statement without spending hours on your nails. It's like a quick sorting ceremony, but for your fingertips!
Personally, I've always been a Ravenclaw at heart (though my friends swear I've got a bit of Hufflepuff in me too). I remember trying to paint the Ravenclaw eagle on my nails once – total disaster! It looked more like a confused pigeon than a majestic eagle. That's when I realized that sometimes, less is more. Simple color combinations are not only easier, but they can be just as impactful. For example, a few stripes of blue and bronze can scream "Ravenclaw" just as loudly as a detailed crest. So, let's get into some specific ideas for each house, shall we?
House | Color Scheme | Design Ideas |
|---|---|---|
Gryffindor | Scarlet and Gold | Red base with gold stripes, alternating red and gold nails, gold glitter accent |
Slytherin | Green and Silver | Green base with silver stripes, silver glitter accent, alternating green and silver nails |
Ravenclaw | Blue and Bronze | Blue base with bronze stripes, alternating blue and bronze nails, bronze glitter accent |
Hufflepuff | Yellow and Black | Yellow base with black stripes, alternating yellow and black nails, black polka dots on a yellow nail |
Magical Motifs: Easy Harry Potter Nail Designs Using Stickers and Stencils
Magical Motifs: Easy Harry Potter Nail Designs Using Stickers and Stencils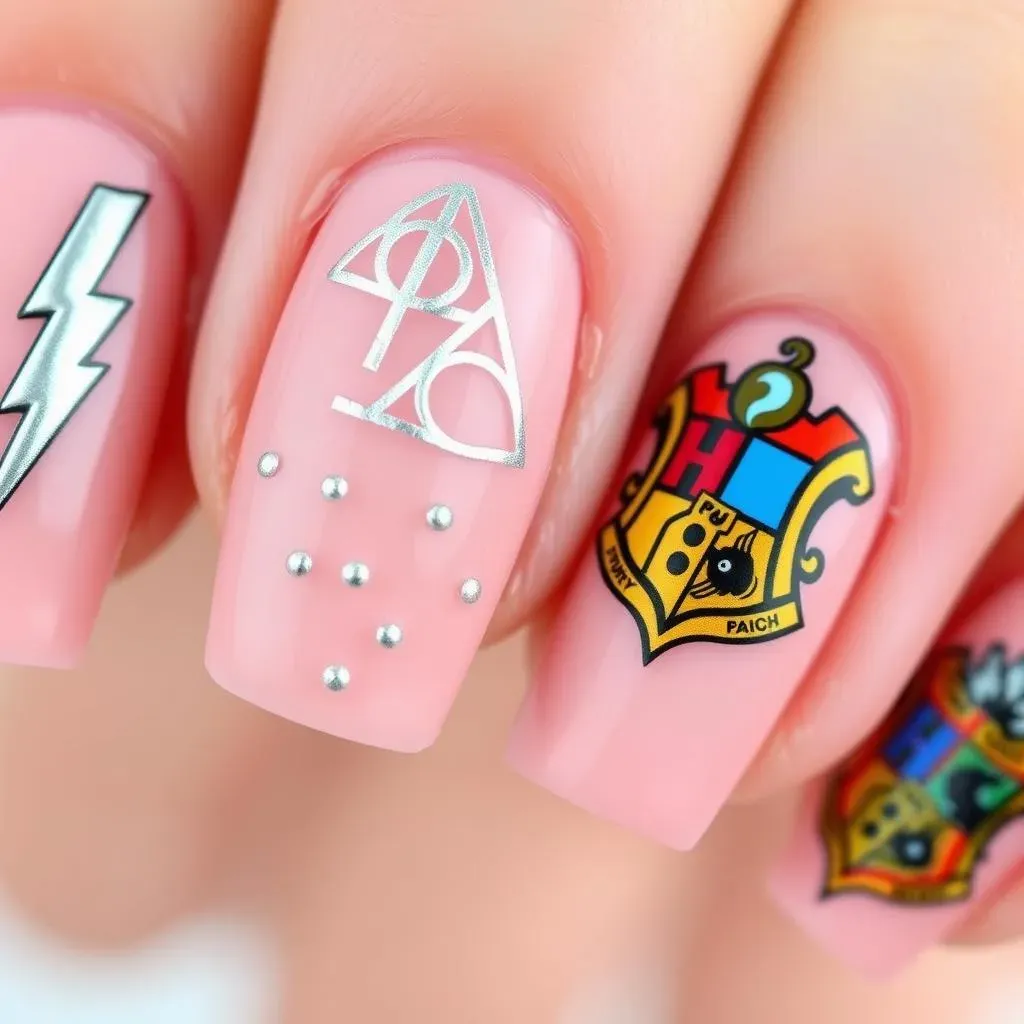
Alright, so you've nailed the basic colors and house pride designs, and now you’re thinking, "Okay, but what about some real magic?" I hear you! That's where stickers and stencils come in. These little beauties are like having a charm that does all the hard work for you. Forget trying to freehand a perfect Deathly Hallows symbol or a tiny golden snitch – stickers and stencils are here to save the day. You can find Harry Potter themed nail stickers and stencils online, or even in some craft stores. They range from simple lightning bolts and glasses to more detailed symbols like the Hogwarts crest and house animals. The best part? They're super easy to use. Just stick them on, paint over them, or peel them off – it's like magic, but without the wand waving!
I remember one time, I tried to paint the Hogwarts castle on my nails using a super fine brush. It looked less like a majestic castle and more like a toddler's doodle. That's when I discovered the magic of stencils. I felt like I had unlocked a cheat code for nail art! Suddenly, I could have intricate designs without spending hours and hours trying to paint them. The key is to start with a good base coat, let it dry completely, and then carefully apply your sticker or stencil. Once you've got your design, you can add a top coat to make it last longer. It's all about making it easy and fun, so you can spend more time enjoying your magical nails and less time struggling with tiny brushes.
Motif | Sticker/Stencil Type | Application Tip |
|---|---|---|
Lightning Bolt | Sticker or stencil | Apply over a contrasting base color |
Deathly Hallows | Stencil | Use a metallic polish for a striking look |
Golden Snitch | Sticker | Place two small silver dots around the sticker for extra effect |
Hogwarts Crest | Stencil | Use multiple colors to fill in the crest details |
Beyond the Basics: Easy Harry Potter Nail Designs with a Little Extra Flair
Beyond the Basics: Easy Harry Potter Nail Designs with a Little Extra Flair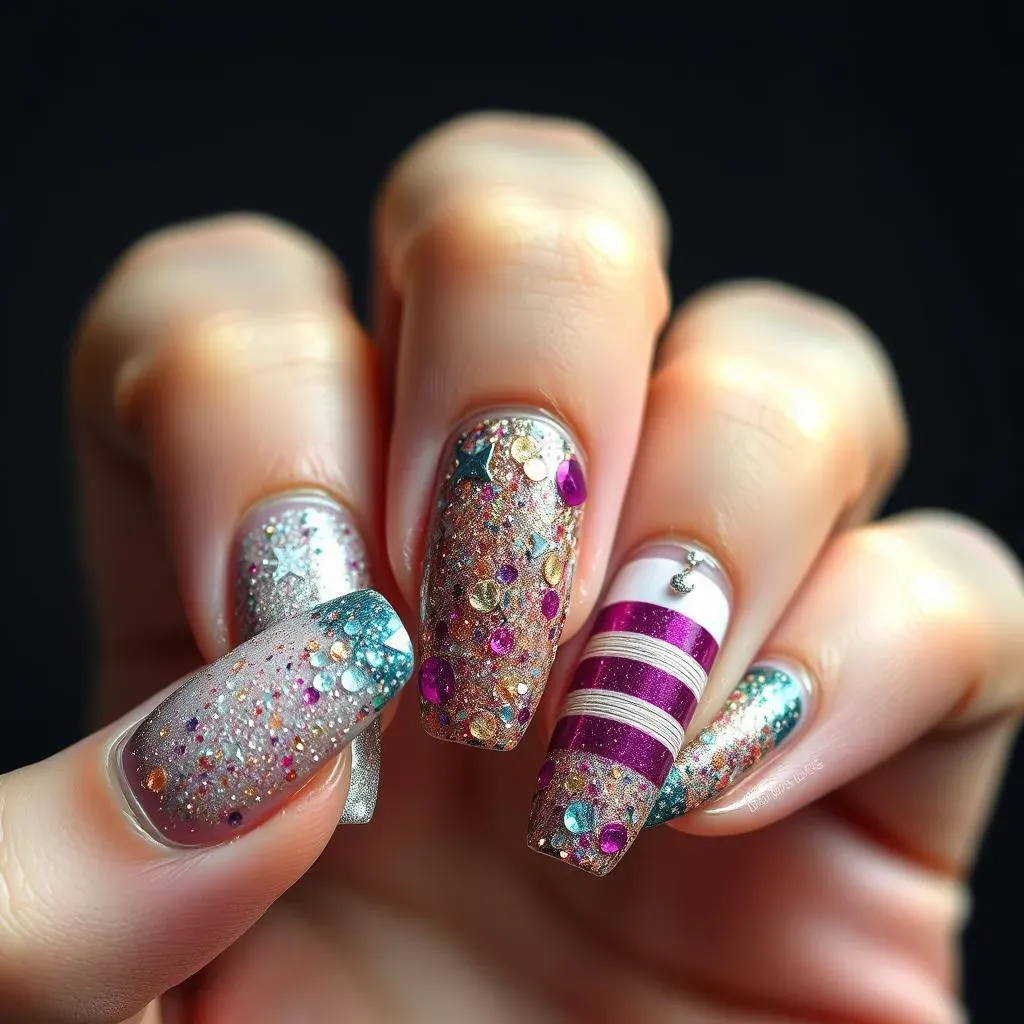
Adding a Touch of Sparkle
Okay, so you've got the basics down, you've rocked your house colors, and you've mastered stickers and stencils. Now, let's add a little bit of extra oomph! We're talking about subtle ways to take your Harry Potter nail designs to the next level without needing a magic wand or a degree in nail art. Think of it like adding a bit of Felix Felicis to your manicure – just a touch of something special to make it really shine. We're not going for crazy complicated, but we're definitely not sticking to plain polish anymore. We can use things like glitter, nail tape, and even some simple dotting tools to create some awesome effects.
I remember when I first tried adding glitter to my nails. I went a bit overboard and ended up looking like I had just wrestled a unicorn. It was a total mess, but it taught me a valuable lesson: less is definitely more when it comes to sparkle. Now, I like to use glitter sparingly, maybe just on a single accent nail or as a subtle top coat. It adds a touch of magic without being too overwhelming. And nail tape? That stuff is a game-changer! You can use it to create crisp lines and geometric designs, perfect for adding a modern twist to your wizarding nails.
Technique | Description | Effect |
|---|---|---|
Glitter Top Coat | A thin layer of glitter polish over your base color | Adds a subtle sparkle |
Glitter Accent Nail | One nail completely covered in glitter | Creates a focal point |
Nail Tape | Thin strips of tape used to create lines and shapes | Adds clean, modern designs |
Simple Techniques, Big Impact
Let's talk about some easy techniques that can really elevate your Harry Potter nail art game. We're not going to be doing any crazy sculpting or airbrushing, but we will be using some simple tools and tricks to create some awesome effects. For example, a dotting tool (or even just a toothpick) can be used to create polka dots, flowers, or even tiny stars. You can also use a sponge to create a gradient effect, which is perfect for a moody Slytherin look or a fiery Gryffindor design. And don't forget about layering – sometimes, adding a sheer or shimmery polish over a solid color can create a whole new dimension.
I found some great ideas online, and that really help me to improve my designs. I was amazed at how simple some of these techniques are, but how much of an impact they can make. For instance, I learned how to use a small piece of sponge to create a gradient effect. It's seriously the easiest thing ever, but it looks like you spent hours on it. I even tried to create a night sky effect with a dark blue gradient and some tiny white dots for stars. I was so proud of how it turned out, and it was a great way to show off my love for the wizarding world with a little extra flair. And the best part is, all of these techniques are super accessible and don't require any special skills or equipment.
Putting It All Together
Now that you've got all these ideas and techniques in your arsenal, it's time to put them all together and create some truly unique Harry Potter nail designs. Don't be afraid to experiment and mix and match different colors, stickers, and techniques. Maybe you want to combine a glitter accent nail with some nail tape stripes, or layer a sheer polish over a gradient base. The possibilities are endless! The most important thing is to have fun and express your own personal style. After all, your nails are just another canvas for your creativity, and what better way to show your love for the wizarding world than with a little bit of magic on your fingertips?
I always loved to create my own designs and to be honest, sometimes it's a hit or miss, but it's important to keep going! Sometimes, the best designs come from happy accidents. So, don't be afraid to try new things, and don't worry if it doesn't turn out perfect the first time. The point is to have fun and let your creativity shine! After all, you're a wizard, or a witch, and you can make your nails look as magical as you want them to be!
The Magic is in Your Hands: Wrapping Up Your Harry Potter Nail Adventure
So, there you have it! From simple stripes to sticker magic, creating easy Harry Potter nail designs is totally within your grasp. You don't need to be a master wizard or a nail art pro to show off your Hogwarts pride. The key is to have fun and let your creativity flow. Whether you're repping your house colors, flashing a Golden Snitch, or just adding a subtle lightning bolt, your nails are now a canvas for your fandom. Remember, practice makes perfect, so don't be discouraged if your first few attempts aren't exactly wizard-worthy. Keep experimenting, and soon you'll be conjuring up magical manicures that even Dumbledore would admire. Now go forth and let your nails shine with the spirit of the wizarding world!