Table of Contents
Ready to transform your nails into miniature masterpieces? This article is your ultimate guide to mastering easy black and red nail designs. Whether you're a nail art newbie or looking to refresh your skills, we've got you covered. We'll start with super-simple designs perfect for beginners, guiding you through step-by-step instructions and helpful tips. Then, we'll level up with more intricate yet still achievable looks, showcasing the versatility of this classic color combination. Think bold geometric patterns, elegant ombré effects, and even playful accents – all while keeping things manageable and fun. Get ready to explore a world of creative possibilities with our curated collection of easy black and red nail designs. You'll discover that achieving salon-worthy results at home is easier than you think! Let's dive into the world of easy black and red nail designs and unleash your inner nail artist.
Simple Black and Red Nail Art Ideas for Beginners
Simple Black and Red Nail Art Ideas for Beginners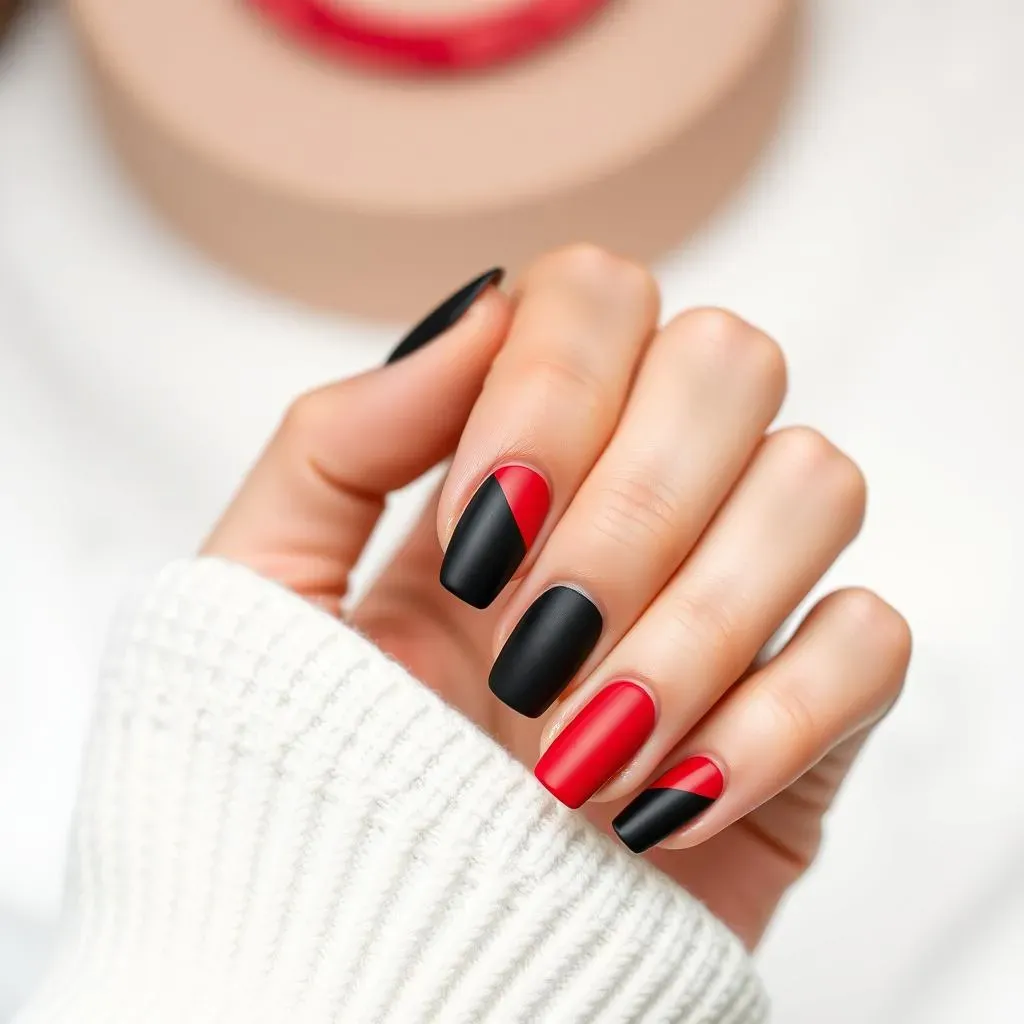
The Classic Two-Tone Look
Let's start with the easiest design: a simple two-tone manicure. Paint all your nails black, letting them dry completely. Then, use a fine brush or striping tape to add a single, clean red stripe along the tip of each nail, mimicking a French manicure but with a bold twist. It's chic, it's simple, and it's perfect for beginners. For extra staying power, consider using a base coat and a top coat. This is a great way to get comfortable with precision and control. You can also try different variations, like a thick red stripe or a thin one, depending on your preference.
This simple approach is surprisingly versatile. Pair it with a casual outfit or a more formal look – it works beautifully in any situation. If you want to add a little more pizzazz, try using a matte black polish and a glossy red one for a lovely contrast. Check out these easy and simple nail art designs for more inspiration.
Step | Action |
|---|---|
1 | Apply base coat |
2 | Paint nails black |
3 | Add red tip |
4 | Apply top coat |
Adding Simple Dots and Stripes
Once you've mastered the two-tone look, let's add some fun details! Using a dotting tool or even a toothpick, add small red dots to a black base. You can create a pattern, or simply scatter them randomly for a playful, slightly messy look. This is a great way to express your creativity without too much effort. Remember, practice makes perfect! The more you experiment, the better you'll get at creating even dots and precise lines. Don't be afraid to try different sizes and arrangements.
Another easy variation involves painting thin red stripes onto a black base. You can use striping tape for clean lines, or freehand it for a more artistic touch. Try horizontal, vertical, or diagonal stripes – the possibilities are endless! For a more polished finish, remember to let each coat dry completely before applying the next. For more festive ideas, explore our easy holiday nail designs.
- Use a dotting tool or toothpick for dots
- Experiment with different stripe patterns
- Let each coat dry completely
Half-Moon Magic: A Twist on the Classic
The half-moon manicure is a timeless classic, and it's incredibly easy to recreate with black and red. Paint your nails black and, before it dries completely, use a small piece of tape or a stencil to create a half-moon shape at the base of your nail. Then, fill in the half-moon with red polish. This creates a subtle yet elegant look that's perfect for any occasion. Remember to carefully remove the tape while the polish is still slightly wet to avoid smudging.
This technique is surprisingly versatile. You can adjust the size and shape of the half-moon to create a different look each time. Experiment with different shades of red and black to find your perfect combination. For even more inspiration, check out these easy nail designs for short nails, which are perfect for beginners.
Stunning and Easy Black and Red Nail Designs You Can DIY
Stunning and Easy Black and Red Nail Designs You Can DIY
Ombré Elegance: A Gradient of Gorgeous
Let's move on to something a bit more sophisticated: an ombré effect. This creates a seamless blend of colors, giving your nails a chic and polished look. Start with a base coat, then apply a gradient of red and black using a makeup sponge. Dab the sponge onto the nail, blending the colors together for a soft transition. It's surprisingly simple, and the result is stunning. Remember to let each layer dry before applying the next for a smooth finish. Experiment with different gradient styles – a sharp transition or a softer, more diffused blend – to find your favorite look. For additional inspiration, check out these easy acrylic nail designs.
The beauty of the ombré technique lies in its adaptability. You can easily adjust the colors and the intensity of the gradient to create a unique design every time. Consider adding some glitter or shimmer for extra sparkle! A clear top coat will seal in the design and add shine, ensuring your manicure lasts longer. For more sophisticated ideas, check out our easy nail designs for special occasions.
- Use a makeup sponge for a smooth gradient
- Experiment with different color combinations
- Add glitter or shimmer for extra flair
Geometric Chic: Lines, Shapes, and Style
Geometric designs are incredibly trendy right now, and they're surprisingly easy to create with black and red. Using striping tape or a fine brush, create clean lines and shapes on a base coat of either red or black. Experiment with different patterns – stripes, checks, triangles – to find your favorite look. You can also use dots or other small details to add extra interest. The key is to keep things simple and focus on creating clean, precise lines.
Geometric nail art offers endless possibilities for creativity. Try combining different shapes and sizes to create a unique and eye-catching design. You can also experiment with different placement and color combinations for a truly personalized look. Remember to seal your design with a top coat for a long-lasting manicure. For more edgy designs, take a look at our selection of cool and easy nail art designs.
Shape | Tip |
|---|---|
Stripes | Use striping tape for clean lines |
Checks | Practice your precision! |
Triangles | Use a stencil for perfect shapes |
Level Up Your Manicure Game: More Advanced Easy Black and Red Nail Designs
Level Up Your Manicure Game: More Advanced Easy Black and Red Nail Designs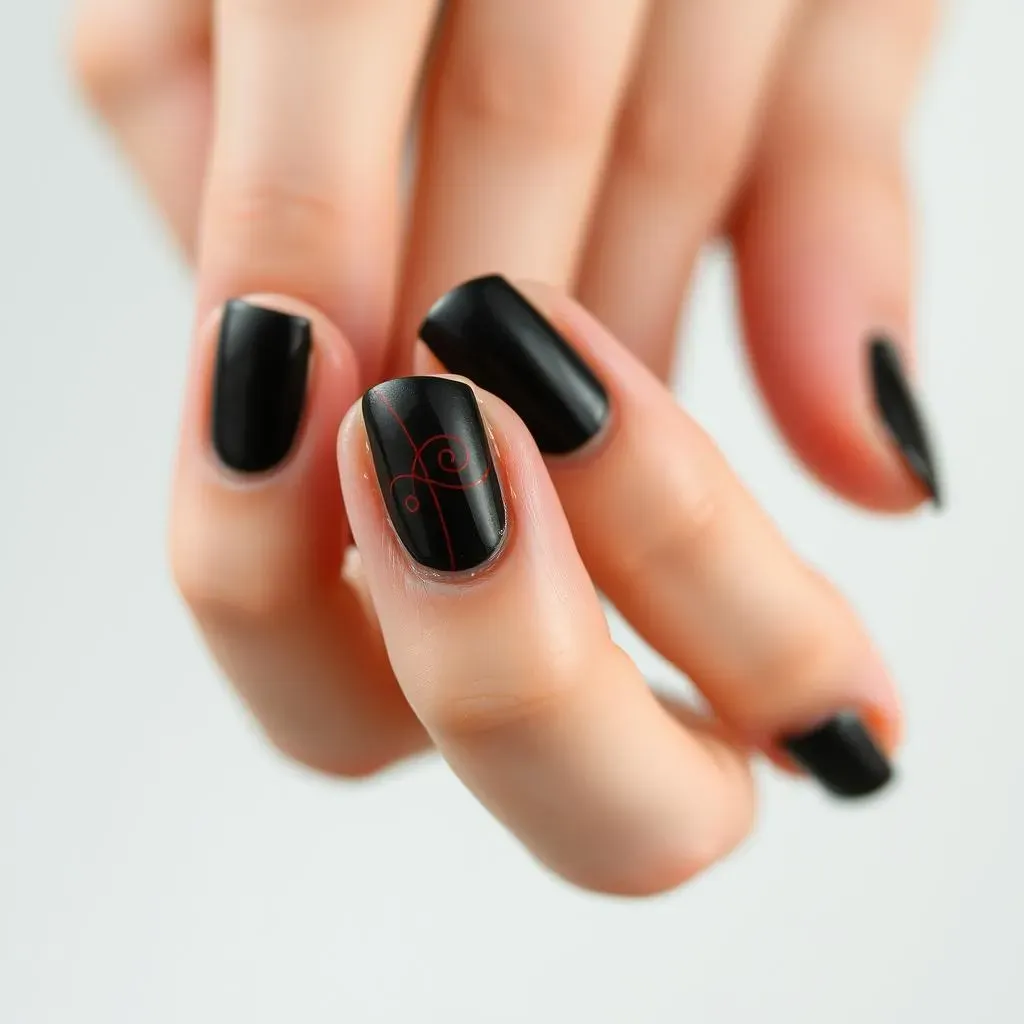
Subtle Accents: Adding a Touch of Red
Let's elevate our designs with subtle accents. Start with a base coat of black. Then, using a thin brush, paint delicate red lines or swirls near the cuticle, or create a thin red border along the edge of each nail. This creates a sophisticated, understated look that's perfect for those who prefer a more minimalist style. You can also add tiny red hearts or other small details for a touch of whimsy. Remember, less is often more when it comes to nail art. A little bit of red can go a long way.
This technique is all about precision and control. Take your time, and don't be afraid to use a toothpick or a fine-tipped brush to create clean lines and precise details. For more intricate designs, check out these easy nail art line designs for inspiration. Experiment with different placements and patterns to create a truly unique look. A clear top coat will help to protect your design and add a glossy shine.
- Use a thin brush for precise lines
- Experiment with different placements
- Add small details for a touch of whimsy
Floral Fantasies: Easy Red Blooms on Black
Introduce a touch of romance with simple floral designs. Start with a black base. Then, using a small brush and red polish, paint tiny flowers on one or two accent nails. Keep the flowers simple – a few petals and a small center are all you need. You can add small leaves or stems for extra detail. This creates a delicate and feminine look that's perfect for spring or summer, but also works well all year round.
Floral nail art doesn't have to be complicated. Focus on creating simple, elegant shapes that are easy to replicate. Don't be afraid to experiment with different flower types and arrangements. For more floral inspiration, check out our collection of easy floral nail designs. Remember to seal your design with a top coat to protect your masterpiece and add a glossy finish. A little bit of patience goes a long way when creating these pretty blooms.
Step | Description |
|---|---|
1 | Apply base coat of black |
2 | Paint simple red flowers |
3 | Add leaves and stems (optional) |
4 | Apply top coat |
Negative Space Nail Art: A Chic and Minimalist Approach
Negative space nail art is all about letting the natural nail show through. For a black and red version, paint a solid black base on most of your nails. On one or two accent nails, leave some of the nail unpainted, creating a unique negative space design. You can create simple shapes, like a half-moon or a stripe, or let your creativity guide you. This technique creates a minimalist yet chic look that's both modern and stylish.
Negative space designs are a great way to experiment with different shapes and patterns. You can also incorporate small details, such as dots or lines, into the negative space for extra interest. For more minimalist inspiration, browse through our easy and simple nail art designs. Remember, simplicity can be incredibly striking. A well-executed negative space design can be just as impactful as a more intricate design.