Table of Contents
Ready to give your nails a glamorous makeover without the salon price tag or complicated techniques? This article is your ultimate guide to easy fake nail designs! We're diving headfirst into a world of stunning nail art that's surprisingly simple to achieve, even if you're a complete beginner. Forget those intimidating tutorials – we've curated a collection of trendy and accessible easy fake nail designs perfect for any skill level. First, we'll explore beginner-friendly options, perfect for those just starting their nail art journey. Then, we'll showcase some of the hottest easy fake nail design trends, giving you plenty of inspiration for your next manicure. Finally, we'll share some pro tips and tricks to help you master the art of applying and maintaining your easy fake nails, ensuring a flawless and long-lasting finish. Get ready to unleash your inner nail artist and create salon-worthy nails from the comfort of your own home! Let's get started with these amazing easy fake nail designs.
Easy Fake Nail Designs for Beginners
Easy Fake Nail Designs for Beginners
Let's face it, perfecting a salon-worthy manicure at home can feel like climbing Mount Everest in flip-flops. But fear not, aspiring nail artists! We're starting with the absolute basics, the "easy peasy, lemon squeezy" of easy fake nail designs. Think simple solid colors, maybe a subtle accent nail, or even just a touch of glitter. These are your stepping stones to nail art nirvana. We’re talking designs so straightforward, even *I* could do them (and trust me, my attempts at intricate nail art usually end in a frantic trip to the nail salon for damage control!). Start with press-on nails; they're a fantastic way to practice application and removal without the commitment (or potential mess) of glue-on sets. For a truly beginner-friendly option, consider solid-color press-ons. Choose your favorite shade – a classic red, a cheerful yellow, or a sophisticated nude – and get ready to be amazed at how effortlessly chic your nails can look.
Design | Difficulty | Supplies Needed |
|---|---|---|
Solid Color Press-ons | Beginner | Press-on nails, nail file, cuticle pusher |
Accent Nail with Glitter | Beginner | Press-on nails, glitter polish, top coat |
Once you've mastered the art of applying press-ons, you can gradually increase the difficulty. Try adding a single accent nail with a different color or design. A simple glitter accent nail is a fantastic choice; it adds a touch of sparkle without requiring any advanced techniques. Check out our post on easy pink nail designs for some inspiration. Remember, practice makes perfect! Don't get discouraged if your first few attempts aren't flawless. The key is to have fun and experiment with different colors and styles until you find what works best for you. You'll be surprised how quickly you improve.
- Start with press-on nails for easy application and removal.
- Choose simple designs like solid colors or a single glitter accent nail.
- Practice makes perfect! Don't be afraid to experiment.
And remember, even the simplest designs can look incredibly chic. A perfectly polished single color can be just as stylish as the most intricate nail art. If you're looking for more inspiration, take a peek at our guide on easy everyday nail designs. It's full of ideas that are both simple and sophisticated.
Trendy & Easy Fake Nail Designs to Try Now
Trendy & Easy Fake Nail Designs to Try Now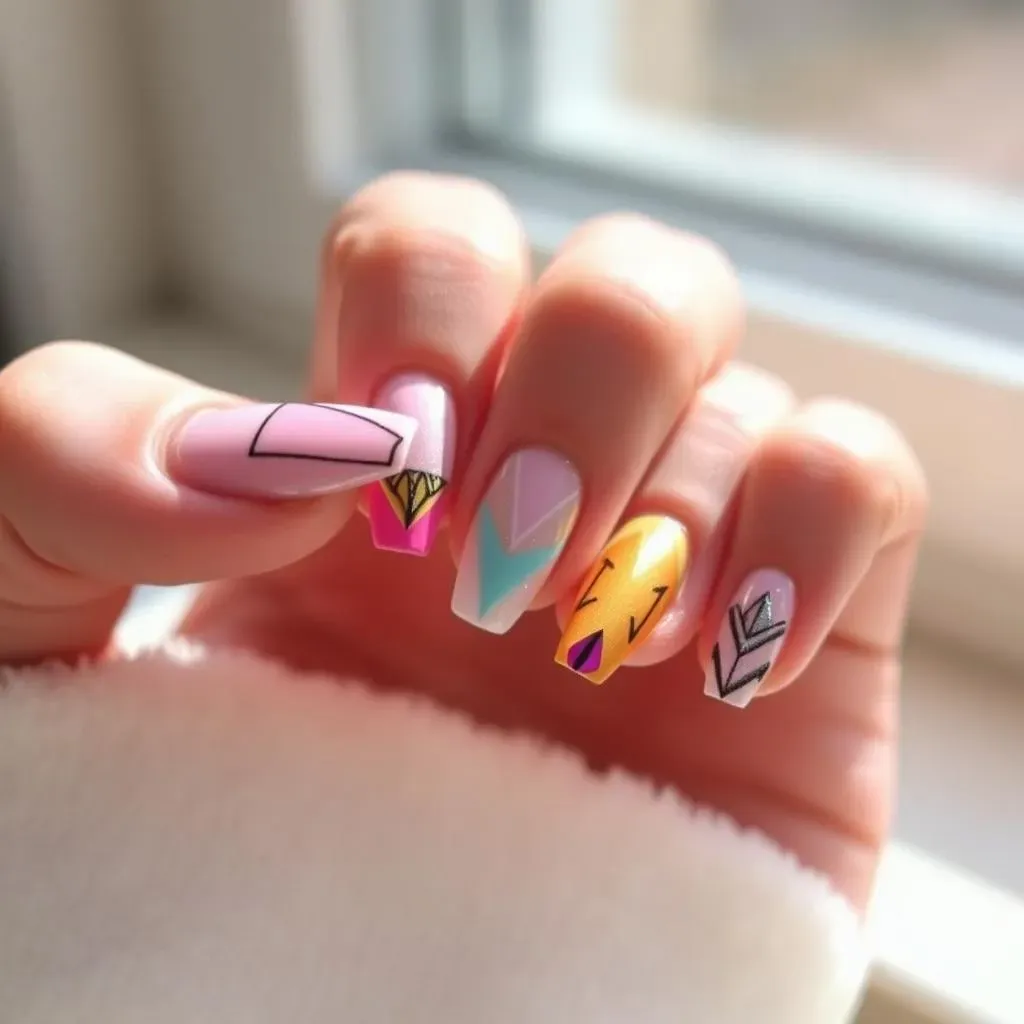
Subtle Shimmer and Shine
Let's move beyond the basics and explore some easy fake nail designs that are totally on-trend! Think subtle shimmers and shines. A simple nude or pastel base with a touch of glitter or metallic foil can elevate your look instantly. This is perfect for a polished, everyday look that's both chic and understated. You can achieve this easily with press-on nails that already have the shimmer incorporated, or by adding a layer of glitter polish over solid-colored press-ons. This is a great way to experiment with different textures and finishes without getting bogged down in complex techniques. Remember, a little goes a long way! Too much glitter can be overwhelming, so start with a light dusting and build up the intensity gradually. For more ideas on subtle nail looks, check out our article on easy pink nail designs.
Another fantastic option is using nail strips with a subtle holographic or iridescent finish. These are incredibly easy to apply and remove, making them ideal for busy individuals who want a quick and glamorous manicure. Simply stick them on, file the edges, and apply a top coat for a flawless finish. Nail strips are also a great way to experiment with different patterns and designs without the need for any specialized tools or skills. They come in a huge variety of colors and finishes, so you're sure to find something that matches your personal style.
Design | Difficulty | Key Feature |
|---|---|---|
Subtle Shimmer Press-ons | Easy | Glitter or metallic accents |
Holographic Nail Strips | Easy | Iridescent or rainbow effect |
Geometric Nail Art
Geometric nail art is another huge trend that's surprisingly easy to replicate using fake nails. Think simple stripes, polka dots, or even chevrons. You can achieve these looks using nail polish strips, stickers, or even a steady hand and some fine-tipped nail art brushes. If you're using press-on nails, choose a set with a plain base color and then add your geometric designs using nail art pens or stickers. For a modern twist, try combining different geometric patterns or using contrasting colors. This is a great way to express your creativity and personality while still maintaining a clean and sophisticated look. Need some inspiration? Check out our collection of easy nail art designs for some fantastic ideas.
Alternatively, consider using pre-designed nail decals with geometric patterns. These are incredibly simple to use – just apply the decal, seal it with a top coat, and you’re done! This is a fantastic option for those who are short on time or lack confidence in their nail art skills. Pre-designed decals are available in countless styles, from minimalist lines and dots to more intricate geometric designs. They’re a great way to achieve a professional look without the effort of freehand painting. Remember to choose decals that are appropriate for the shape and length of your chosen press-on nails.
- Use nail strips or stickers for easy geometric designs.
- Combine different patterns or colors for a unique look.
- Pre-designed decals are a great time-saving option.
Mastering Easy Fake Nail Designs: Tips & Tricks
Preparing Your Nails
Before you even think about slapping on those fake nails, prepping your natural nails is key! Think of it as laying a solid foundation for a skyscraper – you wouldn't want it to crumble, would you? Start by gently pushing back your cuticles with a cuticle pusher. Avoid cutting them, as this can lead to infection. Then, lightly buff the surface of your nails to remove any oils or residue. This helps the adhesive bond better, preventing those dreaded lifts and pops. Finish by cleaning your nails with a non-acetone nail polish remover to ensure a perfectly clean surface. This simple step makes a huge difference in the longevity of your manicure. For more tips on nail care, check out our article on easy everyday nail designs.
Choosing the right size and shape of fake nails is also crucial. Measure your nails carefully before selecting your press-ons. Using nails that are too big or too small will look awkward and may not adhere properly. Consider your nail shape too – almond, square, coffin – and choose press-ons that complement your natural nail shape. A little filing might be needed to perfect the fit, but it's much easier to adjust press-ons than it is to redo a whole set. This extra step will ensure a more natural and polished look.
- Gently push back cuticles.
- Lightly buff nails to remove oils.
- Clean nails with non-acetone remover.
- Choose appropriately sized and shaped press-ons.
Applying and Removing Fake Nails
Applying fake nails might seem daunting, but with a little patience and the right technique, it's a breeze! Start by applying a thin layer of nail glue to the back of the fake nail and carefully press it onto your natural nail. Hold it in place for a few seconds to ensure proper adhesion. If you're using adhesive tabs, follow the manufacturer's instructions carefully. Once all your nails are in place, gently file down any excess nail material to create a smooth, even surface. A top coat of clear polish can add extra shine and protection, extending the life of your manicure. For more inspiration on nail application, have a look at our guide to easy DIY nail designs.
Removing fake nails is just as important. Avoid ripping them off, as this can damage your natural nails. Instead, soak your nails in a bowl of warm, soapy water for a few minutes to soften the adhesive. Then, gently pry off the nails using a cuticle pusher or orangewood stick. If the nails are stubborn, you can use a non-acetone nail polish remover to help loosen the adhesive. Once the nails are removed, gently clean your natural nails and moisturize them with cuticle oil. This keeps them healthy and hydrated. Taking care of your nails during removal is essential for preventing damage and maintaining their health.
Step | Action | Tip |
|---|---|---|
1 | Apply glue/tabs | Use a thin layer |
2 | Press onto nail | Hold for a few seconds |
3 | File excess material | Create a smooth surface |
4 | Apply top coat | Add shine and protection |
Maintaining Your Easy Fake Nails
Even the easiest fake nail designs require a little TLC to stay looking their best! Avoid using your nails as tools – this can cause chipping and breakage. Try to keep your hands moisturized to prevent dryness and cracking around the edges. This simple act will keep your manicure looking fresh and flawless. Regularly apply cuticle oil to keep your cuticles hydrated and healthy. This is crucial for preventing hangnails and keeping your nails looking their best. For more ideas, check out our post on easy nail designs for special occasions.
And finally, remember that even fake nails need a little break every now and then! Give your natural nails a chance to breathe by removing your fake nails every couple of weeks. This allows them to recover and prevents damage. Use this time to pamper your natural nails with nourishing treatments and strengtheners. This will keep them healthy and strong, ready for your next amazing nail art creation! Don't forget to check out our article on best easy nail designs for more inspiration.