Table of Contents
Ready to transform your nails without spending hours in a salon or needing a degree in nail art? This article is your ultimate guide to the best easy nail designs, perfect for everyone from complete beginners to seasoned mani enthusiasts. We'll start by exploring simple yet stunning designs that are incredibly easy to recreate at home, even if your artistic skills are a little rusty. Then, we'll level up, revealing clever techniques and tips that unlock more advanced designs, expanding your nail art possibilities. Get ready to discover seasonal inspiration, with ideas tailored to each time of year, from spring pastels to autumnal hues. Finally, we'll show you how to add extra pizzazz with embellishments and accessories, taking your best easy nail designs to the next level. So, grab your favorite nail polish, and let's dive into a world of effortless elegance and creative expression – because stunning nails shouldn't be complicated!
Effortless Elegance: Mastering the Best Easy Nail Designs for Beginners
Effortless Elegance: Mastering the Best Easy Nail Designs for Beginners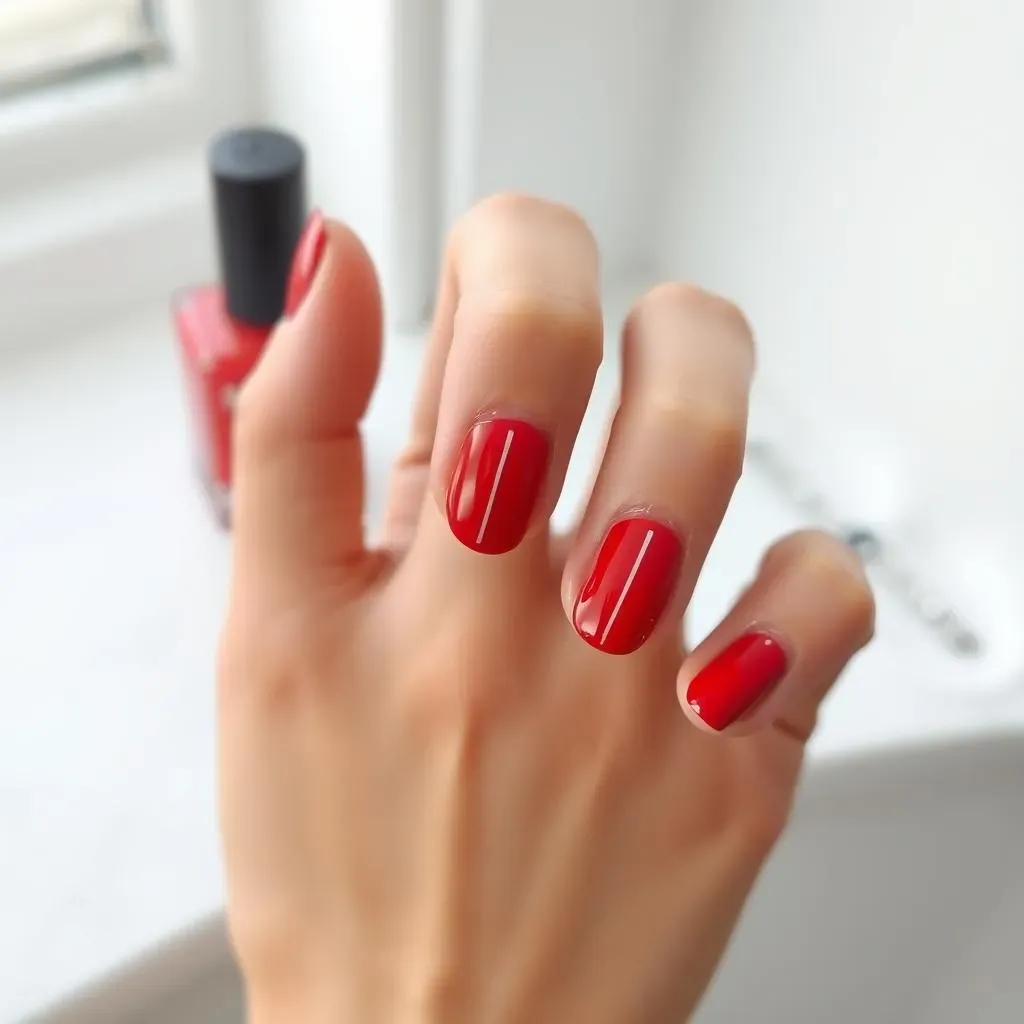
Solid Colors and Simple Shapes
Let's kick things off with the absolute basics: solid colors! This isn't as boring as it sounds. A perfectly polished coat of your favorite shade can be incredibly chic. Think a classic red, a sophisticated nude, or a vibrant summery yellow. The key is to focus on precision and a flawless finish. Make sure your nails are clean and prepped before applying your polish, using a base coat to protect your nails and help the color last longer. Two thin coats are better than one thick one, preventing smudges and ensuring even coverage. Finish with a top coat for extra shine and durability. For inspiration on simple shapes, check out our post on simple almond nail designs.
Don't underestimate the power of a good manicure! Even a simple solid color can look amazing when your nails are well-shaped and clean. Take your time to file them neatly, and push back your cuticles for a polished look. Consider using a cuticle oil to keep them healthy and hydrated. A little extra care goes a long way!
Color | Shape | Tip |
|---|---|---|
Classic Red | Oval | Use a base coat |
Nude Pink | Square | Two thin coats of polish |
Bright Yellow | Rounded | Top coat for shine |
Adding Subtle Accents
Once you've mastered the art of a perfect solid color, it's time to add some subtle accents. This is where you can start to get creative without getting overwhelmed. A simple design like a thin stripe down the center of each nail can instantly elevate your look. Or try adding tiny dots using a toothpick or a dotting tool – it's easier than you think! You can use different colors to create a fun, playful look, or stick to a single color for a more minimalist vibe. For extra inspiration, check out these cute and easy nail art designs.
Remember, less is more when it comes to beginner-friendly nail art. Start with one or two accent nails, and don't worry about perfection. The beauty of these designs lies in their simplicity and effortless charm. Have fun experimenting with different colors and patterns, and don't be afraid to make mistakes – it's all part of the learning process!
- Thin stripes
- Tiny dots
- Simple geometric shapes
Beyond Basic: Exploring More Advanced Best Easy Nail Designs Techniques
Beyond Basic: Exploring More Advanced Best Easy Nail Designs Techniques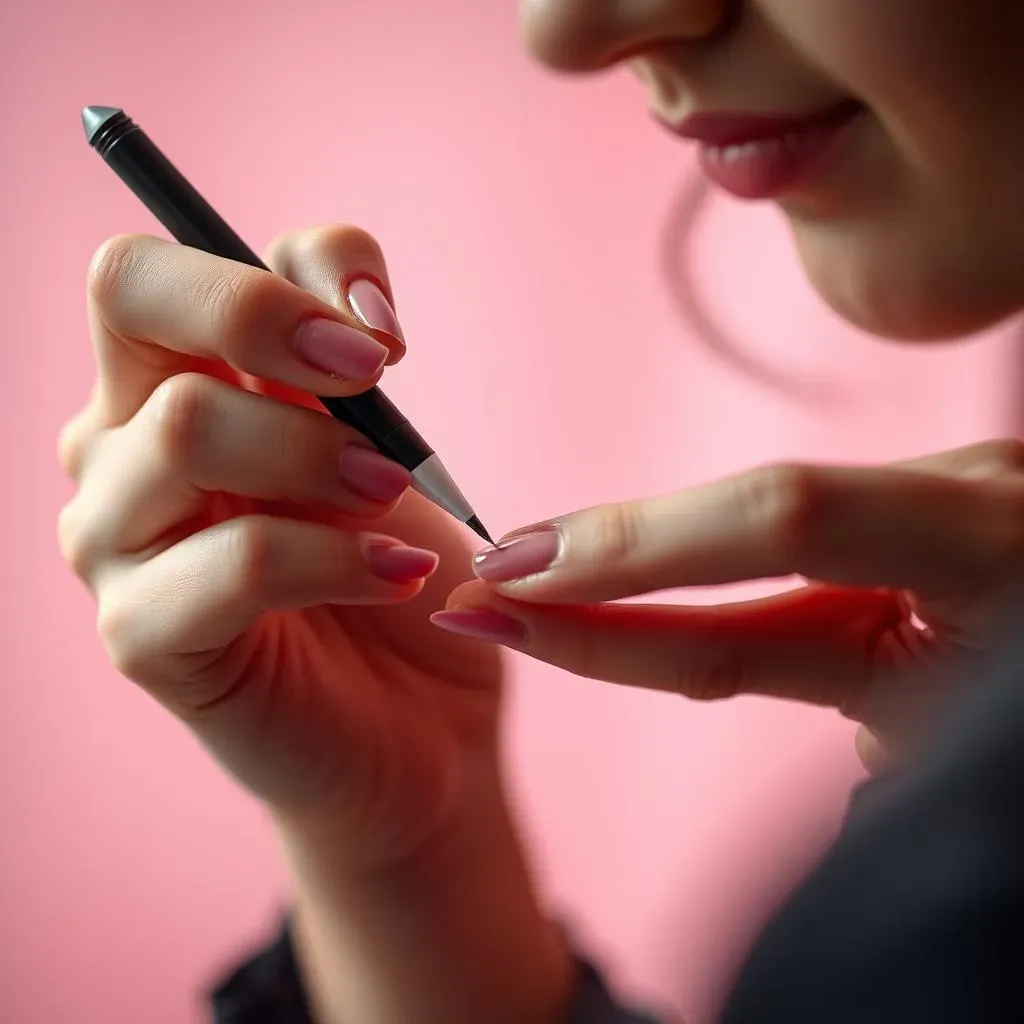
Nail Art Pens and Detailing
Ready to take your nail art to the next level? Nail art pens are your new best friends! These tiny tools allow for incredible precision, letting you create intricate designs that were previously impossible with just a regular polish brush. Think delicate flowers, geometric patterns, or even tiny lettering. Practice makes perfect, so start with simple designs and gradually work your way up to more complex ones. For some seriously cool inspiration, check out our article on easy nail art pen designs.
One tip for using nail art pens? Don't overload the pen with polish! A little goes a long way, and too much polish can make your lines smudge and look messy. If you make a mistake, don't panic! A little nail polish remover on a cotton swab can easily fix any errors. And remember, nail art is all about having fun and expressing your creativity, so don't be afraid to experiment!
- Practice makes perfect
- Start with simple designs
- Use a light hand
Exploring Gradient and Ombre Effects
Gradients and ombre effects are another fantastic way to add visual interest to your nails without requiring tons of skill. These techniques involve blending two or more colors together to create a seamless transition. You can achieve this using a makeup sponge, a small brush, or even your fingertips. Start with a base coat of one color, then apply the second color slightly overlapping the first, blending the two colors together gently. For more guidance, explore these easy spring nail designs which often feature beautiful gradients.
Experiment with different color combinations to find your favorites. Pastel shades create a soft and romantic look, while bolder colors can result in a more dramatic effect. You can also try using different techniques to achieve varying levels of blending, from subtle transitions to more vibrant color changes. Don't forget to finish with a top coat to seal in your design and add shine!
Technique | Colors | Effect |
|---|---|---|
Sponge | Pastel pink and purple | Soft and romantic |
Brush | Bright blue and green | Vibrant and summery |
Fingers | Nude and gold | Subtle and elegant |
Seasonal Style: Best Easy Nail Designs for Every Time of Year
Seasonal Style: Best Easy Nail Designs for Every Time of Year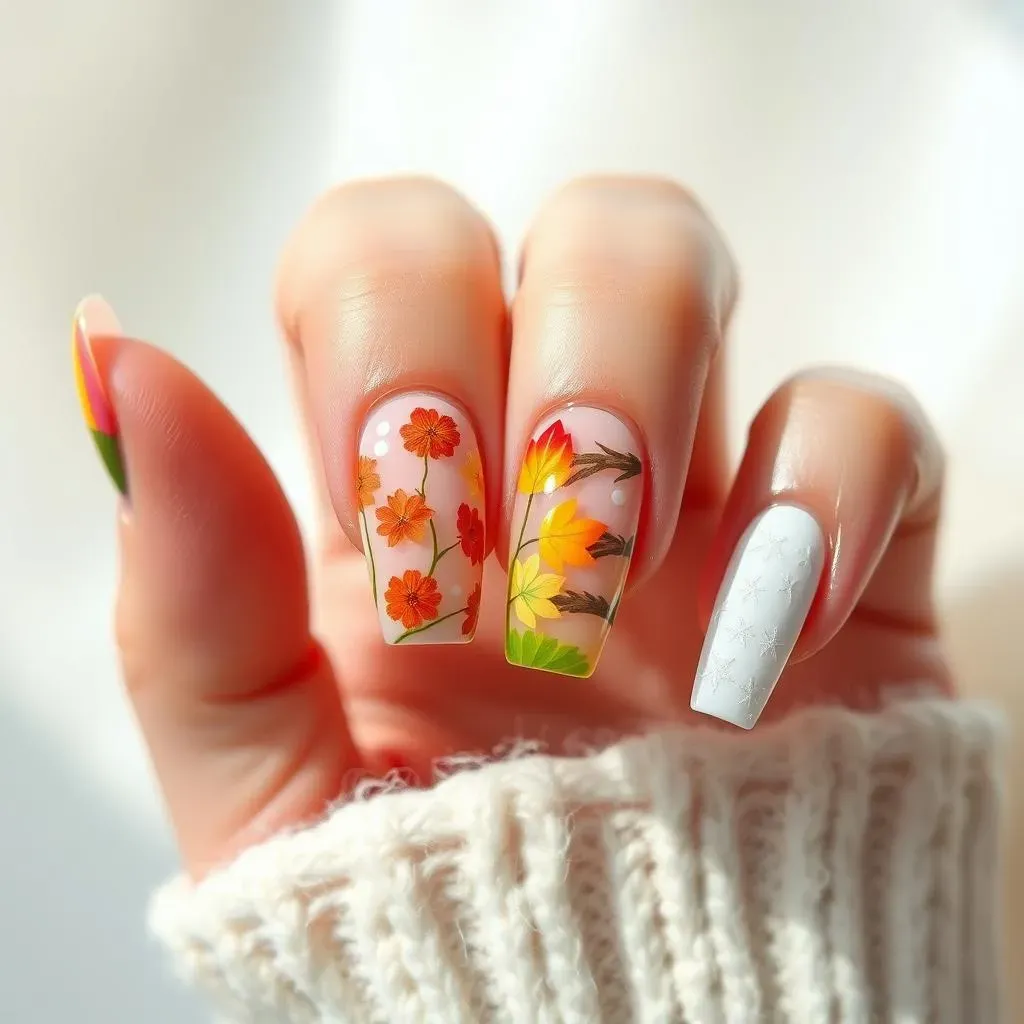
Spring into Color
Spring is all about fresh starts and vibrant colors! Think pastel shades like soft pinks, light blues, and sunny yellows. These delicate hues are perfect for creating a cheerful and feminine look. You can keep it simple with a solid color, or add some subtle accents like tiny flowers or polka dots. For even more spring inspiration, check out our collection of easy spring nail designs.
A fun idea is to create a gradient effect using two or three pastel shades. This technique is surprisingly easy to master and creates a beautiful, dreamy look. Don't be afraid to experiment with different color combinations – the possibilities are endless! And remember, a touch of glitter or shimmer can add some extra sparkle to your spring mani.
- Pastel pinks
- Light blues
- Sunny yellows
- Floral accents
Summer Brights
Summer is the perfect time to go bold with bright, vibrant colors! Think neon pinks, sunny oranges, and electric blues. These energetic shades are perfect for capturing the fun and carefree spirit of the season. You can create a simple but striking look with a solid color, or try adding some playful accents like stripes, dots, or geometric shapes. For some fun summer ideas, check out our easy summer nail art designs.
Another great option is to incorporate tropical themes, such as palm leaves, pineapples, or flamingos. These designs can be created using nail art pens, stencils, or even nail stickers. You can also add some extra sparkle with glitter or holographic polish. No matter what you choose, your summer mani is sure to turn heads!
Color Theme | Design Idea | Tip |
|---|---|---|
Neon Brights | Solid color | Use a good base coat |
Tropical | Palm leaves | Try nail stickers |
Sunset | Ombre effect | Blend colors well |
Accessorizing Your Mani: Best Easy Nail Designs with Added Flair
Accessorizing Your Mani: Best Easy Nail Designs with Added Flair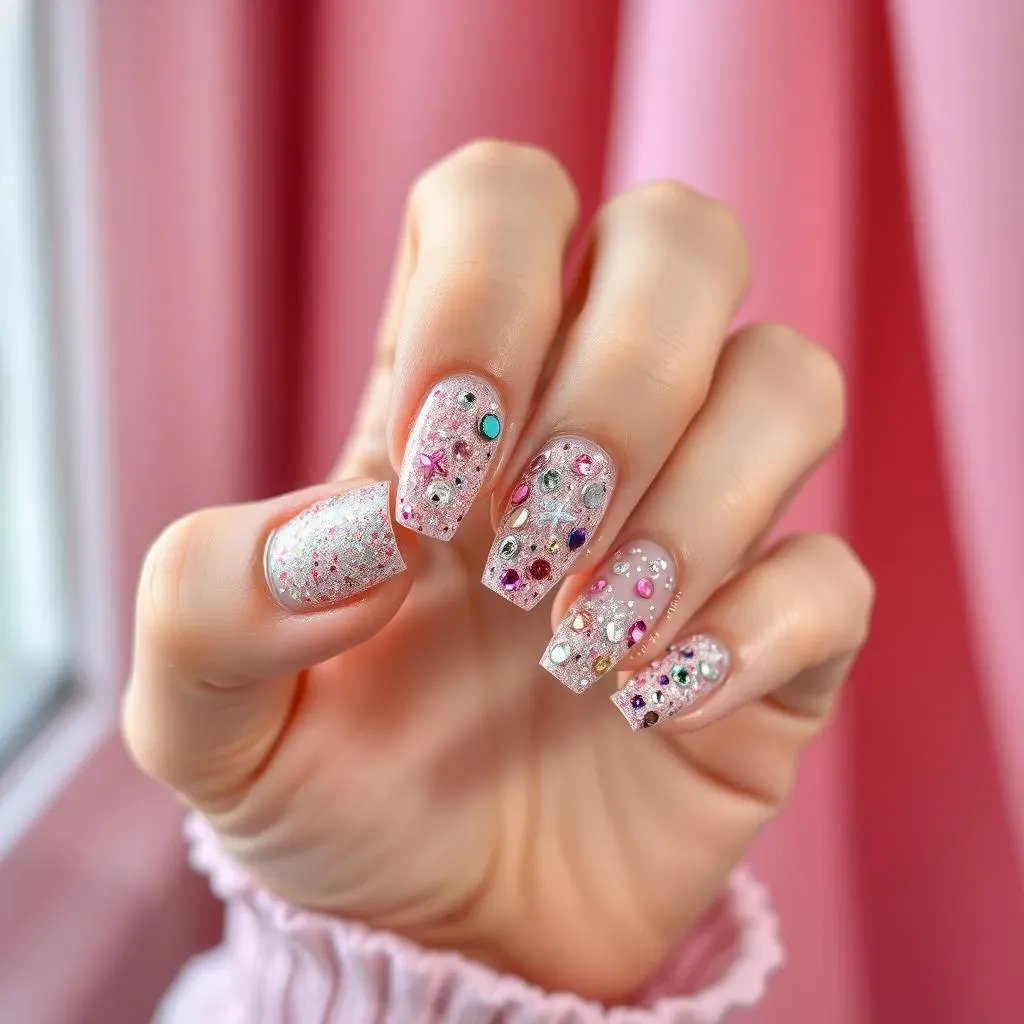
Sparkle and Shine: Adding Glitter and Shimmer
Let's talk sparkle! Glitter and shimmer are your secret weapons for instantly elevating any nail design. A simple coat of glitter polish over a solid color base adds a touch of glamour without overwhelming the look. You can choose fine glitter for a subtle sparkle or chunky glitter for a more dramatic effect. Experiment with different colors and textures to find what suits your style. For extra inspiration, check out our post on easy rhinestone nail designs – the same principles apply to glitter!
Want to get creative? Try applying glitter only to certain parts of your nail, like the tips or a half-moon shape at the base. You can also use a sponge to dab on glitter for a more textured effect. Don't be afraid to experiment and have fun with it!
Glitter Type | Application Method | Overall Look |
|---|---|---|
Fine Glitter | Brush | Subtle Sparkle |
Chunky Glitter | Sponge | Dramatic Shine |
Holographic Glitter | Brush | Rainbow Effect |
Rhinestones and Jewels: Adding Some Bling
Ready to take your nail art to the next level of glam? Rhinestones and jewels are the perfect way to add a touch of luxury and sparkle. Start with a simple base color and then strategically place your chosen jewels. Small rhinestones can add subtle shimmer, while larger jewels can make a bold statement. You can create a variety of looks, from a single accent stone to a full-on jewel-encrusted masterpiece. For inspiration, explore these amazing rhinestone nail designs.
Remember to use a good quality nail glue to ensure your jewels stay in place. And don't be afraid to experiment with different colors and placements! You can create intricate patterns, or keep it simple with a few strategically placed stones. The possibilities are endless!
- Small rhinestones for subtle sparkle
- Larger jewels for a bold statement
- Experiment with different colors and placements
Stickers and Decals: Easy Nail Art Hacks
Short on time but still want a stunning mani? Nail stickers and decals are your best friends! They're incredibly easy to apply, and they come in a huge variety of designs. From delicate flowers to bold geometric patterns, you can find stickers to match any style. Simply apply your base color, let it dry, and then carefully place your stickers. Seal with a top coat to protect your design, and you're done! For even more ideas, check out our guide to awesome easy nail art designs, many of which utilize stickers.
Pro tip: Use tweezers to apply smaller stickers for more precision. And if you make a mistake, don't worry! You can gently peel off the sticker and try again. Nail stickers are a great way to experiment with different designs without the commitment – perfect for trying out new trends!
"Nail art should be fun, not stressful. Don't be afraid to experiment and find what works best for you!" - *Anonymous Nail Artist*