Table of Contents
Ready to unleash your inner nail artist? This guide is your passport to the world of effortlessly chic manicures with our exploration of easy black nail designs. Black polish is incredibly versatile; it's the perfect blank canvas for creativity, whether you're a seasoned pro or a complete beginner. We'll start with the absolute basics, showing you how to achieve a flawless, solid black manicure—a timeless classic that always looks polished. Then, get ready to add some personality! We'll guide you through simple techniques to incorporate subtle yet stunning accents, like shimmering glitter, delicate lines, or playful polka dots, all while keeping things refreshingly easy. Feeling adventurous? We'll explore more creative and unique easy black nail designs, from stylish geometric patterns to mesmerizing marble effects. By the end, you’ll have a whole arsenal of easy black nail designs to experiment with, transforming your nails from drab to fab in minutes. So grab your favorite black polish, and let's get started on your next nail art adventure! Prepare to be amazed by how much you can achieve with these easy black nail designs.
Mastering the Basics: Simple Easy Black Nail Designs
Mastering the Basics: Simple Easy Black Nail Designs
Prepping Your Nails for Perfection
Before you even think about polish, prepping your nails is key! Start by gently pushing back your cuticles with a cuticle pusher. This step helps prevent polish from chipping and gives your nails a cleaner look. Then, give your nails a quick buff to smooth out any ridges. This creates a smoother surface for your polish to adhere to, resulting in a longer-lasting, more even finish. Don't forget to clean your nails with nail polish remover to remove any oils or residue. This ensures that your polish will grip properly and won't peel off prematurely. A little prep goes a long way!
For extra nail care, consider using a cuticle oil before applying your polish. This will help keep your cuticles healthy and moisturized, preventing dryness and cracking. If you're struggling with chipped polish, try applying a base coat to help prevent this issue. For more nail art ideas check out these awesome easy nail art designs.
Step | Action |
|---|---|
1 | Push back cuticles |
2 | Buff nails |
3 | Clean nails |
Applying the Perfect Coat of Black
Now for the fun part! Choose your favorite black nail polish. I personally love a deep, glossy black, but matte black is also super trendy. Apply one thin coat, letting it dry completely before adding a second coat. Don't rush this step! Thin coats are your best friend. They dry faster and prevent bubbling. If you're a bit clumsy like me, it's a good idea to use a thin brush to avoid getting polish on your skin. This helps you achieve a professional-looking finish without the need for clean up.
Once your second coat is dry, consider adding a top coat. This adds shine and helps protect your manicure, keeping it looking fresh for longer. If you want a super glossy look, choose a high-shine top coat. For a more natural look, you could use a matte top coat. There are so many options out there, and experimentation is half the fun! For more inspiration, check out our collection of easy nail art ideas.
- Apply thin coats
- Let each coat dry fully
- Use a top coat for shine and protection
Maintaining Your Manicure
So you've got your perfect black manicure—now how do you keep it that way? The key is to be gentle with your nails. Avoid using your nails as tools, like opening packages or scratching things. Harsh chemicals can also damage your nails and cause your polish to chip, so always wear gloves when doing chores like washing dishes or cleaning. Also, avoid excessive hand washing, as it can dry out your nails and compromise your manicure.
If you notice any chips or smudges, don't panic! A quick touch-up with a small brush and some polish usually does the trick. For long-lasting manicures, consider using a long-lasting top coat. And remember, even the most perfect manicures eventually need a refresh. Treat yourself to a new manicure every couple of weeks to keep your nails looking their best! For some more ideas, look at our awesome easy DIY nail designs.
Adding Flair: Easy Black Nail Designs with Simple Accents
Adding Flair: Easy Black Nail Designs with Simple Accents
Subtle Sparkle: Glitter Accents
Let's add a touch of glam! A simple way to elevate your black manicure is by incorporating glitter accents. You can use a fine glitter polish to create a subtle shimmer, or go bolder with chunky glitter for a more dramatic effect. Try applying glitter only to the tips of your nails for a glittery French manicure twist, or create a gradient effect by blending glitter with your black polish. The possibilities are endless!
For a truly unique look, try using different colored glitters to create a personalized design. Experiment with different glitter placement techniques, such as creating stripes, dots, or even abstract designs. Remember, less is often more. A few strategically placed glitter accents can make a big difference! For more simple designs, check out these amazingly simple manicures.
- Use fine or chunky glitter
- Apply glitter to tips or create a gradient
- Experiment with different colors and placement
Geometric Chic: Simple Line Art
Geometric designs are another fantastic way to add a touch of personality to your black nails without needing advanced nail art skills. Start with simple shapes like stripes, dots, or triangles. Use a thin nail art brush or striping tape to create clean, precise lines. You can create a minimalist look with a single stripe down the center of each nail, or get more creative with intersecting lines or geometric patterns.
For a modern twist, try incorporating negative space into your designs. This involves leaving some of the nail bare, creating a striking contrast with the black polish. Negative space designs can be as simple or as complex as you like. Experiment with different shapes and arrangements to find a look you love. For more inspiration on simple designs, take a look at these easy nail art pen designs.
Design | Tools |
|---|---|
Stripes | Stripping tape or thin brush |
Dots | Dotting tool or toothpick |
Triangles | Thin brush and tape |
Stepping Up Your Game: Easy Black Nail Designs with Creative Twists
Stepping Up Your Game: Easy Black Nail Designs with Creative Twists
Marble Madness: Easy Black Marble Nails
Let's get a little more adventurous! Black marble nails are surprisingly easy to achieve and look incredibly sophisticated. You'll need a few different shades of black polish (a dark black, a slightly lighter black, and maybe even a grey for contrast), and a small container of water. Carefully drop small amounts of each polish into the water, creating a swirling effect. Then, gently dip your nail into the water to pick up the design. It takes a little practice, but the results are worth it! This technique also works beautifully with other dark colors, allowing you to create unique and personalized designs.
For a more controlled approach, use a toothpick or thin brush to create the marble effect directly on your nail. This gives you more precision, but it does require a steadier hand. Regardless of your method, finish with a top coat to protect your masterpiece. Don't forget to clean up any excess polish around your nails! For more inspiration on creative nail art, check out these cool and easy nail art designs.
- Use multiple shades of black and grey
- Create a swirling effect in water or on the nail
- Seal with a top coat for protection
Abstract Art Attack: Easy Black Abstract Nails
Ready to unleash your inner artist? Abstract nail art allows you to express your creativity without any strict rules. Start with a base coat of black polish. Then, using various tools—a thin brush, a toothpick, even a sponge—add splashes of color or create interesting textures. You can use different shades of black, metallic polishes, or even add tiny dots of different colors for a pop of unexpected interest. The beauty of abstract art is that there's no right or wrong way to do it!
Don't be afraid to experiment! Try using different techniques, such as dry brushing, sponging, or even using a toothpick to create unique textures. Remember to layer your colors strategically for depth and dimension. Let your imagination run wild, and don't be afraid to embrace imperfections—they often add to the unique charm of abstract art. For more unique designs, check out our cute and easy nail designs.
Tool | Effect |
|---|---|
Thin brush | Fine lines and details |
Toothpick | Dots and textures |
Sponge | Ombre and blended effects |
Beyond the Basics: More Advanced Easy Black Nail Designs
Beyond the Basics: More Advanced Easy Black Nail Designs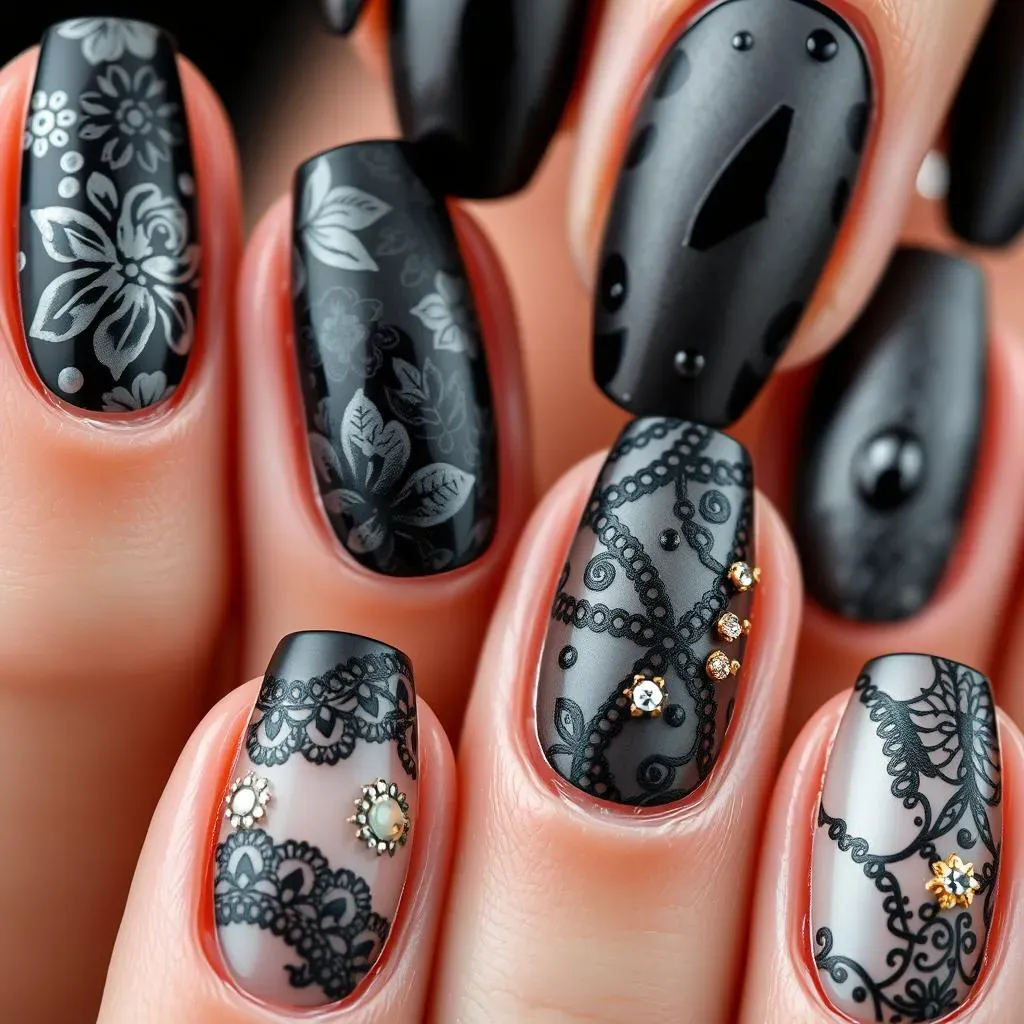
Intricate Designs: Black Nail Art with Stencils
Let's take things up a notch! Stencils open up a world of intricate designs without needing expert-level freehand skills. You can find tons of amazing nail art stencils online or in craft stores—floral patterns, geometric shapes, even delicate lace designs. Simply apply your black base coat, carefully place the stencil on your nail, and then apply a contrasting color (like silver, gold, or even a bright pop of color) over the stencil. Once dry, gently remove the stencil to reveal your stunning design.
Experiment with layering different stencils to create more complex designs. For example, you could layer a floral stencil over a geometric one for a unique, eclectic look. Don't be afraid to get creative and experiment with different color combinations! For more advanced techniques, check out our guide to easy nail designs for special occasions.
Stencil Type | Design Idea |
|---|---|
Floral | Delicate flowers on a black base |
Geometric | Stripes, chevrons, or other patterns |
Lace | Elegant lace accents |
Adding Dimension: Black 3D Nail Art
Ready for some serious wow factor? 3D nail art adds texture and dimension to your manicure, taking it from simple to spectacular. While it might sound intimidating, creating simple 3D designs is easier than you think! You'll need some 3D nail art gels or acrylics, a dotting tool, and a steady hand. Start by applying your black base coat. Then, use your dotting tool to create small dots or other shapes directly on your nails, building up layers to create a 3D effect.
You can add small embellishments like rhinestones or glitter to further enhance your design. Remember to cure each layer of 3D gel or acrylic properly to ensure it sets correctly. Practice makes perfect, so don't be discouraged if your first attempt isn't flawless. For more inspiration on 3D nail art, explore these easy nail designs with rhinestones.
- Use 3D nail art gels or acrylics
- Build up layers for a 3D effect
- Add embellishments for extra flair