Table of Contents
Ready to unleash your inner nail artist? This guide is your passport to a world of stunning nail designs, all achievable with the surprisingly versatile easy nail art dotting tool. Forget complicated techniques and expensive salon visits – we're diving headfirst into simple, step-by-step tutorials that'll have you creating professional-looking manicures in minutes. Whether you're a complete beginner or looking to refresh your nail art skills, we've got you covered. We'll start with the basics, teaching you how to master the dotting tool itself and create simple yet elegant designs like polka dots and tiny flowers. Then, we'll build on this foundation, exploring more intricate patterns and textures. Finally, we'll explore some seriously inspiring, advanced nail art ideas to push your creative boundaries. Get ready to transform your nails into miniature masterpieces – all thanks to the magic of the easy nail art dotting tool!
Mastering the Dotting Tool: Basic Techniques and Tips
Mastering the Dotting Tool: Basic Techniques and Tips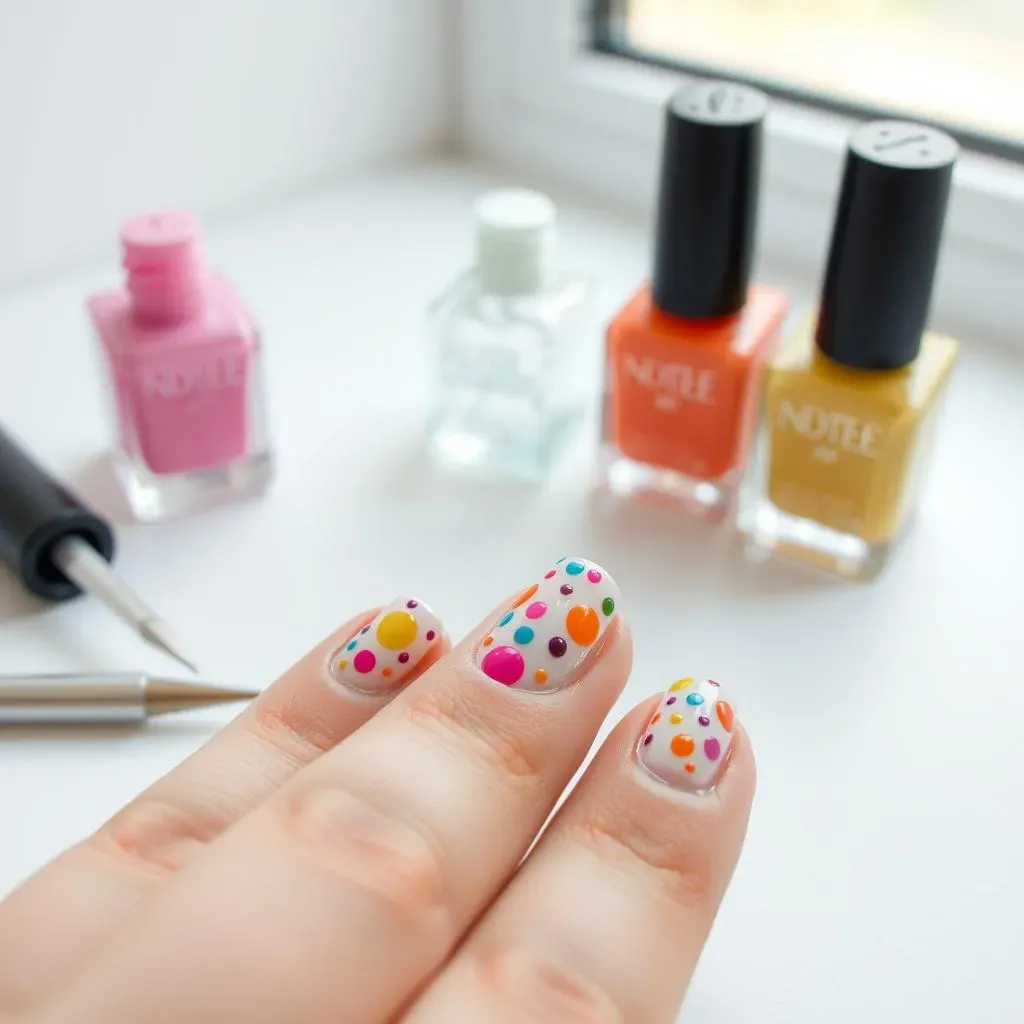
Getting Started: Your Dotting Tool Kit
First things first, let's talk tools! You'll need a dotting tool, of course. These come in various sizes and shapes, so experiment to find your favorites. Some have double-ended tips for even more versatility. You can find them at most beauty supply stores or online. Also grab some nail polish in your favorite colors – the brighter, the better! Don't forget a base coat and top coat to protect your amazing nail art. For super-fine dots, a toothpick or even a fine-tipped brush can also work wonders. Remember, practice makes perfect, so don't get discouraged if your first attempts aren't flawless.
Next, prep your nails. Start with clean, dry nails. A base coat is essential to protect your nails from staining and to help your polish last longer. Once the base coat is dry, you're ready to start dotting! If you're feeling fancy, check out these easy nail designs for beginners for some extra inspiration.
Tool | Description | Tip |
|---|---|---|
Dotting Tool | Various sizes and shapes available | Experiment to find your preference |
Nail Polish | Bright colors are fun! | Use a base and top coat |
Toothpick | For extra-fine dots | Practice makes perfect! |
Dotting Techniques: Size, Spacing, and Pressure
The secret to amazing dotting lies in controlling the size, spacing, and pressure of your dots. For smaller dots, use a lighter touch and less polish on the tool. For larger dots, use more polish and a firmer press. Consistent spacing between your dots is key to creating clean, professional-looking designs. Think of it like baking – precise measurements make all the difference! Try experimenting with different spacing to see what looks best to you. Want some quick ideas? Check out these fast and easy nail designs for some speedy inspiration.
Practice makes perfect, so don't be afraid to experiment! Try different colors, sizes, and patterns. Start with simple designs, and gradually work your way up to more complex ones. Remember, it's your creative canvas, so have fun with it! And if you mess up? It's nail polish, it's easily removable! Need some more ideas for easy designs? Check out these awesome easy nail art designs for more ideas.
- Practice different dot sizes.
- Experiment with spacing between dots.
- Don't be afraid to try different colors.
Simple Dotting Designs: From Polka Dots to Floral Fun
Simple Dotting Designs: From Polka Dots to Floral Fun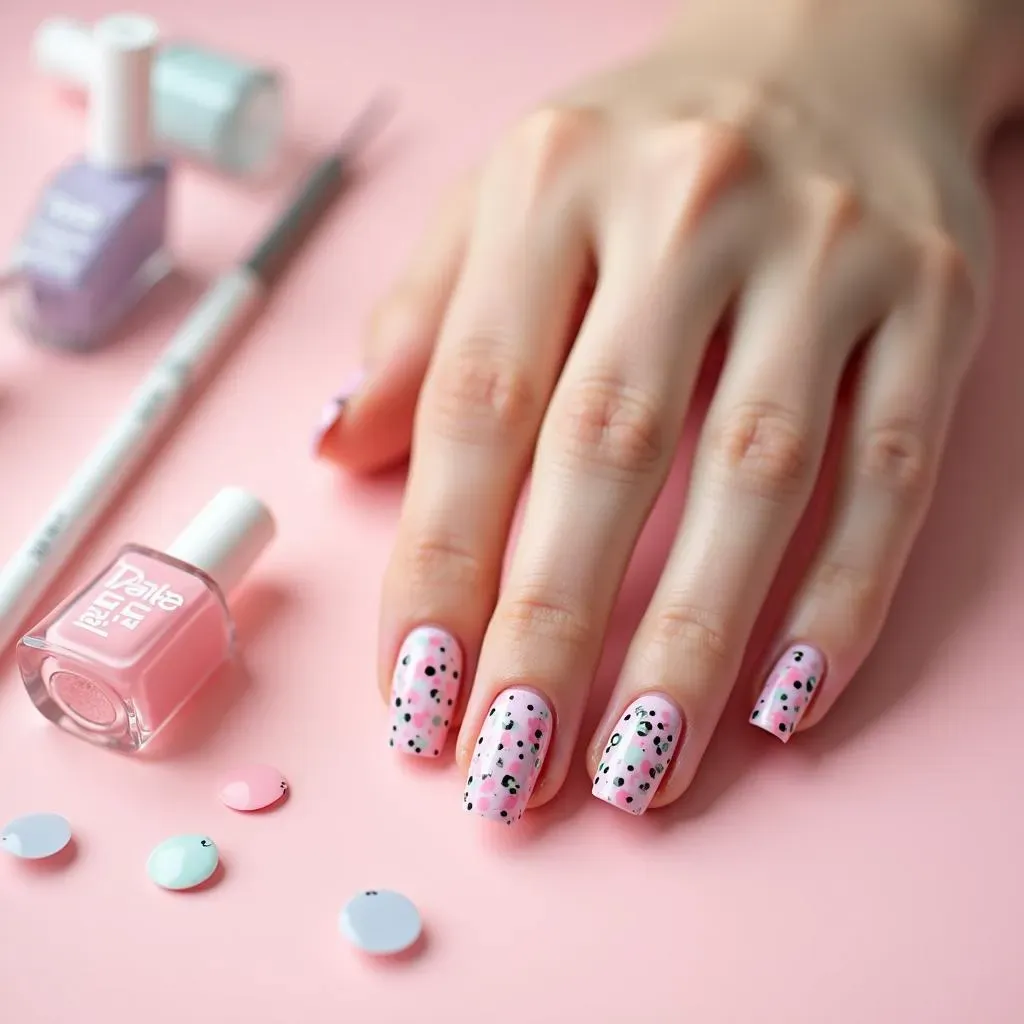
Polka Dot Perfection: A Classic Look
Let's start with the easiest design: polka dots! This is perfect for beginners. Simply dip your dotting tool into your chosen nail polish color, and gently dab it onto your nails, creating evenly spaced dots. Experiment with different sizes and colors for a fun, personalized touch. For a truly eye-catching look, try alternating colors or creating a gradient effect. Need some inspiration? Check out these easy 2-color nail designs for some simple yet effective ideas.
Once you've mastered the basic polka dot, try adding a twist. Create different sized dots, or use a second color to make a border around each dot. You can also create patterns with your dots, such as stripes or zigzags. The possibilities are endless! Looking for something more festive? These easy cute summer nail designs might give you some ideas for a fun, summery look.
- Use different sized dots for variation.
- Try alternating colors for a vibrant effect.
- Experiment with patterns, such as stripes or zigzags.
Floral Fantasies: Delicate Blooms and Petals
Ready to level up? Let's try some simple floral designs. You can use dots to create tiny flowers, leaves, or even entire bouquets on your nails. Start by creating small dots in a circular pattern for the flower's center. Then, add smaller dots around the center to create petals. Use a different color for the leaves, and add some small dots for detail. A little goes a long way! Feel like adding a little sparkle? These easy nail designs with rhinestones might spark your imagination.
For a more complex design, try creating different types of flowers. Use different colors and sizes of dots to create unique looks. You can also add other elements, such as swirls or lines, to enhance your floral designs. Don't be afraid to experiment and have fun with it! Looking for more inspiration? Check out these awesome cute easy nail art designs for some adorable ideas.
Flower Element | Dotting Technique | Color Suggestions |
|---|---|---|
Center | Small dot | Yellow, orange, pink |
Petals | Small dots in a circle | Pink, purple, white |
Leaves | Teardrop shapes | Green, dark green |
Intermediate Dotting Designs: Creating Intricate Patterns and Textures
Intermediate Dotting Designs: Creating Intricate Patterns and Textures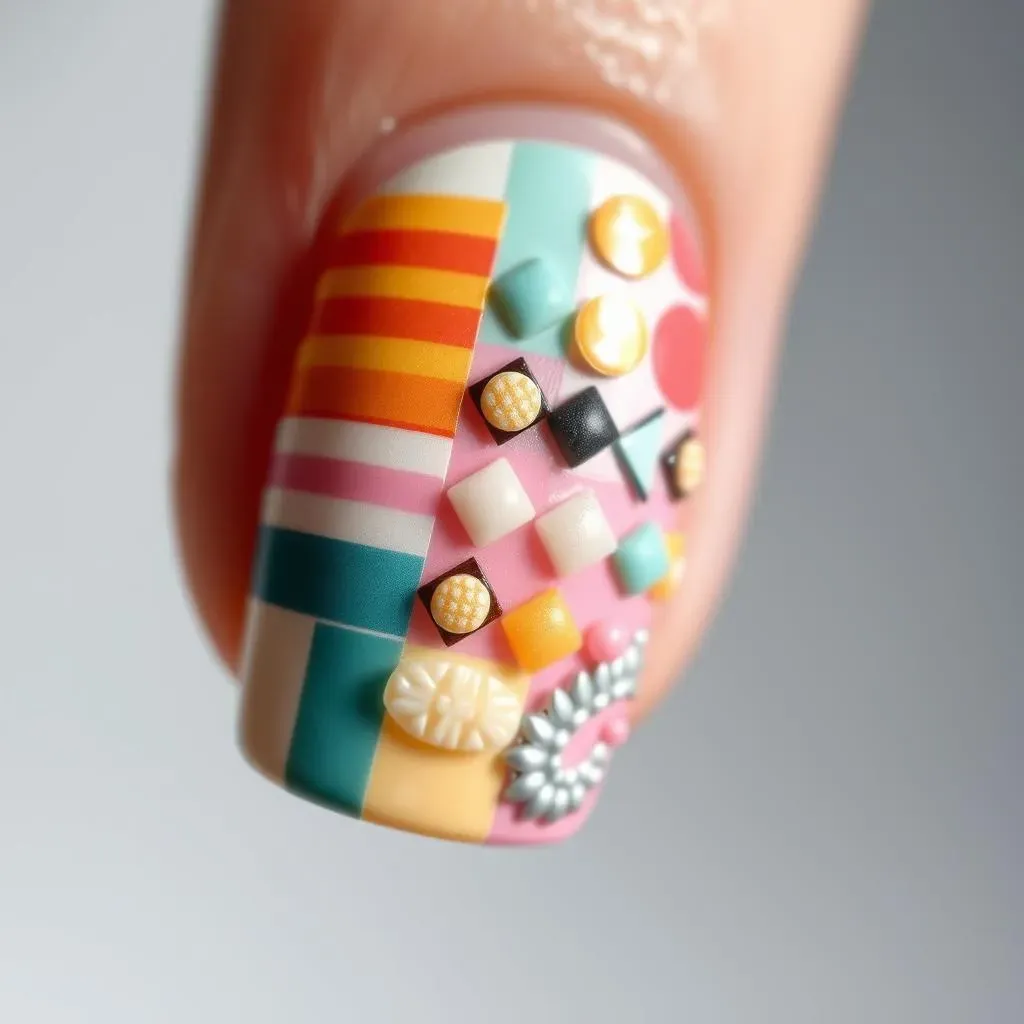
Geometric Wonders: Stripes, Checks, and More
Now we're getting into the fun stuff! Let's explore geometric designs. Think stripes, checks, and other cool patterns. Start by creating evenly spaced dots in a row to make a stripe. Then, add more rows of dots to create a striped effect. For a check pattern, create alternating rows of dots, spacing them evenly. Experiment with different colors and spacing to create unique looks. Feeling ambitious? These awesome line designs might inspire you to add some lines to your geometric patterns.
To create more complex geometric designs, try using different sizes and colors of dots. You can also add other elements, such as lines or swirls, to enhance your designs. Remember, practice makes perfect, so don't be afraid to experiment! Still need more ideas? Check out these simple almond nail designs for some elegant inspiration.
- Use a ruler or tape for perfectly straight lines.
- Experiment with color blocking for a bold look.
- Try using a combination of dots and lines for extra detail.
Textured Treats: Ombre, Gradient, and 3D Effects
Ready to add some dimension? Let's explore textured effects. An ombre effect is achieved by gradually blending colors together. Start by placing dots of one color, then gradually add dots of a lighter or darker shade. Blend the colors together with a toothpick or small brush for a seamless transition. Want a more dramatic look? These amazing red nail art designs might give you some ideas for a bold ombre.
For a gradient effect, use multiple colors to create a rainbow or other color transitions. Experiment with different color combinations to create unique looks. For a 3D effect, create dots of varying sizes to create a sense of depth. Smaller dots in the background and larger dots in the foreground create a more three-dimensional look. Need some extra inspiration? These easy designs for long nails showcase some amazing 3D effects.
Effect | Technique | Color Suggestions |
|---|---|---|
Ombre | Gradual color blending | Shades of pink, blue, or green |
Gradient | Multiple colors blended | Rainbow colors, or analogous colors |
3D | Varying dot sizes | Contrasting colors |
Advanced Dotting Designs & Inspirations: Taking Your Nail Art to the Next Level
Advanced Dotting Designs & Inspirations: Taking Your Nail Art to the Next Level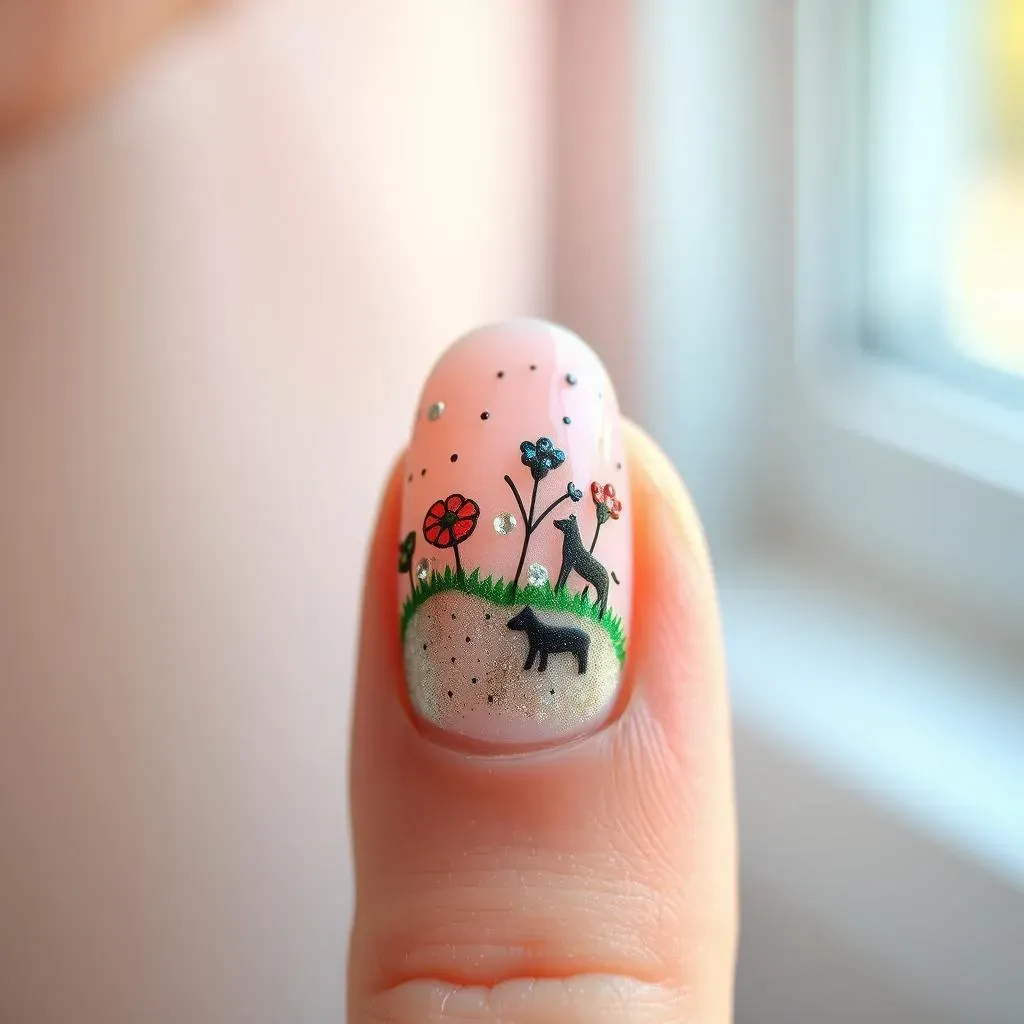
Intricate Patterns and Designs
Now that you've mastered the basics, let's explore more complex designs. Think intricate floral arrangements, geometric masterpieces, or even tiny animals! The possibilities are truly endless. You can combine different techniques, such as dots, lines, and swirls, to create unique and eye-catching nail art. For example, you could create a delicate floral design by using dots to create the petals and leaves, and then adding thin lines to define the stems. Feeling adventurous? Try creating a miniature landscape on your nails – a tiny forest, a starry night sky, or even an underwater scene! Remember, practice makes perfect, so don't be afraid to experiment and have fun with it. Check out these easy summer nail designs for some vibrant inspiration.
Don't be afraid to step outside the box and try new things. One great way to elevate your nail art is to incorporate different textures. You can use glitter, rhinestones, or even small pieces of foil to add some sparkle and dimension to your designs. Think about using a combination of matte and glossy polishes to create a contrasting effect. The key is to have fun and let your creativity shine! Need some more advanced ideas? These simple nail designs for 2024 offer some truly stunning inspiration.
- Combine dots with lines and swirls for intricate designs.
- Incorporate textures like glitter or rhinestones.
- Experiment with different color combinations and finishes.
Adding Special Touches and Embellishments
Let's talk about adding some extra pizzazz to your nail art. Think beyond simple dots! Incorporate tiny embellishments, such as small charms, studs, or even dried flowers. These additions can transform a simple dotting design into a true work of art. For example, you could add tiny metallic studs to a geometric design, or place a small dried flower in the center of a floral design. The possibilities are limitless! These easy nail designs with rhinestones might give you some extra ideas.
Another way to elevate your dotting designs is to use different tools. Experiment with different-sized dotting tools, toothpicks, or even fine-tipped brushes to create unique effects. You can also use stencils to create more precise patterns. Don't be afraid to mix and match techniques to create truly unique and personalized nail art. Want more ideas for unique designs? These easy Hawaiian nail designs are a great example of how to add unique touches.
Embellishment | Application Technique | Design Suggestions |
|---|---|---|
Rhinestones | Use dotting tool or tweezers | Geometric patterns, floral accents |
Small Charms | Glue onto cured polish | Accentuate a specific design element |
Dried Flowers | Seal with top coat | Bohemian or floral designs |