Table of Contents
Dreaming of a tropical escape but stuck indoors? Bring the vibrant spirit of Hawaii to your fingertips with our guide to easy Hawaiian nail designs! This article isn't about complicated salon techniques; it's about unleashing your creativity and achieving stunning results with simple steps. We'll walk you through the easiest ways to create gorgeous Hawaiian-inspired nail art, perfect for any skill level. Whether you're a nail art newbie or a seasoned pro looking for fresh inspiration, you'll find plenty of ideas and helpful tips here. Get ready to explore a range of simple designs, from delicate hibiscus flowers to playful palm trees, all achievable with readily available tools. We'll cover essential techniques to help you master the art of easy Hawaiian nail designs, ensuring you can recreate these looks at home with confidence. From choosing the right colors and tools to applying the designs flawlessly, we've got you covered. So, ditch the expensive salon appointments and embrace the fun of creating your own personalized tropical getaway – right on your nails. Let's dive into the world of easy Hawaiian nail designs!
Easy Hawaiian Nail Designs: Simple Steps for Stunning Manicures
Easy Hawaiian Nail Designs: Simple Steps for Stunning Manicures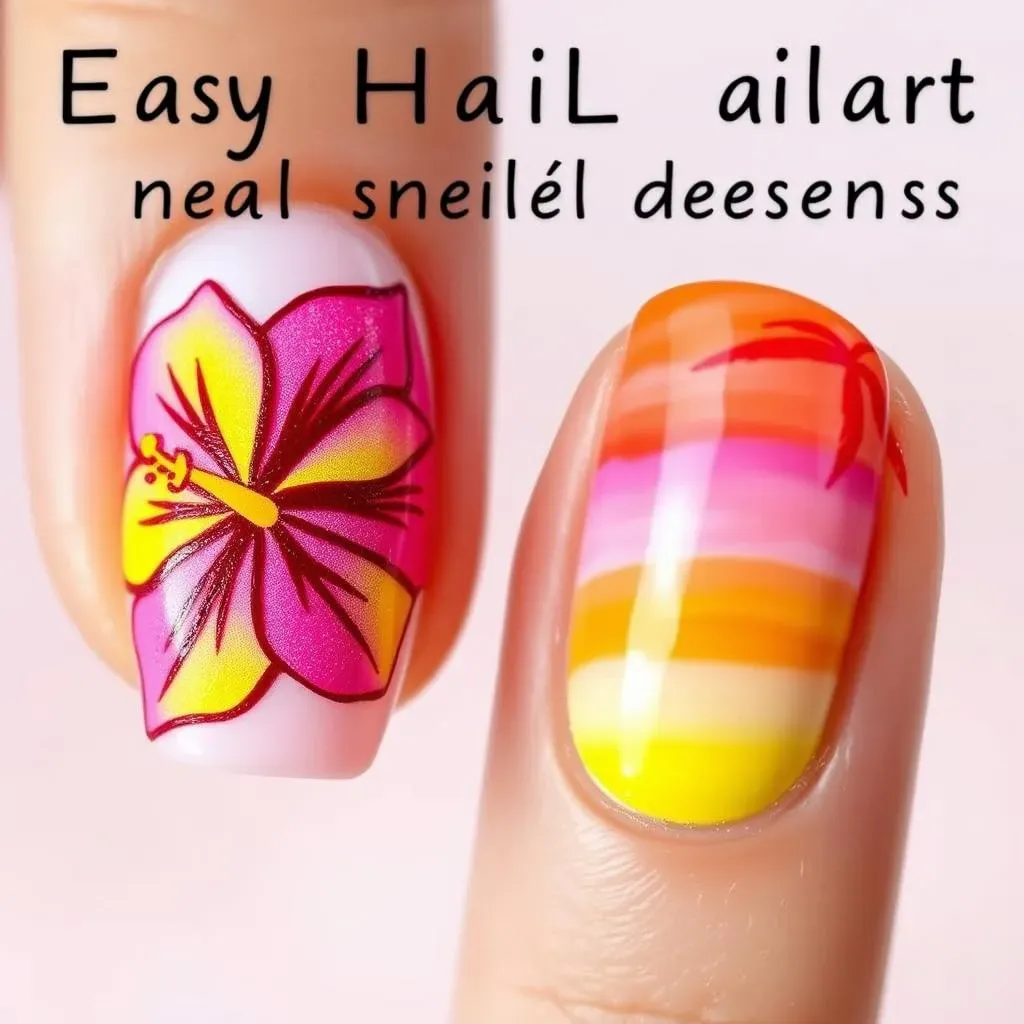
Simple Hibiscus Flowers
Let's start with a classic: hibiscus flowers! These are surprisingly easy to paint. You'll need a few nail art brushes – a thin detail brush for the outlines and a slightly wider one for filling in the petals. Start by painting a base coat of a pretty pastel color, like a soft pink or sunny yellow. Once that's dry, use your thin brush to create the hibiscus outline. Think of a simple, slightly uneven five-petal shape. Then, fill in the petals with your wider brush, leaving a little space in the center for the stamen. Add a few small dots in the center for the stamen using a different color. For extra flair, add some tiny green leaves using a similar technique. It's that simple!
Need some inspiration for other easy flower designs? Check out our post on easy flower nail designs for more ideas. And if you're a beginner, we've got you covered with easy nail designs for beginners to help you get started.
Step | Description |
|---|---|
1 | Apply base coat |
2 | Outline hibiscus |
3 | Fill in petals |
4 | Add stamen |
5 | Add leaves (optional) |
Tropical Sunset Gradient
For a more abstract Hawaiian feel, try a sunset gradient. This is super simple and looks fantastic. Start with a base coat, then use sponges to blend two or three tropical colors together. Think oranges, pinks, and yellows. Dab the sponge onto your nail, overlapping the colors slightly to create a soft blend. You can even add a touch of glitter for extra sparkle. This technique is super forgiving, so don't worry about perfection; it's all about that beautiful, blended effect! It's all about that beautiful, blended effect.
Looking for more gradient ideas? Check out our easy red nail art designs or our easy fall nail art designs for inspiration. Both techniques are similar and can be adapted to any color scheme.
- Apply base coat
- Use a sponge to blend colors
- Overlap colors for a soft blend
- Add glitter (optional)
Mastering Easy Hawaiian Nail Art: Techniques and Tips
Mastering Easy Hawaiian Nail Art: Techniques and Tips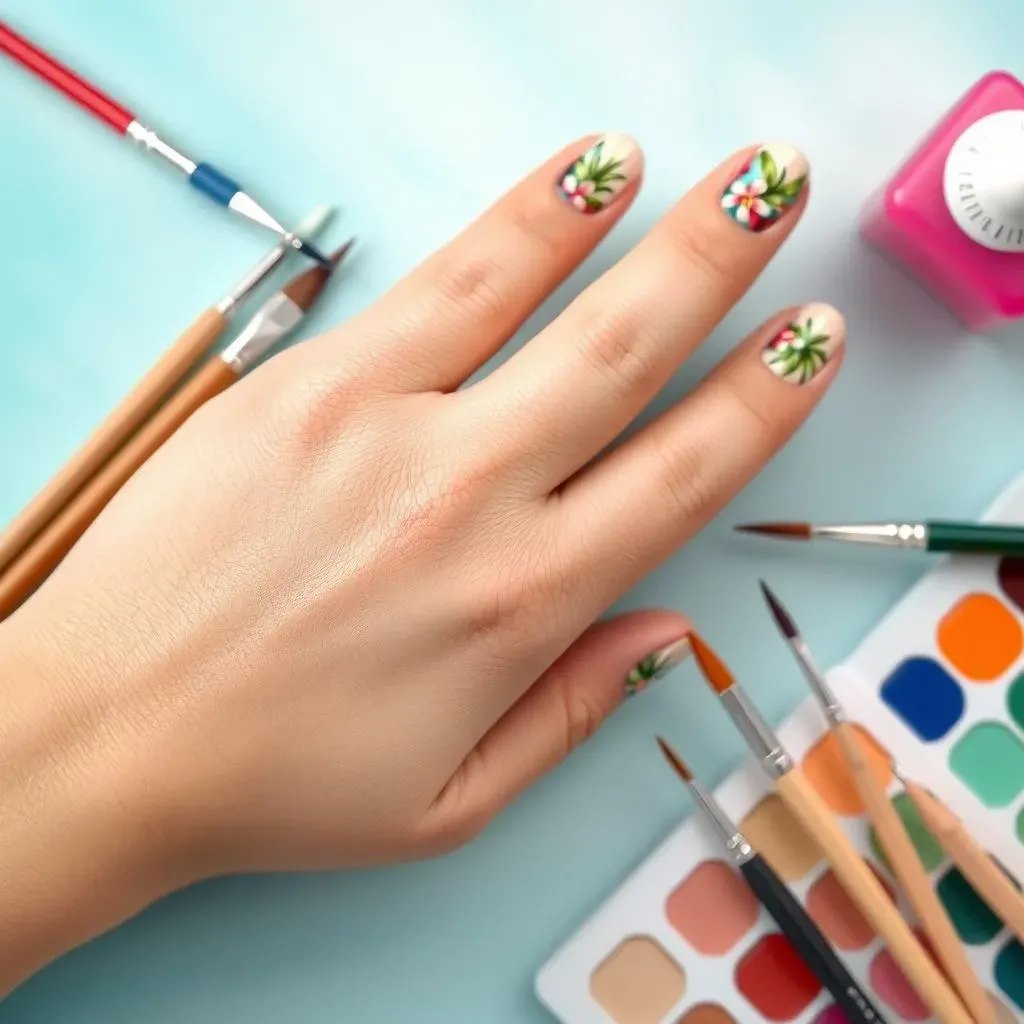
Choosing the Right Tools
Let's talk tools! You don't need a whole salon's worth of equipment to create amazing Hawaiian nail art. A good base coat and top coat are essential for longevity and shine. Then, you'll want a few nail art brushes: a thin detail brush for outlines and fine details, and a slightly wider brush for filling in larger areas. Dotting tools are also handy for creating small dots and adding texture. Finally, consider a good quality nail polish remover for those inevitable little mistakes – we all make them! And don't forget a cute little nail art palette to keep your colors organized.
Want to explore more nail art tools? Check out our guide on easy nail art pen designs for some cool ideas. If you're working with short nails, we also have a great article on easy nail art for short nails to help you maximize your nail space.
- Base coat
- Top coat
- Thin detail brush
- Wider brush
- Dotting tools
- Nail polish remover
- Nail art palette
Mastering Basic Nail Art Techniques
Once you have your tools, let's talk techniques. Start with a clean, dry nail. Always apply a base coat before any color to protect your nails and help your polish last longer. When painting designs, use light, even strokes. Don't overload your brush with polish; a little goes a long way. If you make a mistake, don't panic! Use your nail polish remover and a small brush to carefully clean up any smudges. Practice makes perfect, so don't be afraid to experiment. And remember, a top coat seals everything in and adds that professional shine.
For more inspiration and tutorials, check out our range of simple nail art designs. We have tutorials for easy cute nail designs and easy nail art designs for beginners to help you get started. Remember, even the simplest designs can look amazing with a little practice and attention to detail.
Technique | Description |
|---|---|
Base Coat | Protect nails, improve polish longevity |
Light Strokes | Avoid overloading the brush |
Clean Up | Use remover for mistakes |
Top Coat | Seal design, add shine |
Showcase Your Style: Easy Hawaiian Nail Designs for Any Occasion
Showcase Your Style: Easy Hawaiian Nail Designs for Any Occasion
Beach Day Ready
These easy Hawaiian nail designs are perfect for a day at the beach! Think bright, sunny colors like yellows, oranges, and pinks. A simple gradient sunset effect, as described earlier, would be stunning. Or, try a playful design featuring tiny palm trees or hibiscus flowers. Keep it simple and fun – after all, you're at the beach!
For more beach-themed nail art, check out our collection of beach nail designs for even more inspiration. If you're looking for something a bit more formal, we also have great ideas for nail designs for special occasions.
- Bright, sunny colors
- Simple gradient
- Palm trees or hibiscus
- Fun and playful
Wedding Vibes
For a more elegant touch, consider incorporating softer pastel shades with delicate hibiscus designs. A simple white base with tiny pink hibiscus flowers would be incredibly chic. Alternatively, a subtle ombre effect in blush pinks and corals would create a romantic feel. Remember, less is often more when it comes to wedding nails.
Looking for more wedding-inspired nail art? We have a dedicated post on easy wedding nail designs to check out. We also have some great ideas for easy date night nail designs if you need some inspiration for a romantic evening.
Design | Description |
|---|---|
Pastel Hibiscus | Delicate pink hibiscus on white base |
Ombre Coral | Blush pink and coral gradient |
Party Ready
For a night out, go bold! Think vibrant neon colors, glitter, and maybe even some 3D accents. A bright yellow base with neon pink hibiscus flowers would be striking. You could also add some glitter to the hibiscus centers for extra sparkle. Don't be afraid to experiment and have fun with it!
Need more party-ready nail designs? We've got a fantastic collection of easy party nail designs to help you find the perfect look. We also have some easy cute nail designs that can easily be adapted for a party look.
- Vibrant neon colors
- Glitter accents
- 3D embellishments (optional)
- Bold and playful