Table of Contents
Ready to give your toes some serious TLC? This guide is your passport to a world of "cute easy nail designs for toes," perfect for any skill level. Whether you're a nail art newbie or a seasoned pro, we've got you covered. We'll start with the basics – simple, stylish solid colors and shades that are quick to apply and always look chic. Then, get ready to unleash your inner artist! We'll explore easy-to-master nail art techniques, perfect for adding a touch of personality to your pedicure. Think adorable polka dots, delicate stripes, or even charming floral accents. Next up, we'll add some serious sparkle with glitter and rhinestone embellishments, transforming your toes into tiny works of art. Finally, we'll explore seasonal designs, so you can keep your toes looking fabulous all year round – from spring pastels to autumnal hues and festive winter wonderlands. So grab your favorite polishes, and let's get started on creating the cutest, easiest toe nail designs you've ever seen!
Simple Solid Colors and Shades
Simple Solid Colors and Shades
Classic Elegance: One-Color Wonders
Sometimes, the simplest approach is the most stunning. A single, well-chosen shade of nail polish can elevate your entire look. Think of a rich, deep crimson for a touch of drama, or a sunny yellow for a cheerful pop of color. The key is to choose a color that complements your skin tone and personal style. Don't be afraid to experiment! Try a sophisticated nude shade for a natural, understated look, perfect for everyday wear. Or, go bold with a vibrant turquoise for a fun, summery feel. For short nails, check out our guide on easy toenail designs for short nails for more inspiration.
For a touch of extra sophistication, consider a high-gloss topcoat to add shine and longevity to your manicure. A matte topcoat can give a more modern, minimalist vibe. The possibilities are endless!
- Nude
- Red
- Pink
- Coral
- Blue
- Purple
Exploring Shades: Subtle Variations
Once you've mastered the art of the single-color pedicure, you can start experimenting with subtle variations. Try using different shades of the same color family to create a gradient effect. For example, you could use three shades of pink, from a pale blush to a deep rose, to create a soft, romantic look. Or, try a mix of pastel colors for a fun, spring-like feel. These subtle shifts in color add depth and visual interest without being overwhelming. Remember to apply thin coats for even coverage and to prevent smudging. Check out these easy spring nail art designs for some inspiration.
Don't forget the importance of proper nail preparation! Clean, dry nails are essential for a long-lasting, beautiful pedicure. Start by gently pushing back your cuticles and removing any dead skin. Then, apply a base coat before your chosen color to protect your nails and enhance the vibrancy of your polish.
Color Family | Light Shade | Medium Shade | Dark Shade |
|---|---|---|---|
Pink | Baby Pink | Rose Pink | Deep Rose |
Blue | Sky Blue | Baby Blue | Navy Blue |
Matching Your Mood: Color Psychology
Did you know that different colors can evoke different emotions? Choosing your nail polish color can be a fun way to express your personality and mood. For instance, bright, cheerful colors like yellow or orange can uplift your spirits and make you feel more optimistic. Calming colors like blue or green can have a relaxing effect. Deep, rich colors like burgundy or emerald can add a touch of sophistication and elegance. Consider what message you want to convey with your pedicure and choose a color that reflects your current mood. For some spooky fun, check out our easy Halloween nail art designs.
Remember, there are no hard and fast rules when it comes to choosing nail polish colors. The most important thing is to choose shades that you love and that make you feel confident and beautiful. Have fun experimenting and discovering your personal style!
Easy Nail Art Designs for Beginners
Easy Nail Art Designs for Beginners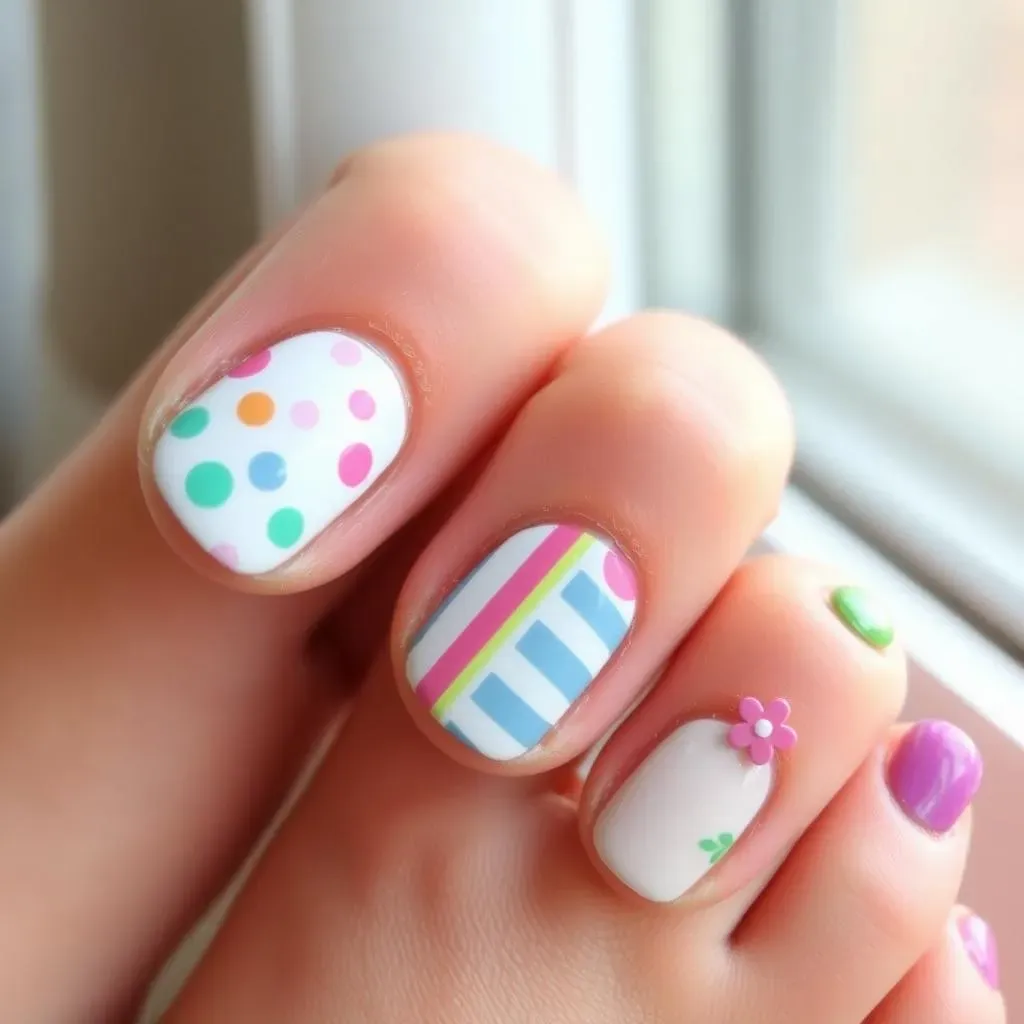
Polka Dots: Fun and Easy
Let's start with a classic: polka dots! They're super cute and surprisingly easy to do. All you need is a base coat, two contrasting colors, and a small dotting tool (or even a toothpick!). Paint your toenails your base color, let it dry, then use the dotting tool to add dots of your second color. Vary the size and spacing of the dots for a more unique look. You can even try a gradient effect, starting with larger dots at the base of the nail and gradually decreasing in size towards the tip. For more inspiration on easy designs, check out our guide on easy at-home nail art designs.
Don't worry about making them perfect; a slightly imperfect look adds to the charm! Think of it as abstract art for your toes. A little imperfection is totally okay, and adds a touch of whimsy.
- Choose two colors that complement each other.
- Use a base coat to protect your nails.
- Don't be afraid to experiment with different sizes and patterns.
Stripes: Simple and Chic
Stripes are another incredibly versatile and easy nail art design. You can create classic vertical stripes, playful horizontal stripes, or even diagonal stripes for a more modern look. For perfectly straight lines, use thin strips of tape to section off your nails before applying the polish. Once dry, carefully peel away the tape to reveal crisp, clean lines. If you prefer a more freehand approach, use a thin brush to paint your stripes directly onto the nail. Remember, practice makes perfect!
Experiment with different color combinations to find your favorite style. Try a nautical theme with red and white stripes, or create a more sophisticated look with black and gold stripes. For more ideas, check out our easy nail art line designs.
Stripe Style | Color Combination | Difficulty |
|---|---|---|
Vertical | Black & White | Easy |
Horizontal | Pink & Purple | Easy |
Diagonal | Blue & Green | Medium |
Simple Floral Accents: Adding a Touch of Spring
For a touch of elegance, try adding simple floral accents to your pedicure. You don't need to be a professional nail artist to create a beautiful floral design. Start with a solid base color. Then, using a thin brush and a contrasting color, paint small flowers or simple leaves onto your toenails. Keep the design simple and minimalistic for a chic look. You can add a few small dots for the flower centers, or use a different shade of polish to create simple petals.
These designs are perfect for spring and summer, but you can adapt them to any season by changing your color palette. For example, use darker colors like burgundy and deep green for a fall-inspired design. Or, try using sparkly polishes for a touch of festive cheer. For more inspiration, check out our easy Easter nail art designs for some ideas.
Adding Sparkle and Shine: Glitter and Rhinestones
Adding Sparkle and Shine: Glitter and Rhinestones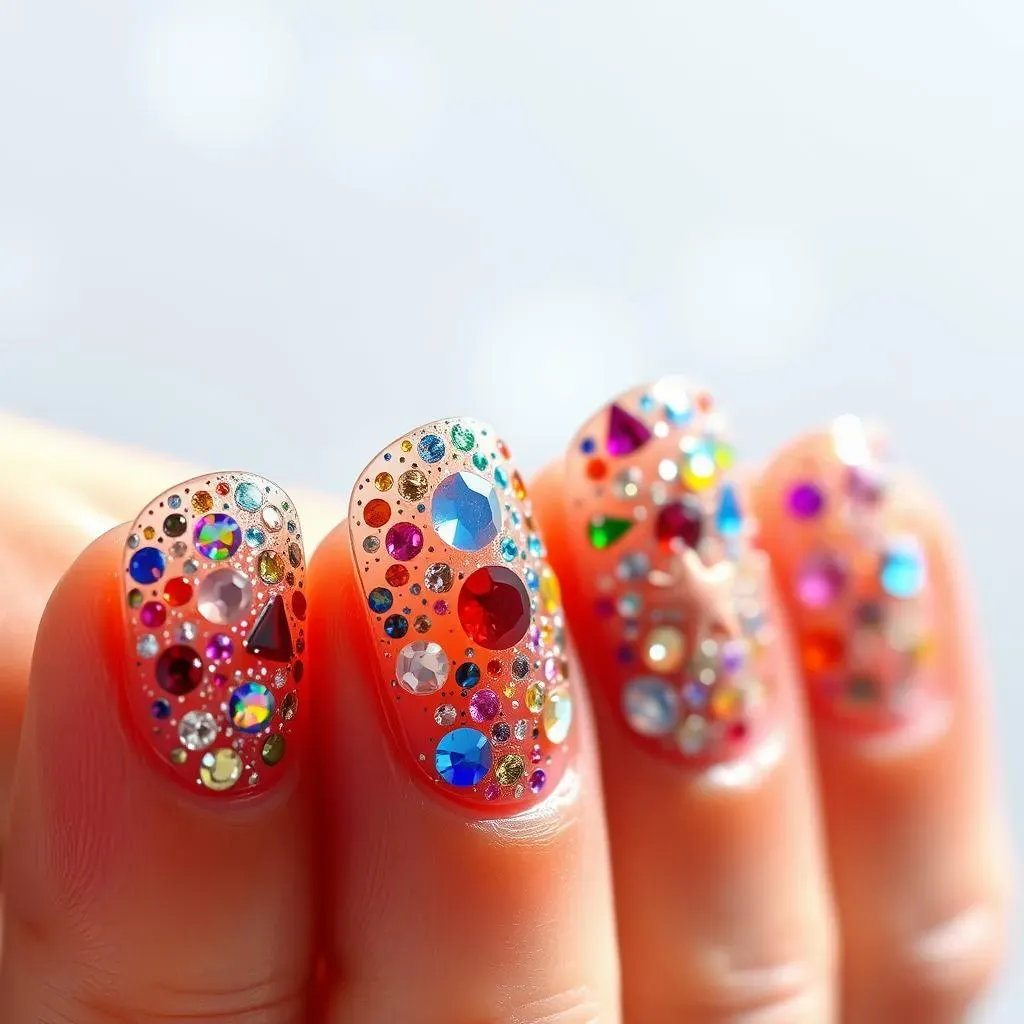
Glitter Power: Adding Some Shimmer
Let's talk glitter! It's the easiest way to add a touch of glam to your toes. You can use a glitter topcoat over a solid color for an understated shimmer, or go all out with a chunky glitter polish for maximum sparkle. For a more subtle effect, try mixing a small amount of glitter into your regular nail polish before applying it. The possibilities are endless!
Experiment with different glitter colors and sizes to find your perfect match. A fine glitter will create a more delicate shimmer, while a chunky glitter will add more texture and drama. For a touch of extra pizzazz, try using different colored glitters together to create a unique, multi-dimensional look. For some extra inspiration on easy designs, check out our easy at-home nail art designs.
- Fine Glitter
- Chunky Glitter
- Glitter Topcoat
- Mix Glitter into Polish
Rhinestone Glam: Adding Some Bling
Rhinestones are another fantastic way to add a touch of sparkle to your pedicure. They're super easy to apply and come in a huge variety of colors, shapes, and sizes. You can use them to create simple accents, or go all out and create intricate designs. Start by applying a base coat of your favorite color, then carefully place the rhinestones onto your nails using a dotting tool or tweezers.
To ensure your rhinestones stay put, use a topcoat to seal them in place. You can also use a special nail glue designed for rhinestones for extra security. Experiment with different placements for a unique look – along the cuticle, near the tip, or scattered across the nail. To learn more about making your nails look great, check out our easy nail designs for beginners guide.
Rhinestone Shape | Size | Color |
|---|---|---|
Round | Small | Clear |
Square | Medium | Silver |
Triangle | Large | Gold |
Combining Glitter and Rhinestones: Double the Sparkle
Why choose between glitter and rhinestones when you can have both? Combining these two elements can create a truly dazzling pedicure. Start by applying a base coat of your favorite color, then add a layer of glitter polish. Once dry, carefully place your rhinestones onto the glitter for a super sparkly effect. You can also create a more intricate design by using the rhinestones to outline shapes or create patterns within the glitter.
Remember to use a top coat to seal everything in place and protect your design. A high-gloss topcoat will enhance the sparkle of both the glitter and rhinestones, making your pedicure truly shine. For more advanced techniques, check out our step-by-step nail art designs.
Seasonal Toe Nail Designs: Spring, Summer, Fall, Winter
Seasonal Toe Nail Designs: Spring, Summer, Fall, Winter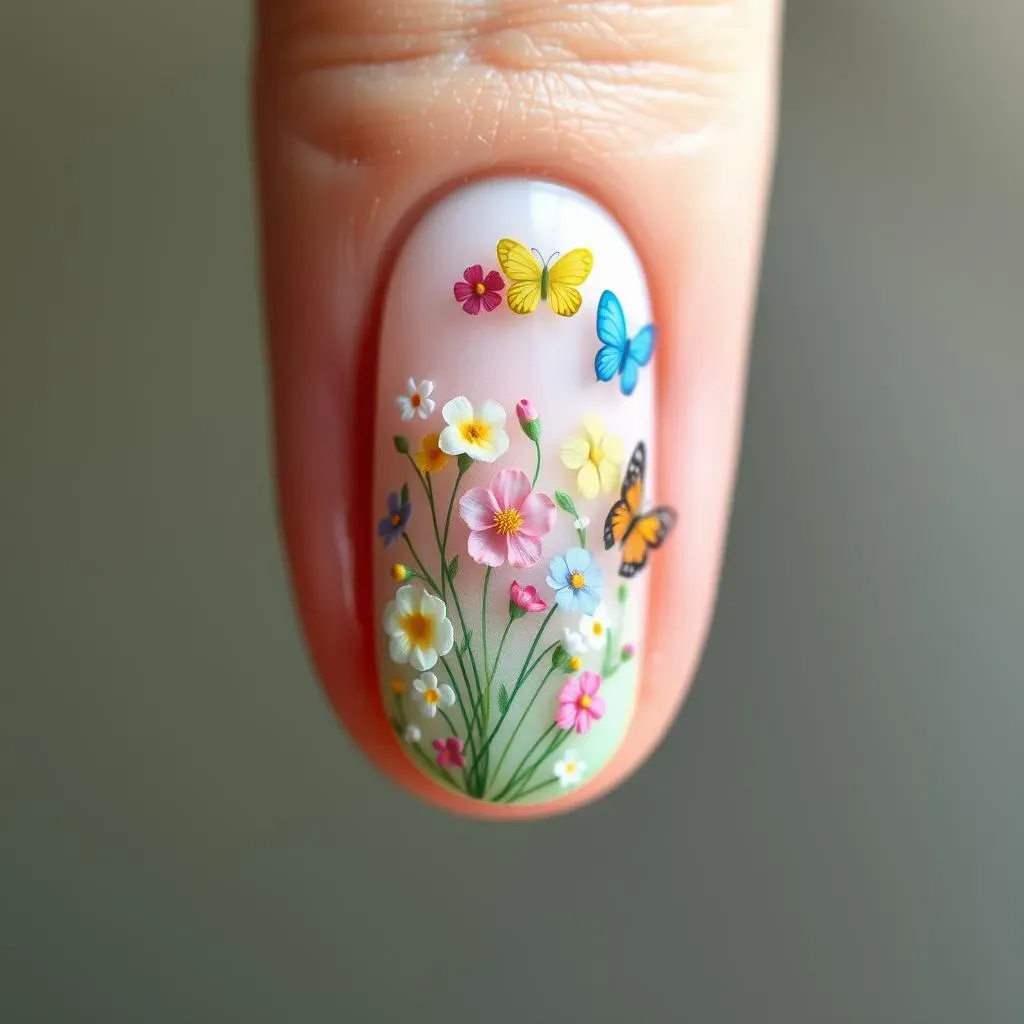
Spring into Color: Pastel Perfection
Spring is all about fresh starts and vibrant colors! Think soft pastels like baby pink, mint green, and lavender. These shades are perfect for creating a delicate, feminine look. You can use them on their own or combine them for a multi-colored design. A simple floral accent, like the ones we discussed earlier, would also look lovely. For more springtime inspiration, check out our easy spring nail art designs.
To make your spring pedicure extra special, add some tiny, delicate flowers or butterflies. These details will add a touch of whimsy and elegance to your look. Remember, less is often more when it comes to nail art. A few carefully placed accents can make a big impact.
- Pastel Pink
- Mint Green
- Lavender
- Light Yellow
- Baby Blue
Summer Fun: Bright and Bold
Summer is the perfect time to experiment with bright, bold colors! Think vibrant neons, sunny yellows, and tropical blues. These shades are perfect for creating a fun, energetic look that's perfect for showing off your sandals. You can use them on their own or combine them for a multi-colored design. Try a tropical theme with bright colors and fun designs. For more ideas, check out our easy toe nail art designs.
To really capture the essence of summer, add some beachy elements to your design. Think seashells, starfish, or even tiny palm trees. You can also add some glitter or rhinestones for extra sparkle. Remember to use a high-quality topcoat to protect your design from chipping and fading.
Color | Theme | Accents |
|---|---|---|
Neon Pink | Tropical | Flowers |
Bright Yellow | Beach | Seashells |
Turquoise | Ocean | Starfish |