Table of Contents
Ready to elevate your nail game without the salon price tag or complicated techniques? This article is your ultimate guide to mastering easy french tip nail designs. Whether you're a complete beginner or just looking to refresh your skills, we'll cover everything you need to know to create salon-worthy manicures at home. We’ll start with the fundamental techniques for achieving that classic look, then explore creative variations and fun nail art that builds upon the easy french tip design. We'll walk you through the essential tools and simple steps involved, ensuring even the most novice nail artist can achieve stunning results. Get ready to discover a world of stylish and easy french tip nail designs, perfect for any occasion and skill level. From timeless classics to trendy new styles, we’ll showcase the hottest easy french tip nail designs for 2024, so you can find the perfect look to express your unique personality. So grab your favorite polish and let's get started on your journey to beautiful, effortless nails!
Easy French Tip Nail Designs: Perfect for Beginners
Getting Started: Your First Easy French Manicure
Let's face it, achieving that perfect salon-worthy French manicure can seem daunting. But trust me, it's easier than you think! The key is to start with the basics and build your confidence. We're talking simple, clean lines and a color palette that works for you. Think classic white tips on a nude base – a timeless combo that always looks chic. For a super easy approach, try using French manicure stickers! They're a game-changer for perfectly straight lines every time. These little helpers take the guesswork out of the process, leaving you with flawless tips in minutes. Once you've mastered the classic look, you can easily experiment with different colors and nail art techniques. Don't be afraid to try fun colors on your tips – pastels are perfect for spring, while darker shades create a more dramatic effect. For extra help with nail shapes, check out our guide to cute and easy nail designs for short nails to find the perfect fit for your style.
Remember, practice makes perfect! Don't get discouraged if your first attempt isn't flawless. Even professional nail artists started somewhere. The more you practice, the better you'll become at creating those crisp lines and achieving the precise shape you desire. And if you're feeling adventurous, you can always add some simple nail art to your ring finger, like a tiny flower or a delicate sparkle. This adds a little extra personality to your manicure without making it too complicated. For even more inspiration, check out our awesome easy at-home nail art designs to find more ideas.
Step | Action |
|---|---|
1 | Apply a base coat. |
2 | Use stickers or freehand to create the tips. |
3 | Apply a top coat for shine and longevity. |
Beyond the Basics: Creative Easy French Tip Nail Art
Adding a Pop of Color
Once you've mastered the classic white-tip French manicure, it's time to unleash your creativity! Think beyond the basic white and explore a rainbow of possibilities. Pastel shades are perfect for a soft, spring-like look. Try a delicate baby blue, a sunny yellow, or a sweet lavender. For a bolder statement, consider vibrant jewel tones like emerald green or sapphire blue. The possibilities are endless! Don't be afraid to experiment with different color combinations to find what suits your style and the season. For more inspiration on color palettes, check out our selection of awesome easy pretty nail designs.
A great tip is to keep your base coat neutral, allowing your colorful tips to really shine. A nude, sheer pink, or even a light grey works wonders as a base. This keeps the overall look sophisticated while letting your vibrant tips take center stage. You can also add a bit of sparkle! A touch of glitter on just one or two nails can add a touch of glamour without being overwhelming. And don't forget about the power of negative space! Leaving some of your nail bed bare can create a modern and minimalist look. This is an easy way to add a stylish touch without needing advanced nail art skills.
- Pastel shades for a soft look
- Vibrant jewel tones for a bold statement
- Glitter accents for added sparkle
- Negative space for a minimalist touch
Incorporating Simple Nail Art
Ready to take your easy french tip nail designs to the next level? Adding simple nail art is a fantastic way to personalize your manicure and add a touch of personality. Start with small details, like tiny dots or delicate lines. A single accent nail featuring a small design can add a unique touch without making the overall look too busy. You can use a dotting tool or a thin nail art brush for these designs. For inspiration, check out our easy nail art pen design ideas for some easy-to-follow tutorials.
Floral designs are always a popular choice. A small flower or a few leaves on your accent nail can add a touch of femininity and elegance. Similarly, geometric patterns are easy to create and can add a modern edge to your manicure. Try simple stripes, chevrons, or even tiny triangles. Remember, less is often more when it comes to nail art. A few well-placed details can make a big difference. If you are looking for more festive designs, you might like our selection of easy Christmas nail designs.
Nail Art Idea | Difficulty | Supplies Needed |
|---|---|---|
Dots | Easy | Dotting tool or toothpick |
Lines | Easy | Thin nail art brush |
Small flowers | Medium | Thin nail art brush and dotting tool |
Easy French Tip Nail Designs at Home: Tools and Techniques
Essential Tools for a Perfect Manicure
Let's talk tools! You don't need a mountain of supplies to create stunning easy french tip nail designs at home. A few key items will make all the difference. First, you'll need good quality nail polish remover, cotton balls, and a nail file. Choose a nail file with a fine grit to avoid damaging your nails. Next, you'll need a base coat, your chosen nail polish colors (at least two – one for the base and one for the tips), and a top coat for a long-lasting, shiny finish. A good top coat is crucial for protecting your manicure and preventing chipping. For precise application, a thin nail art brush can be incredibly helpful, especially when creating detailed designs, but it's totally optional for simple french manicures. If you're struggling with achieving perfectly straight lines, consider using French manicure stickers; they are a lifesaver!
For those who prefer a longer-lasting manicure, a gel nail kit can be a worthwhile investment. Gel manicures are known for their durability and shine, lasting for several weeks. However, you'll need a UV lamp to cure the gel polish. If you're new to gel manicures, check out some beginner tutorials online before you get started. Remember, proper preparation is essential for a flawless manicure. Make sure your nails are clean, dry, and free of any old polish before you begin. A little prep work goes a long way! For more simple nail art ideas, you might find our basic easy nail designs helpful.
- Nail polish remover
- Cotton balls
- Nail file (fine grit)
- Base coat
- Nail polish (at least two colors)
- Top coat
- Optional: Thin nail art brush
- Optional: French manicure stickers
- Optional: Gel nail kit and UV lamp
Mastering the Techniques: Step-by-Step Guide
Now for the fun part – the actual application! Start by applying a thin layer of base coat to each nail, allowing it to dry completely. This protects your nails and provides a smooth surface for the polish. Next, apply your chosen base color in two thin coats, letting each coat dry before applying the next. This prevents smudging and ensures an even finish. If you're using stickers, carefully apply them to the tips of your nails, ensuring they're aligned correctly. For freehand application, use a steady hand and a light touch to create thin, even lines. A helpful tip is to use the edge of your nail polish brush to create a very thin line for the tip.
Once your tips are perfectly painted, apply a top coat to seal in the color and add shine. A top coat is crucial for protecting your manicure and preventing chipping. Apply two thin coats, allowing each coat to dry before applying the next. After your top coat is completely dry, gently remove any excess polish around your cuticles using a cotton swab dipped in nail polish remover. This will leave you with a clean and polished look. Remember, patience is key! Allow each coat of polish to dry completely to prevent smudging. Take your time and enjoy the process! If you're looking for more ideas for simple designs, check out our simple nail designs in pink.
Step | Description |
|---|---|
1 | Apply base coat |
2 | Apply base color (2 thin coats) |
3 | Apply tip color (stickers or freehand) |
4 | Apply top coat (2 thin coats) |
5 | Clean up excess polish |
Trending Easy French Tip Nail Designs for 2024
Trending Easy French Tip Nail Designs for 2024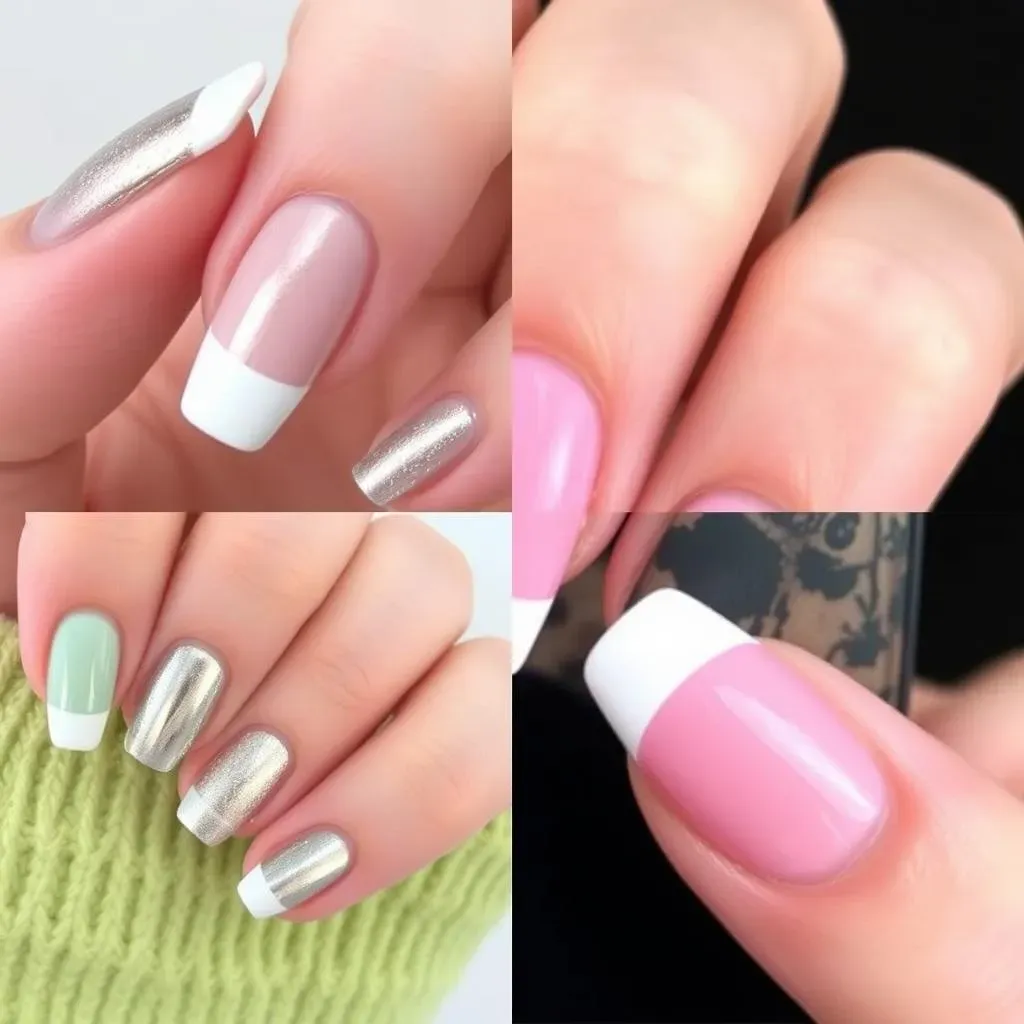
Metallic Mania: Gold, Silver, and Beyond
Metallic accents are HUGE this year! Think shimmering gold tips on a nude base for a touch of glam, or sleek silver tips for a modern twist. Don't be afraid to experiment with other metallic shades like rose gold, copper, or even a chrome effect. These finishes add a luxurious touch to your manicure without requiring complex nail art skills. To achieve a really polished look, make sure your base coat is smooth and even before applying the metallic polish. A few thin coats will give you the best coverage and prevent any streaking. For some extra sparkle, consider adding some tiny glitter to the base coat near the cuticle. This will add a subtle shimmer that complements the metallic tips beautifully. For more inspiration on metallic nail designs, check out our collection of awesome simple acrylic nail designs.
Remember, the key is to keep it simple and chic. You don't need to go overboard with embellishments to achieve a stunning look. A simple metallic French manicure is surprisingly versatile and can be dressed up or down depending on the occasion. For a more dramatic effect, try using a darker base color, such as a deep navy or burgundy, to create a striking contrast with your metallic tips. This contrast really makes the metallic finish pop! For more ideas on how to incorporate metallics into your nail designs, you might want to check out our simple acrylic nail designs.
- Gold tips on a nude base
- Silver tips for a modern look
- Rose gold for a softer touch
- Chrome effect for a high-shine finish
Ombre Dreams: Soft Blends of Color
Ombre nail art is another huge trend, and it's surprisingly easy to achieve a beautiful ombre effect with your French manicure. Instead of a sharp line between the base color and the tip color, create a gradual blend. This creates a soft, dreamy look that's both modern and sophisticated. You can achieve this using a sponge or a small brush to blend the colors together. Start with your base color and gradually transition to your tip color. For a super easy ombre effect, use two similar shades for a subtle gradient. For a more dramatic look, use contrasting colors. For example, you can use a light pink base and a darker rose gold tip. This creates a beautiful and elegant effect.
Remember to use thin coats to avoid creating a thick, uneven finish. Allow each coat to dry completely before applying the next. You can use a clear top coat to enhance the shine and make your ombre manicure last longer. If you are looking for more inspiration on ombre nail designs, you can check out our awesome easy spring nail art designs for some gorgeous ideas. For a fun twist on the classic ombre French manicure, consider adding some glitter or other embellishments to the tips. This will add some extra sparkle and personality to your look. Experiment with different colors and techniques to create your own unique ombre French manicure.
Step | Action |
|---|---|
1 | Apply base coat. |
2 | Apply base color. |
3 | Blend tip color using a sponge or brush. |
4 | Apply top coat. |
Color Blocking: Bold and Geometric
Color blocking is another big trend that's easy to incorporate into your French manicure. Instead of just one color on the tips, use two or more colors to create a bold, geometric design. This is a fun way to add personality to your look without needing advanced nail art skills. For instance, try a half-and-half design, with one half of the tip in one color and the other half in another. Or, try creating stripes or other geometric patterns using different colors. This bold design is perfect for those who want a manicure that makes a statement. Remember to use thin coats of polish to prevent the colors from bleeding into each other. Make sure each coat is completely dry before applying the next to prevent smudging.
Color blocking works best with contrasting colors. Choose colors that complement each other or create a striking contrast. For example, try pairing a bright yellow with a deep blue, or a bright pink with a deep green. For a more subtle look, use analogous colors. Analogous colors are colors that are next to each other on the color wheel. For example, you can use shades of pink, orange, and yellow. If you're looking for more easy nail art ideas, check out our easy summer nail art designs for some fun and vibrant options. You can also incorporate some simple nail art details, such as dots or lines, to enhance the color-blocked design. This will add some extra visual interest and make your manicure even more unique. Don't be afraid to experiment with different color combinations and techniques to create your own unique color-blocked French manicure.
- Half-and-half design
- Stripes
- Geometric patterns
- Contrasting colors