Table of Contents
Ready to upgrade your nail game without spending hours in the salon? Then you've come to the right place! This article is all about mastering simple nail designs black, proving that sometimes, less is more. We'll explore various ways to rock a classic black manicure, from the effortlessly chic solid black look to subtly stunning nail art that's easy enough for beginners. Get ready to discover how a simple black polish can be transformed into a statement look. We'll cover classic black polish perfection, easy-to-achieve nail art using black as a base, stunning black and white combinations, and even seasonal twists to keep your nails looking fresh all year round. Whether you prefer a minimalist aesthetic or want to add a touch of flair, this guide will provide you with plenty of inspiration and step-by-step ideas to create gorgeous, simple nail designs black, perfect for any occasion. So grab your favorite black nail polish, and let's get started!
Classic Black: Solid & Chic
Classic Black: Solid & Chic
The Timeless Elegance of a Solid Black Manicure
Sometimes, the simplest things are the most striking. A classic solid black manicure exudes sophistication and effortless chic. It's incredibly versatile, working perfectly for a night out or a casual day at the office. The deep, rich color is universally flattering and adds a touch of mystery to any look. Think of it as the little black dress of nail art – a timeless staple that never goes out of style. For a truly polished finish, ensure your nails are neatly shaped and filed before applying two coats of your favorite black polish. Don't forget a top coat for extra shine and longevity!
Choosing the right black polish is key. Some blacks are more intense and opaque than others, so test a few different brands to find your perfect match. Look for polishes that are known for their smooth application and long-lasting wear. A good quality base coat will also prevent staining and help the color pop. And if you're feeling adventurous, why not try a matte top coat for a modern, slightly edgy twist? It's a small change that makes a big difference!
Polish Type | Pros | Cons |
|---|---|---|
Creamy Black | Classic, easy application | Can show imperfections |
Gel Black | Long-lasting, high shine | Requires UV lamp |
Matte Black | Modern, sophisticated | Can be harder to clean |
Nail Prep for a Flawless Finish
Before you even think about applying polish, proper nail prep is essential for a long-lasting, professional-looking manicure. Start by gently pushing back your cuticles using a cuticle pusher or orangewood stick. Avoid cutting your cuticles, as this can lead to infection. Next, shape your nails using a nail file. Choose a shape that complements your hand and finger length; almond, square, or oval are all popular choices. Then, buff the surface of your nails gently to remove any ridges or imperfections. This step creates a smooth surface for the polish to adhere to, leading to a more even and longer-lasting manicure.
Once your nails are prepped, apply a base coat. This protects your nails from staining and helps the polish adhere better. Then, apply two thin coats of your chosen black nail polish, allowing each coat to dry completely before applying the next. Finally, seal the deal with a top coat for extra shine and protection. A top coat also helps to prevent chipping and extend the life of your manicure. For extra long-lasting results, you might consider checking out our guide on easy fake nail designs which can be painted with a simple black polish too!
- Push back cuticles
- Shape and file nails
- Buff nail surface
- Apply base coat
- Apply 2 coats of black polish
- Apply top coat
Adding Accents: Simple Nail Art
Adding Accents: Simple Nail Art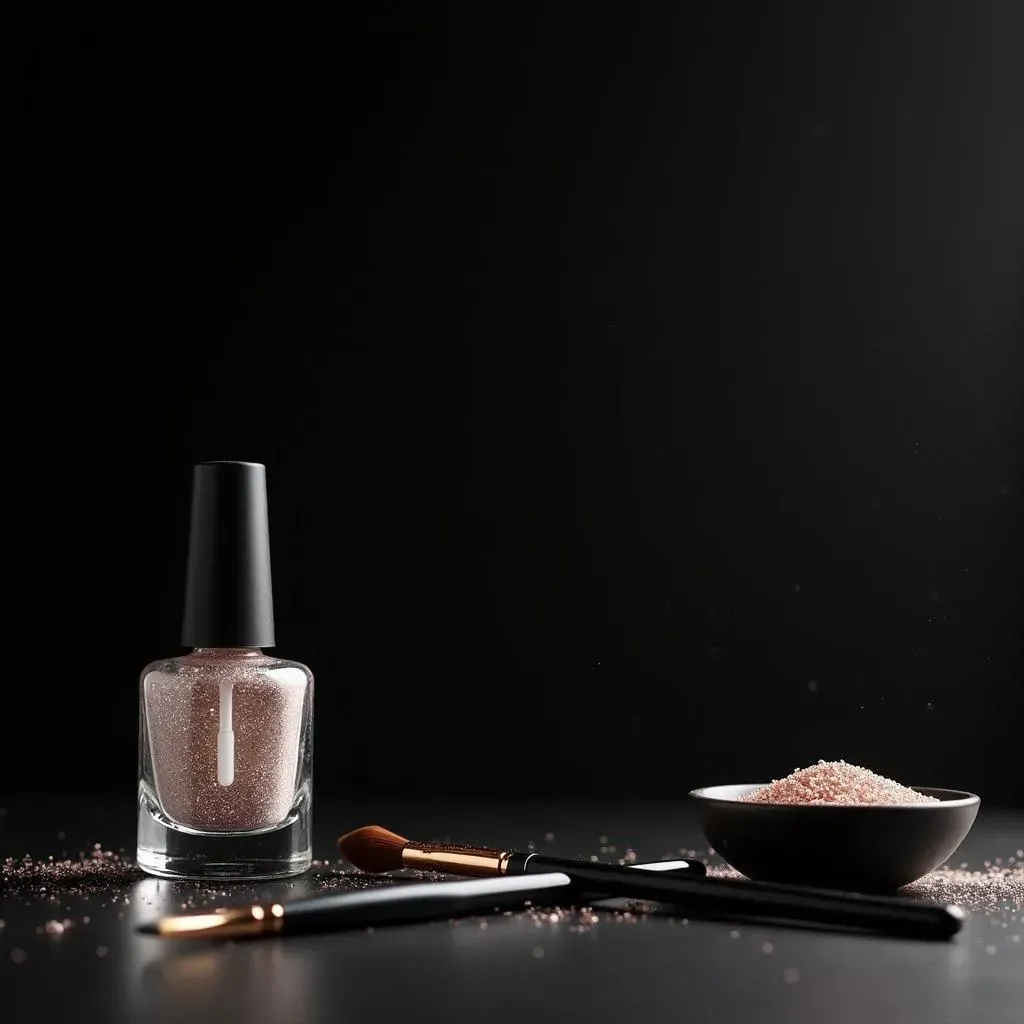
Subtle Sparkle: Glitter Accents
Let's add a touch of glamour! A simple way to elevate a black manicure is with subtle glitter accents. This is super easy and looks surprisingly sophisticated. Try adding a thin line of glitter along the cuticle, or create a delicate glitter gradient that fades from the base to the tip of your nail. You can even use a small dotting tool to add tiny glitter dots for a fun, playful touch. This is a great way to add a little extra something without going overboard. Think of it as adding a sprinkle of stardust to your look.
For a more unique touch, experiment with different glitter colors. Gold or silver glitter is classic, but you can also try colorful glitters for a fun pop of color. If you’re feeling extra creative, try layering different glitter sizes and shades for a more dimensional effect. Remember, less is more! A few well-placed glitter accents can make a huge difference. Need some inspiration? Check out our ideas for simple nail art designs to get you started.
- Glitter line at cuticle
- Glitter gradient
- Glitter dots
Geometric Shapes: Modern & Minimalist
Geometric shapes are another fantastic way to add visual interest to a black manicure without making it overly complicated. Simple lines, dots, or triangles can create a modern and minimalist look. You can use a thin nail art brush or even a toothpick to create these designs. Start with a clean base coat, then use a light-colored polish (white or nude works great) to add your geometric shapes. Once dry, apply a top coat to seal everything in place. It's a fantastic way to showcase your creativity, and the results are stunning!
Think about creating stripes, chevrons, or even abstract designs. You can also combine different geometric shapes for a more complex look. Don't be afraid to experiment with different placement and patterns to find what works best for you. If you are looking for more inspiration, then our blog post on easy line nail art designs can give you some more ideas. You can even try using a stencil for perfectly crisp lines if you're not confident in your freehand skills.
Shape | Difficulty | Style |
|---|---|---|
Lines | Easy | Modern, minimalist |
Dots | Easy | Playful, fun |
Triangles | Medium | Geometric, chic |
Negative Space: Elegant Simplicity
Negative space nail art is all about embracing the empty space on your nails. It's a trendy technique that creates a clean, modern, and effortlessly chic look. To achieve a negative space design, simply paint sections of your nails black, leaving the rest bare. You can create simple shapes like half-moons or triangles, or get more creative with more abstract designs. The contrast between the black polish and the bare nail creates a striking visual effect. It's a great way to add a touch of sophistication to your manicure without being too fussy.
Negative space designs work particularly well with black nail polish because of the strong contrast it creates with your natural nail color. If you're a beginner, start with simple designs and gradually work your way up to more complex ones. Remember to use a thin brush for precise application. A good quality top coat is also essential to protect your manicure and prevent chipping. For more ideas on simple nail designs, you might enjoy looking through our collection of cute and easy designs for short nails.
- Half-moon design
- Triangle design
- Abstract designs
Black & White Magic: TwoTone Designs
Black & White Magic: TwoTone Designs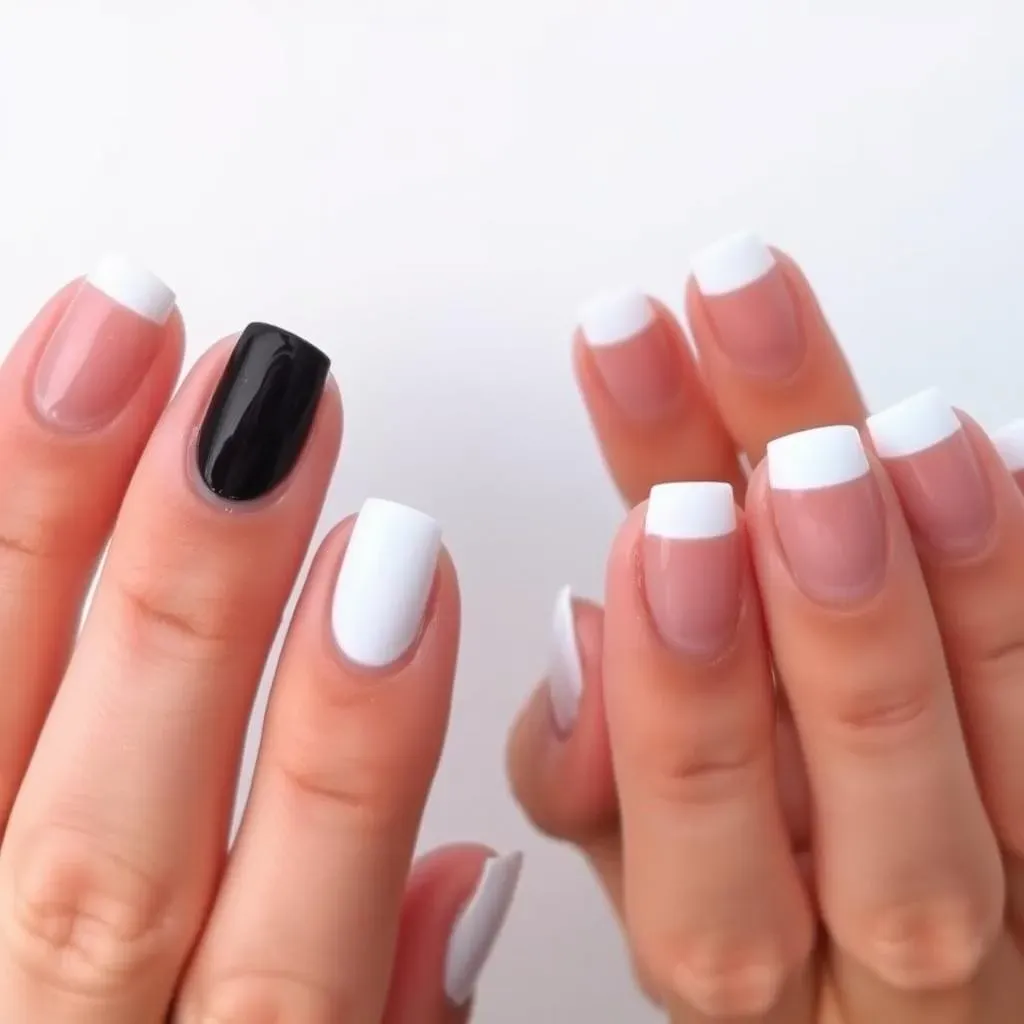
Classic French Manicure, Reimagined
Let's talk about the power of contrast! Black and white nail art is a timeless classic for a reason. It's effortlessly chic, visually striking, and surprisingly versatile. A modern take on the classic French manicure, for example, uses black as the base and white for the tips—a bold and stylish twist on a traditional design. This look is surprisingly easy to achieve, even for beginners. Just apply a base coat, two coats of black polish, and then carefully paint the tips white using a thin brush. A steady hand is helpful, but even slightly imperfect lines add a touch of charming imperfection!
To make this look extra special, consider experimenting with different tip shapes. Instead of a straight line, try a curved or v-shaped tip for a more modern feel. Or, for a unique twist, try a reverse French manicure, where the black is the tip and the white is the base. This simple change can completely transform the look. And don't forget to finish with a top coat for shine and protection. For more inspiration on French manicures, check out our guide on easy French tip designs.
- Classic black base, white tips
- Reverse French manicure
- Experiment with tip shapes
Checkerboard Chic: A Playful Pattern
Want something a little more playful? A black and white checkerboard pattern is a surprisingly easy yet stylish nail art design. This pattern is both modern and classic, and it's surprisingly easy to create using nail striping tape or a steady hand and thin brush. Simply paint your nails white, then use striping tape to create the checkerboard squares, painting the squares black. Once the polish is dry, carefully remove the tape to reveal a perfectly crisp design. A top coat will seal the deal and add a glossy finish.
This design is incredibly versatile and can be adapted to suit any occasion. You can make the squares larger or smaller depending on your preference, and you can even add a touch of glitter or other embellishments for extra flair. For those who prefer to use nail art pens, check out our ideas for easy nail art pen designs. Remember to let each layer dry completely before moving on to the next step to avoid smudging. This is a great way to add a touch of personality to your manicure without spending hours perfecting the details.
Step | Description |
|---|---|
1 | Apply base coat |
2 | Paint nails white |
3 | Apply striping tape |
4 | Paint squares black |
5 | Remove tape |
6 | Apply top coat |
Seasonal Twists: Black Nails for Every Occasion
Seasonal Twists: Black Nails for Every Occasion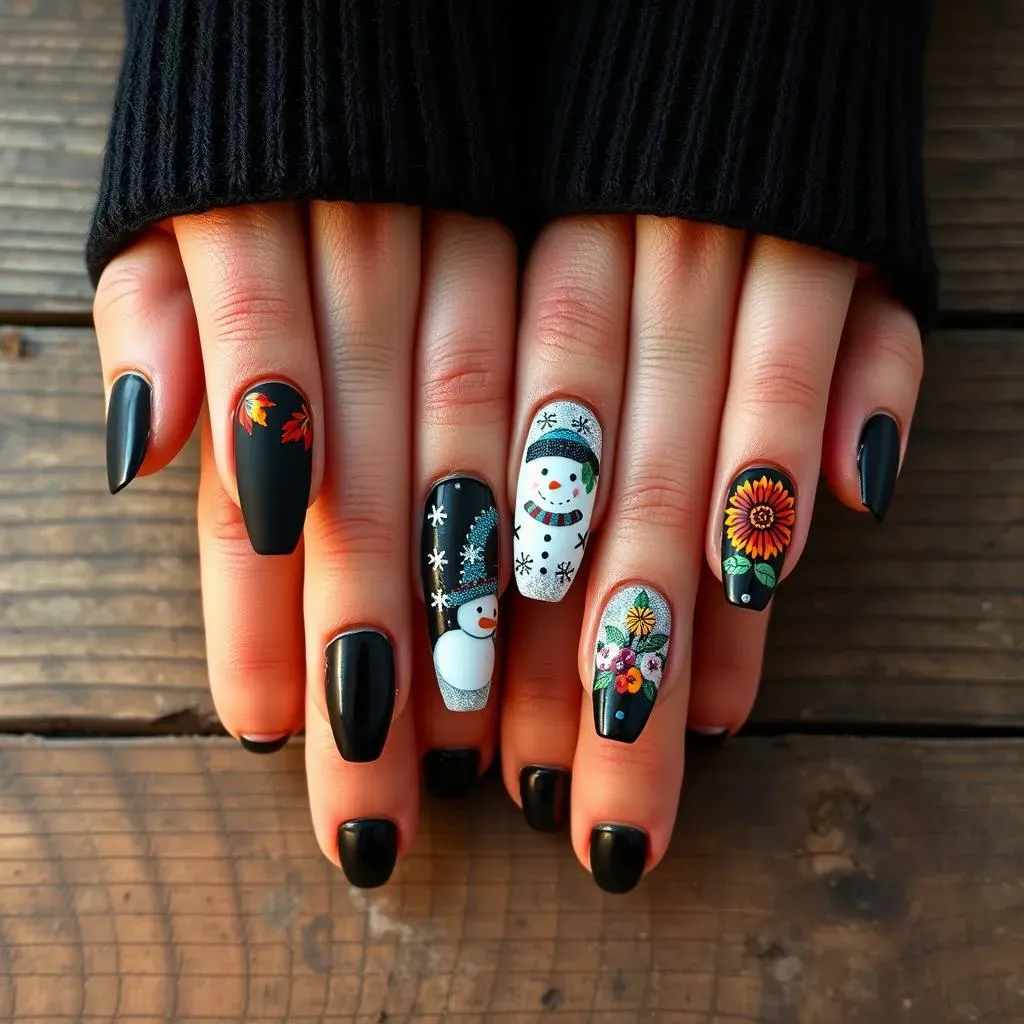
Autumnal Accents: Black Nails for Fall
As the leaves change color, so can your nails! Embrace the cozy vibes of fall with black nail designs that incorporate autumnal hues. Think deep reds, burnt oranges, and golden yellows. You can create a simple ombre effect, blending black with a fall-inspired shade, or add subtle accents using nail art brushes and fall-themed designs like leaves or pumpkins. A matte top coat adds a sophisticated touch, complementing the earthy tones of the season. For even more autumnal inspiration, check out our easy autumn nail designs post for more ideas.
For a more intricate design, consider using stamping plates with autumnal patterns, or try freehand painting with thin brushes. Don't be afraid to experiment with different textures and finishes to create a truly unique look. Mixing matte and glossy polishes can add visual depth and interest. And remember, even the simplest designs can look stunning when executed with precision and attention to detail. A well-maintained manicure is always in style, regardless of the season!
- Ombre with fall colors
- Leaf or pumpkin designs
- Matte top coat
Winter Wonderland: Festive Black Nail Art
Winter calls for cozy sweaters, warm drinks, and festive nail art! Black nails provide a perfect canvas for winter-inspired designs. Incorporate snowflakes, snowmen, or even simple winter scenes. You can use a variety of techniques, from freehand painting to nail stamping, to create your desired look. Adding subtle glitter or shimmer can add a touch of sparkle and magic to your winter manicure. For more winter-themed inspiration, check out our winter nail designs.
Consider using silver or white accents to create a snowy effect, or add small rhinestones for a touch of glamour. If you're feeling adventurous, try creating a 3D design using acrylic paints or nail sculpting gels. Remember to keep the design simple and elegant. Overly complicated designs can look cluttered and overwhelming, especially during the busy holiday season. A simple, well-executed design is always more effective than a complicated, poorly executed one.
Design | Technique | Difficulty |
|---|---|---|
Snowflakes | Freehand painting or stamping | Easy to Medium |
Snowmen | Dotting tool | Easy |
Winter scene | Freehand painting | Medium to Hard |
Summer Brights: Black Nails with a Pop of Color
Summer is the perfect time to experiment with bold and bright colors. While black nails might seem like an unusual choice for summer, they can actually create a striking contrast with vibrant hues. Incorporate pops of bright colors like neon pink, sunny yellow, or ocean blue to create a fun and playful summer manicure. You can use these colors to create simple accents, or go for a more elaborate design. Consider adding some summery elements, like flowers, fruits, or tropical designs. For more summer nail art ideas, check out our collection of easy summer nail art designs.
A black base can make bright colors pop even more. Keep the design simple, focusing on a few key colors and elements. Too many colors can make the manicure look cluttered and chaotic. Consider using a glossy top coat to enhance the vibrancy of the colors and add a touch of shine. You could even try a fun color-blocking design, or add some simple geometric shapes in bright colors to a black base. Remember that summer is a time for fun and experimentation, so don't be afraid to try something new and bold!
- Neon accents
- Floral designs
- Tropical designs