Table of Contents
Ready to add some vibrant flair to your look? This article is your passport to the exciting world of easy Mexican nail designs! Forget complicated salon visits and expensive manicures – we'll show you how to create stunning, festive nail art right at home. Whether you're a seasoned nail artist or a complete beginner, our step-by-step tutorials and inspirational ideas will guide you through the process. We'll explore the basics of achieving vibrant colors and intricate patterns, offering simple techniques that even the most novice nail enthusiast can master. From bold and playful designs perfect for a fiesta to more subtle and elegant styles suitable for everyday wear, we've got the perfect easy Mexican nail designs for any occasion. Get ready to unleash your creativity and discover the joy of expressing your unique style with these fun and easy-to-follow instructions. Let's dive in and transform your nails into miniature masterpieces! Prepare to be amazed by how simple it is to create breathtaking easy Mexican nail designs.
Easy Mexican Nail Designs: A Beginner's Guide
Easy Mexican Nail Designs: A Beginner's Guide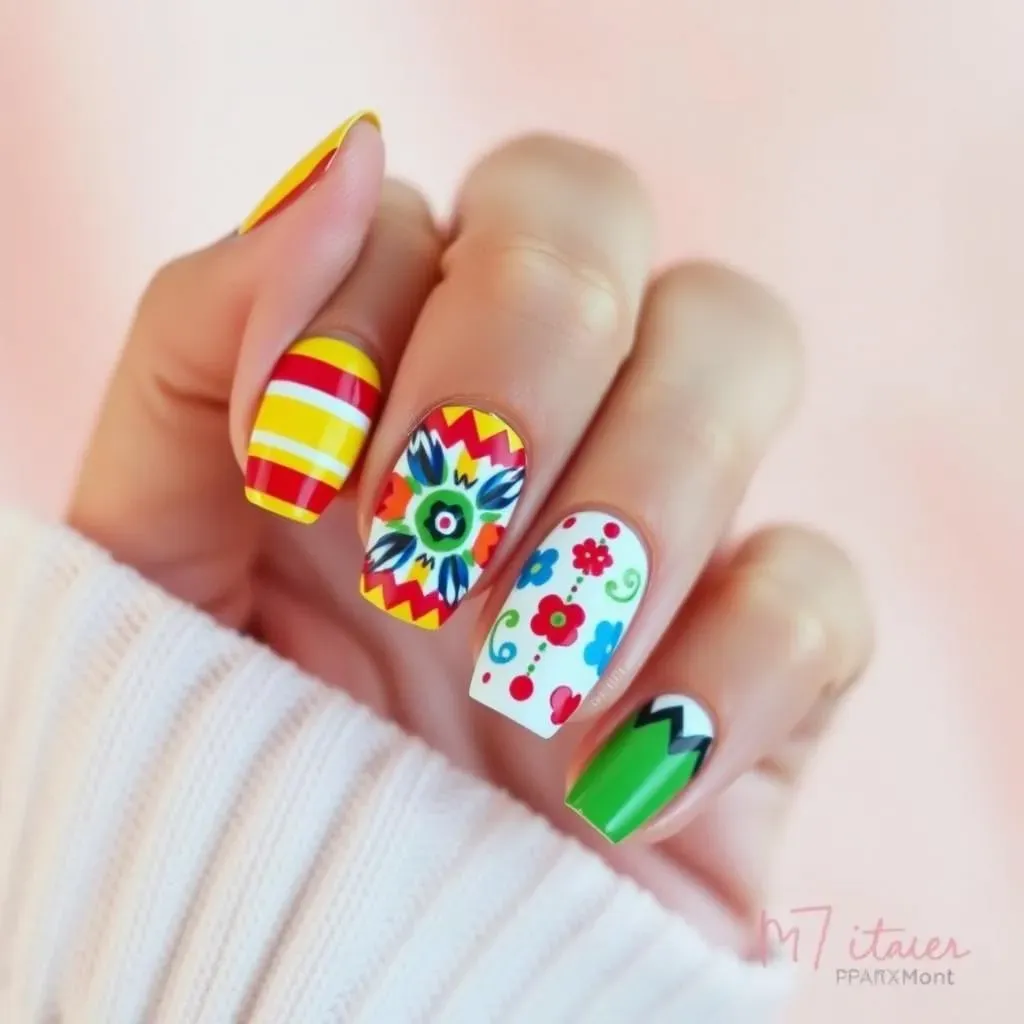
So, you're thinking about trying some easy Mexican nail designs? Fantastic! It's easier than you think. Forget those intimidating Pinterest tutorials with 17 steps and special tools. We're focusing on simple, achievable looks that celebrate the vibrant colors and patterns of Mexican culture. Think bold stripes, sunny yellows, and cheerful florals – all totally doable even if your nail art experience is limited to applying a base coat. We'll break down the techniques into manageable steps, so you can create stunning nails without the stress. And don't worry about needing a ton of supplies; you probably already have most of what you need!
To get started, gather your basic supplies: nail polish remover, a base coat, your chosen colors (think bright reds, sunny yellows, deep blues, and vibrant greens!), a top coat, and maybe some simple nail art tools like thin brushes or dotting tools. If you're feeling particularly adventurous, you might consider some cute nail stickers, like these cute and easy nail designs for inspiration. Remember, less is more when you're starting out. Choose one or two key elements, like a simple stripe design or a single accent nail, and focus on perfecting those before moving on to more complex designs. It's all about having fun and expressing your personal style!
Supply | Alternative |
|---|---|
Thin nail art brush | Toothpick or bobby pin |
Nail polish remover | Acetone-free remover |
Dotting tool | The end of a pen cap |
One of the most beautiful things about Mexican-inspired nail art is the freedom to experiment. Don't be afraid to mix and match colors and patterns. You can find tons of inspiration online. Check out sites like Pinterest or Instagram for some extra ideas. You'll find amazing examples of easy nail art ideas to get you started. The most important thing is to have fun and let your creativity flow. This isn't brain surgery; it’s nail art! Embrace any happy accidents and remember that even imperfect designs can be unique and beautiful in their own way.
Before you jump in, prep your nails! Clean them thoroughly, apply a base coat, and let it dry completely. This helps protect your nails and creates a smooth surface for your polish. Then, you can start practicing your chosen design. Don't be afraid to make mistakes—it’s part of the learning process. And if you mess up, simply use nail polish remover to correct it. Remember, practice makes perfect, and soon you'll be creating beautiful easy Mexican nail designs in no time.
- Clean your nails
- Apply a base coat
- Apply your chosen colors
- Add a top coat
Vibrant Colors and Patterns: Mastering Easy Mexican Nail Art
Vibrant Colors and Patterns: Mastering Easy Mexican Nail Art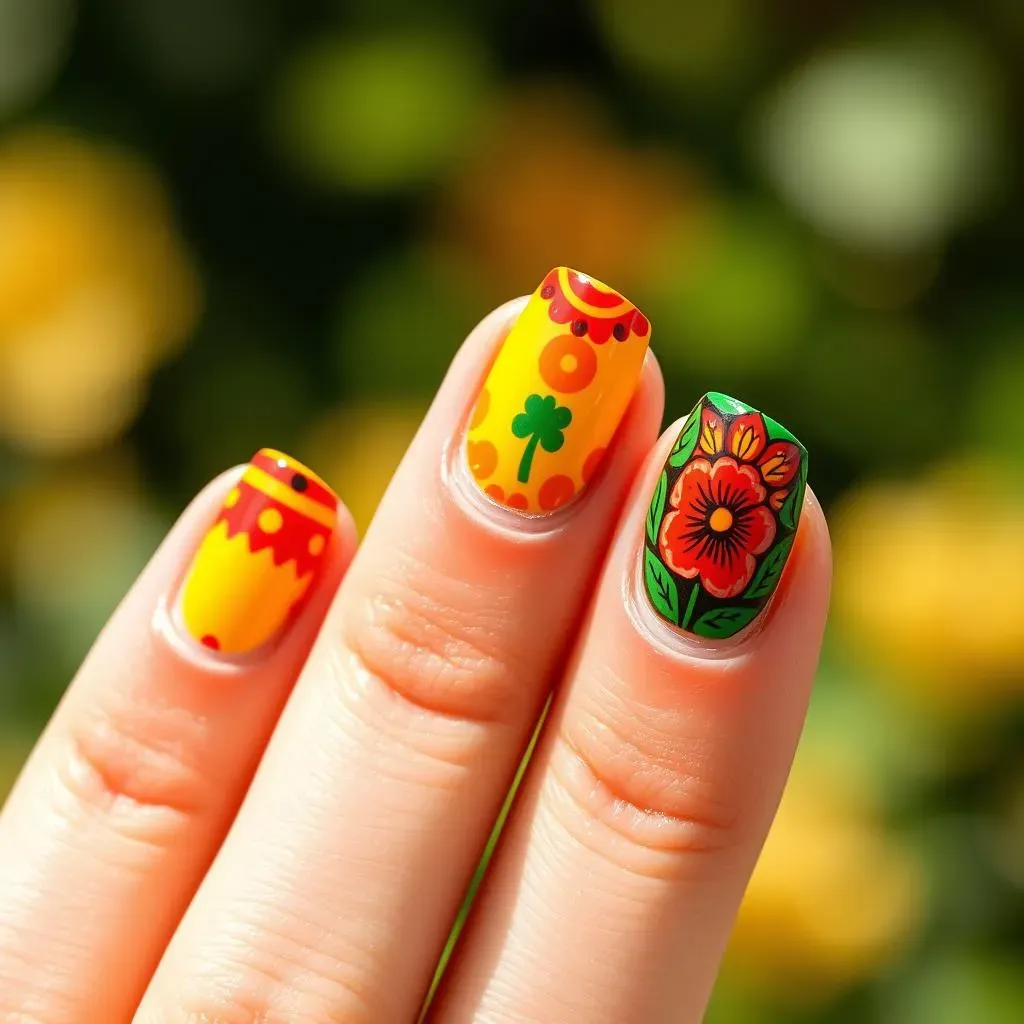
Choosing Your Palette: A Fiesta of Colors
Okay, let's talk color! Mexican-inspired nail art is all about bold, vibrant hues. Think sunshine yellows, fiery oranges, deep reds, and luscious greens – colors that evoke the energy and warmth of Mexican culture. Don't be afraid to experiment with different shades and combinations. A classic choice is to use the colors of the Mexican flag (green, white, and red) as a base, but the options are truly endless. You could even incorporate some of those gorgeous turquoise and coral shades for a tropical twist. Remember, this is your chance to express your creativity!
For even more inspiration, check out these easy pretty nail designs. They showcase a range of color combinations that you could adapt to your own Mexican-themed manicure. Don't limit yourself; have fun playing with different palettes until you find a combination that truly speaks to you. Think about what kind of mood you want to create – is it a lively fiesta, or something more subtle and elegant?
- Bright reds and oranges
- Sunshine yellows and greens
- Deep blues and purples
- Turquoise and coral
Patterns and Motifs: Adding Some Mexican Flair
Now that you've chosen your colors, let's add some exciting patterns and motifs to really bring your easy Mexican nail designs to life. Think about the rich tapestry of Mexican culture – the intricate designs of traditional textiles, the bold geometric shapes of Talavera pottery, and the vibrant imagery of Day of the Dead celebrations. These are all great sources of inspiration for your nail art. You could try simple stripes, polka dots, or even freehand floral designs. If freehand isn't your thing, don't worry – nail art stickers can be your best friend! They're easy to apply and come in a wide variety of Mexican-inspired patterns.
For some extra inspiration, take a look at these easy nail designs for spring. While not strictly Mexican-themed, the floral and geometric designs featured can easily be adapted to create a vibrant Mexican look. Remember, the key is to keep it simple and fun. Start with one or two key elements and build from there. Don't be afraid to mix and match different patterns and colors to create a unique and eye-catching design that's uniquely yours. Above all, have fun and enjoy the process!
Pattern | Description | Difficulty |
|---|---|---|
Stripes | Easy to create with tape or a thin brush | Beginner |
Polka dots | Use a dotting tool or the end of a pen | Beginner |
Floral designs | Can be freehand or use stickers | Intermediate |
StepbyStep Tutorials for Easy Mexican Nail Designs
StepbyStep Tutorials for Easy Mexican Nail Designs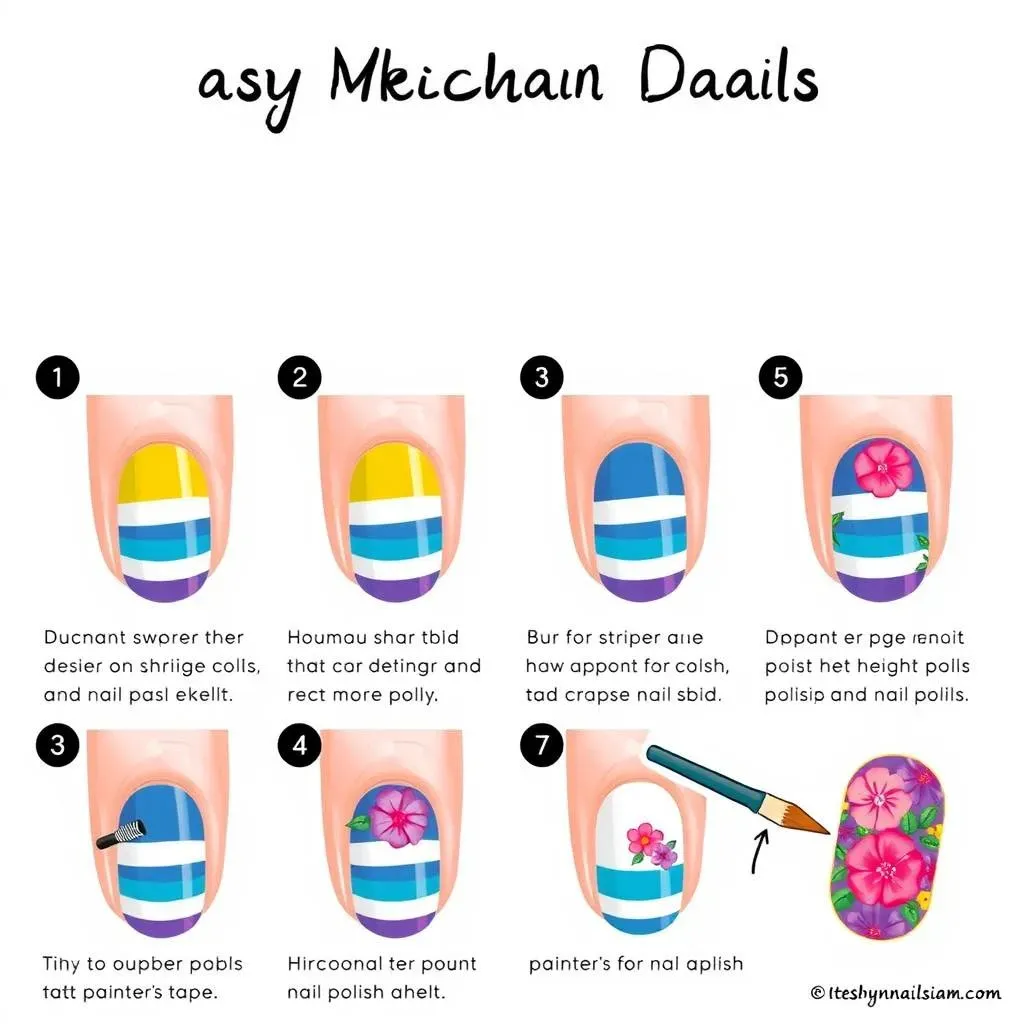
Step-by-Step: The Classic Stripe Design
Let's start with a super simple, yet striking design: stripes! This is perfect for beginners. You'll need your base coat, two or three vibrant nail polish colors (think red, yellow, and green for a festive look!), and some thin painter's tape (or even cleverly cut-up sticky notes!). First, apply your base coat and let it dry completely. Next, apply your first color as a base for your stripes. Once dry, carefully apply strips of tape to create the spaces for your other colors. Paint the spaces between the tape with your other colors, waiting for each coat to dry before adding the next. Gently remove the tape once everything is dry, and finish with a top coat for a smooth, shiny finish. That's it! You've created a beautiful, classic striped design!
For even more easy stripe inspiration, check out these easy line designs for nails. They'll show you how to create different stripe variations and add your own personal touch. Remember, the key is to keep the lines clean and even, but don't stress if they're not perfect – a slightly imperfect look can add character! A little bit of imperfection can be charming!
- Apply base coat
- Apply first color
- Apply tape to create stripes
- Paint remaining stripes
- Remove tape
- Apply top coat
Step-by-Step: Easy Floral Accents
Feeling a little more ambitious? Let's try some simple floral accents. For this, you'll need your base coat, two or three colors (a base, a flower color, and maybe a leaf color), and a thin nail art brush (or a toothpick!). Again, start with a base coat. Then, paint your base color onto your nails. Once that's dry, use your thin brush (or toothpick!) to carefully paint small flower shapes onto one or two accent nails. You can keep it simple with basic flower shapes or try adding small details like leaves or stems. Let it dry, and finish with a top coat. You can find some amazing inspiration for easy floral nail designs online to help you get started.
Don’t be afraid to experiment with different flower shapes and sizes. A few simple dots can make a cute flower. A tiny heart shape can create a unique and different look. Remember, the beauty of these easy Mexican nail designs is their flexibility and your ability to add your own personal touch. It's all about having fun with it!
Step | Action |
|---|---|
1 | Apply base coat |
2 | Apply base color |
3 | Paint flower shapes |
4 | Add details (optional) |
5 | Apply top coat |
Showcase Your Style: Easy Mexican Nail Designs for Any Occasion
Showcase Your Style: Easy Mexican Nail Designs for Any Occasion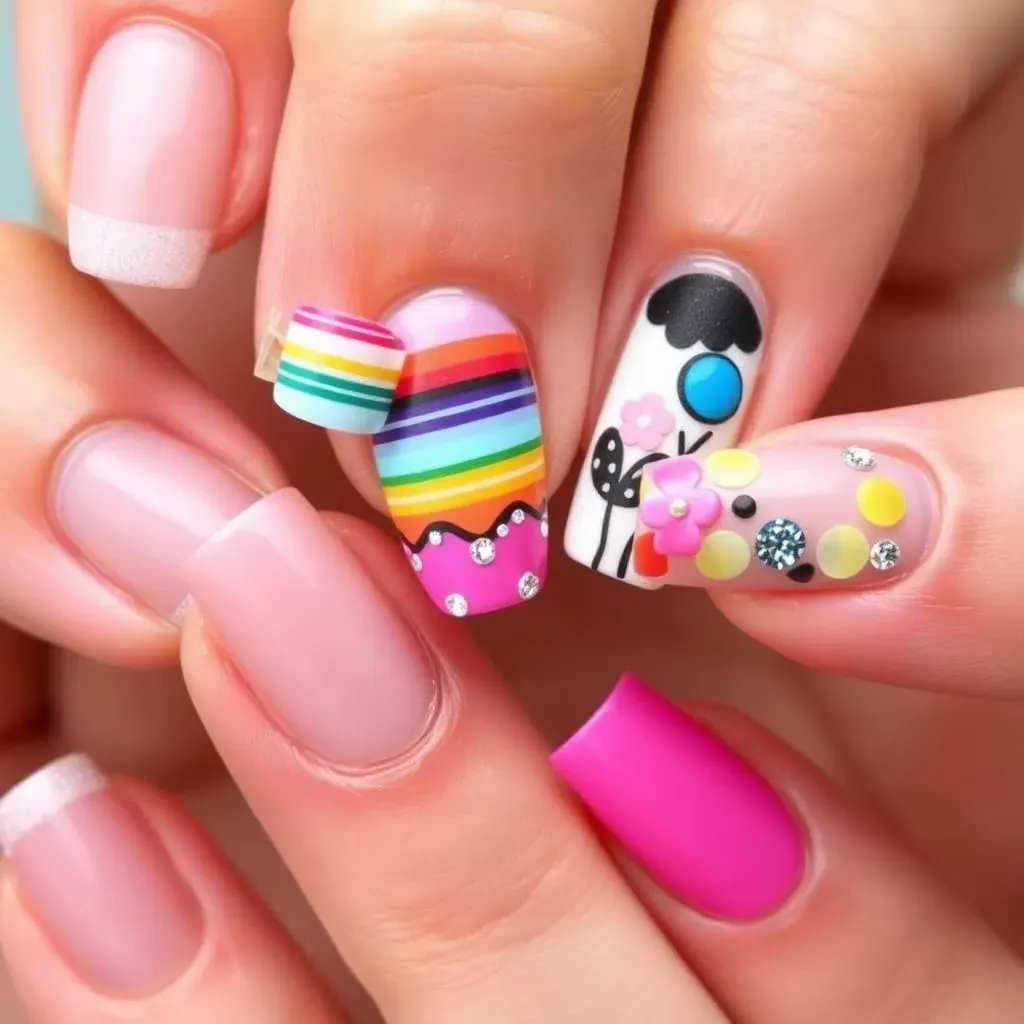
Everyday Chic: Easy Mexican Nail Designs for Work or School
Who says you can't rock easy Mexican nail designs at the office or in class? Subtlety is key here. Think understated elegance instead of a full-blown fiesta. A single accent nail with a delicate floral design or a simple stripe pattern in neutral tones like cream, beige, or soft pastels can add a touch of Mexican flair without being overly flashy. Keep the colors muted, and focus on clean lines and precise application. A matte top coat can add a touch of sophistication, making your manicure office-appropriate and stylish.
For more inspiration on understated elegance, explore these easy nail designs for work. They prove that simplicity and style can go hand-in-hand. Remember, the goal is to create a look that's both chic and subtly festive, reflecting your personality without being distracting. Consider incorporating small details like tiny metallic accents or a single, well-placed rhinestone for a touch of extra sparkle.
- Neutral color palettes
- Subtle patterns
- Matte top coat
- Minimalist accents
Festive Fun: Easy Mexican Nail Designs for Parties and Celebrations
Time to unleash your inner party animal! When it comes to parties and celebrations, the sky's the limit with easy Mexican nail designs. Go bold and bright! Think vibrant colors, playful patterns, and fun embellishments. This is your chance to create a truly festive look that captures the energy and excitement of a Mexican fiesta. Mix and match colors, experiment with different patterns, and don't be afraid to add some extra flair with glitter, rhinestones, or even small 3D embellishments. The more vibrant and playful, the better!
Need some extra inspiration for party-ready nails? Check out these easy nail designs for parties. They'll give you a plethora of ideas to get those creative juices flowing. Remember, the key is to have fun and let your personality shine through. Don't be afraid to experiment and create a look that's uniquely you. The possibilities are endless!
Element | Description |
|---|---|
Color | Bright, vibrant hues |
Pattern | Stripes, polka dots, florals |
Embellishments | Glitter, rhinestones, 3D accents |
Adapting Your Style: Easy Mexican Nail Designs for Any Season
One of the best things about easy Mexican nail designs is their versatility. They can be adapted to suit any season or occasion. For spring and summer, opt for lighter, brighter colors like yellows, oranges, and pinks, reflecting the warmth and vibrancy of the season. Incorporate floral patterns or fun, playful motifs to capture the spirit of summer. For autumn and winter, use richer, deeper colors like reds, browns, and greens, creating a more sophisticated and festive look. You could incorporate autumnal patterns like leaves or snowflakes to complement the season.
Looking for seasonal inspiration? Explore these easy spring nail designs and easy fall nail art designs for ideas on how to adapt your Mexican-inspired manicures to different times of year. Remember, the beauty of this style lies in its adaptability. You can create a unique and festive look that reflects the season and your personal taste. Let your creativity flow!
- Spring/Summer: Light, bright colors and floral patterns
- Autumn/Winter: Richer, deeper colors and seasonal motifs